How to host a Rust server: Setting up and hosting your own dedicated server in 2025

Rust is an ever-popular multiplayer survival game in which players gather resources and build shelters to survive in an unforgiving environment. Not to mention, other players are prowling around to steal some hard-earned loot from you.
While the default modes are already fun, you can enhance your gameplay experience by setting up your own dedicated Rust server. It enables you to install mods and set custom rules, for example, you can control how quickly buildings and items degrade or create safe zones.
This article will explain how to host a Rust server using two methods – automatically and manually. The automatic method is much easier – you will use Hostinger Game Panel and be able to start playing in a few minutes. That said, the manual method gives you more customization options.
Rust server prerequisites
To get a Rust host up and running, you need a virtual private server (VPS) to store the game components. For optimal performance and responsiveness, make sure to choose one with sufficient hardware based on the following requirements:
- Operating system. Windows, Linux, or macOS. We recommend a Linux-based operating system for hosting any game server due to its stability and efficiency.
- CPU. Rust requires at least a quad-core processor, while a six-core processor is ideal for larger servers.
- RAM. You should have at least 8 GB.That said, we recommend 16 GB for hosting a lot of players.
- Storage. 20 GB as a minimum, but your server might require more disk space as it grows.
- Internet connection. A stable and fast connection with a minimum speed of 100 Mb/s is essential for seamless gameplay and handling multiple player connections.
Hostinger’s game server hosting plans are an excellent choice for Rust servers. They offer reliability, performance, and scalability for an enjoyable gaming experience.
As one of the top gaming VPS providers, Hostinger’s plans offer various advantages:
- Premium hardware. Our Game Panel hosting uses powerful AMD EPYC processors and SSD NVMe storage, ensuring fast and lag-free performance for Rust servers.
- Multiple server locations. You can host your game in numerous locations around the globe. This ensures low latency, which is critical for a hassle-free Rust gaming experience.
- Graphical Game Panel. We provide an intuitive, beginner-friendly Game Panel to let you easily set up and manage over 100 games without commands.
- Instant setup. Your VPS will be ready in less than five minutes.
- Customization and control. Full root access to install server mods and plugins provides extensive customization and control over your Rust server environment.
- Robust AI Assistant. Hostinger’s VPS includes Kodee, which offers guided assistance, scripts, and commands customized to your needs.
- Affordable and scalable plans. Starting at just $6.99/month, Hostinger’s dedicated game server plans are scalable to meet the growing needs of your Rust server.
How to host a Rust server automatically
Hostinger Game Panel lets you set up a Rust server without any commands, making the process more efficient and safe since you won’t run the wrong utility.
After purchasing a Rust server hosting plan based on your projected needs and player count, complete the onboarding process. It involves tasks like setting up a new password and selecting a data center location.
Once finished, follow these steps to install the Rust server on your new VPS:
- Log in to hPanel and click VPS from the sidebar menu.
- Click Manage on your Game Panel plan.

- At the top, you will see that the Game Panel has been installed on your VPS. Click Manage Panel.
- The Game Panel login screen will open on a new tab. Enter the admin login details you created during the onboarding process and hit Login.
- Click Create Instance and choose Rust from the Select Application drop-down menu.
- Hit Create Instance to confirm.
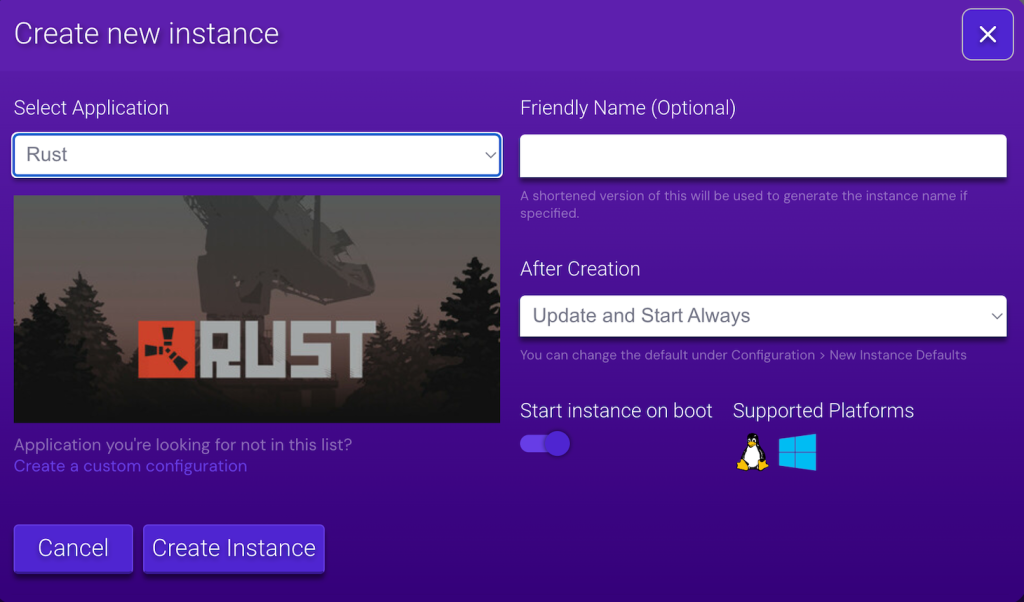
- Once the creation process is finished, hit Start.
During the first startup, Game Panel might download additional components. After that process is complete, your Rust server is ready.
Double-click the new Rust instance and go to the Connection Info section. Enter these details into your game client to access the server.
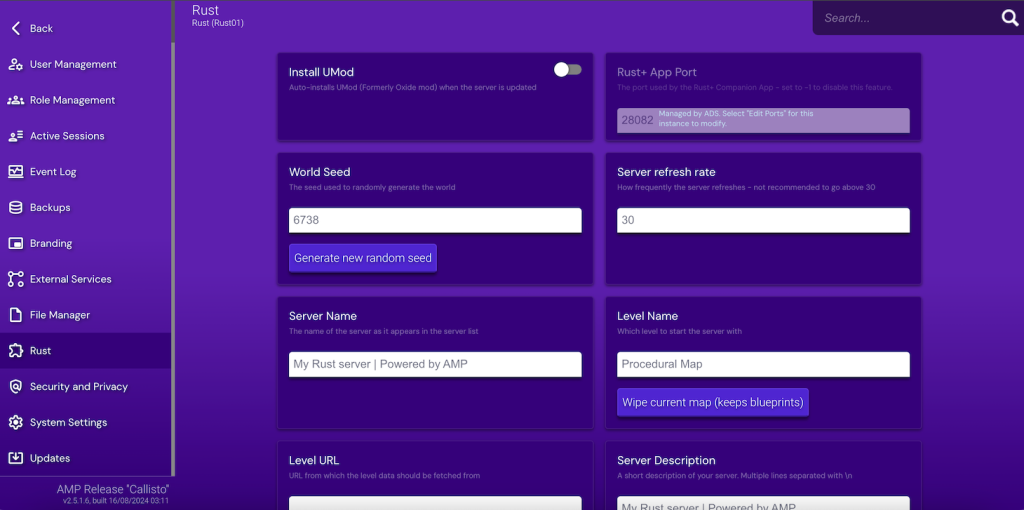
To change in-game settings, head to your Rust instance → sidebar → Configuration → Rust. We will explain the configuration parameters in the later section. From this menu, you can also enable Umod to install mods.
How to host a Rust server manually
Setting up a Rust game server manually requires some Linux commands. We recommend this method if you want to install different operating systems or additional software.
1. Set up your VPS
After purchasing a hosting plan from Hostinger and completing the onboarding process, let’s set up your VPS for Rust. To begin, navigate to hPanel → sidebar → VPS. Click Manage on your server.
To run commands on your server, you must access it via a remote connection protocol. Here’s how to do so:
- Navigate to the SSH access tab on the Overview menu and obtain the SSH login credentials.
- Open your preferred command line application. You can use an SSH client like PuTTY, Terminal, or Hostinger Browser terminal that is built-into hPanel.
- Enter your SSH login details and hit Enter.
By default, you will connect to your server as root. This account has the highest privileges in a Linux environment, allowing you to run any command without confirmation.
Using root to set up a game server can be risky since you are more prone to executing the wrong utilities. To minimize the risk, let’s create a new superuser, which requires the sudo prefix and a password to run high-permission commands. Do so by running this:
adduser superuser-name
Enter a new password and other details. Then, grant the user privilege to use administrative commands by adding it to the sudo group:
usermod -a -G sudo superuser-name
Switch to the new superuser by entering the following command. Remember to replace superuser-name with the actual value:
su superuser-name && cd
2. Install the Rust server
With your VPS ready, the next step is installing the Rust dedicated server. Let’s begin by updating your Linux package repository to ensure the downloaded software is up-to-date. To do so, run the following Linux command:
sudo apt update && sudo apt upgrade
Then, install SteamCMD, the command-line version of the Steam client, to install and update server files for games like Rust. To do that, simply run the following:
sudo apt install steamcmd
Install necessary dependencies such as screen or tmux to run server processes in the background. Use the command:
sudo apt-get install tmux
Create a specific directory for your Rust server files by executing the command below:
mkdir rust_server
Within the desired server folder, use SteamCMD to download the server files with the command:
steamcmd +login anonymous +force_install_dir ./rust_server +app_update 258550 +quit
This command logs you into SteamCMD and downloads the necessary server files to the specified rust_server folder. The number 258550 is Rust’s Steam ID.
After the installation, all Rust server files will be located in the rust_server directory. To access them, navigate to the folder using the cd command:
cd rust_server
3. Modify server settings
After successfully installing the Rust server, you can configure the game server to match your preferences and requirements. To start, navigate to your Rust installation directory using the cd command.
Rust’s primary configuration file is typically named server.cfg. Open it using the nano text editor:
nano server.cfg
This file contains various settings you can modify. Here are some of the important ones:
Server name and description
Assign a unique name to your server using the line:
server.hostname "Your Server Name"
To add a server description that explains your server’s theme or rules, include the following:
server.description "Your Server Description"
Map type
Choose the type of map you want to use by modifying the following line:
server.level "Procedural Map"
Several map types you can use include:
- Procedural Map. Randomly generated landscapes that offer a unique experience in every game.
- Barren. A less detailed map for better performance that focuses on simpler terrain.
- Hapis Island. Fixed layout with consistent features for predictable gameplay.
- Savas Island. Smaller, more combat-focused map, ideal for quicker and more intense matches.
- Custom Maps. Created by the community for modified servers, these maps offer varied and unique designs.
Server port
Port is a network endpoint that game servers use to exchange data with clients. Include the following to ensure the server port is correctly set and allows players to connect:
server.port 28015
The default port for Rust game traffic is 28015. For the RCON (Remote Console) protocol, it is 28016.
Additionally, port forwarding on your network is crucial to allow external connections to your server, such as from a local network.
For Rust, this typically involves configuring your router to forward TCP port 28015, ensuring players can connect to your server from outside your network.
Player slots
Define the maximum number of players that can join your server. Change the number by editing this line:
server.maxplayers 50
Combat mode
Allow player conflict by setting the player vs. player or PvP parameter to true like so:
server.pve true
If you want a survival-focused mode with limited or no player combat, set the PvP parameter to false.
Game mode
Set the game mode according to your preference using:
bamemode.set mode
Replace mode with your desired game mode. Here are the options:
- Vanilla and survival. The default Rust game mode with normal difficulty and penalties.
- Softcore. This mode reduces death penalties and is suitable for a less intense experience.
- Hardcore. Your Rust world becomes more difficult with additional survival challenges for experienced players.
Other Advanced Settings
Adjust crafting speeds with:
crafting.instant true
Set day and night cycles using:
env.daylength 45
Add the following to determine the rate at which players gather resources:
gather.rate dispenser 2
Configure what loot appears in the game using various loot configuration lines.
After making changes, press CTRL + X, Y, and Enter to exit the editor.
Then, restart your server for the changes to take effect by accessing Hostinger’s VPS Overview page and clicking Reboot VPS.
4. Launch the Rust server
Now that your own Rust server is configured, it’s time to launch it and explore the gameplay you’ve crafted. Ensure you are in the rust_server directory, then start the Rust server with the following command:
./RustDedicated -batchmode
If you want to customize the game settings when starting, use this command instead:
./RustDedicated -batchmode +server.port 28015 +server.level "Procedural Map" +server.maxplayers 100 +server.hostname "Your Server Name" +server.identity "your_server_identity"
This startup script initiates the Rust server process with parameters such as port, map type, maximum players, server name, and unique server identity.
After your server starts, monitor your command line for errors or warnings. This is important for checking error messages related to server initialization, network connectivity, and script executions that might cause startup issues.
Once your server is running, open your Rust client, and you should see your VPS in the room list. Alternatively, you can check the connectivity by opening the game console and entering the following command:
connect 123.456.78.90:28015
Remember to replace 123.456.78.90 with your server’s actual IP address. You can obtain it from the VPS Information tab in hPanel’s VPS Overview menu.
5. Manage and maintain the Rust server
Effective management and maintenance of your private Rust server are crucial for a stable and enjoyable gaming experience. Here are some Rust server management tips for a smooth server operation:
Server backup and maintenance
To prevent data loss, regularly back up your server files. Rust server hosting providers like Hostinger offer various features that streamline the backup process.
Our system automatically backs up your VPS data every week. For more frequent backups, opt for the daily upgrade. Before making any major changes, capture the current state and configuration of your system by creating a snapshot.
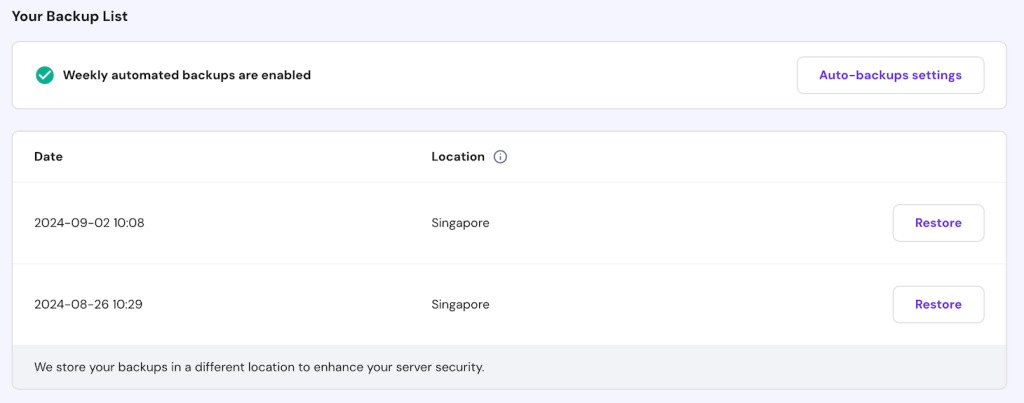
These features are accessible under Backup & Monitoring → Snapshots & Backups in your VPS dashboard.
Rust server performance optimization
Monitoring and optimizing server performance is essential. Utilize Rust-specific tools and plugins to track performance, resource usage, and player activity.
Hostinger customers can use the Server Usage menu in hPanel to check CPU usage, RAM usage, disk space, and traffic data, with statistics available for various time frames.
You can also consider using plugins like Battlemetrics or RustAdmin to optimize your server further and prevent crashes.
Player management
As the server owner, it’s important to regularly communicate with your player community to address their concerns or feedback. Ensure your in-game settings align with their preferences for an enjoyable experience.
For example, use server admin commands to adjust world settings and PvP/PvE options to ensure fair competition.
Employing users command options is essential to maintain a positive gaming environment based on community feedback and needs. Use users kick <username> to temporarily punish misbehaving players, or users ban <username> for more serious offenses.
Community building
Foster a positive community by setting clear rules, moderating players effectively, and encouraging interaction. Regular events or challenges can also greatly enhance engagement.
Furthermore, maintain open communication with your players through forums or chat groups. Implementing player recognition programs or community feedback sessions can also contribute to an active gaming community.
Server wipes and updates
Regular server wipes help maintain balance and refresh the gameplay experience. Before doing so, save the current settings by running the server.writecfg console command and communicate the schedule to your community.
Additionally, ensure your dedicated server is always updated with the latest Rust version for enhanced security, improved performance, and new features. Run commands such as update_oxide or app_update 258550 to download available patches.
Batch file configuration
Use bash script files for more efficient server administration. They can automate tasks like server startup, updates, and backups with a single execution.
Create these scripts using a text editor and save them in your server directory. To make one using Nano, run the following command. Replace scriptname with your preferred name:
sudo nano rust_server/scriptname.sh
Then, enter the command you want to automate. For example, a simple batch script to start the server might look like this:
#!/bin/bash ./RustDedicated -batchmode +server.port 28015 +server.level "Procedural Map" +server.maxplayers 100 +server.hostname "Your Server Name"
A server update batch file could be:
#!/bin/bash steamcmd +login anonymous +force_install_dir ./rust_server +app_update 258550 +quit
For backups, a batch script might be:
#!/bin/bash tar -czvf rust-server-backup.tar.gz /path/to/rust_server/
After adding the script, save the file by pressing Ctrl + X, Y, and Enter. Make it executable by running this command:
chmod +x scriptname.sh
To execute the script, enter the folder containing the file, which in our case is rust_server. Then, simply write their name into your command-line interface like so:
./scriptname.sh
Conclusion
Setting up a Rust server lets you install mods and create custom in-game rules. To do so, you need a VPS hosting provider that meets the minimum requirements and offers various features that simplify the setup, like Hostinger.
Hostinger Game Panel users can easily host a Rust server in a few clicks. After completing the onboarding process, log in to Game Panel and create a new instance. Wait until the server finishes downloading the components, and you are all set.
If you want to use a different operating system or install additional software, you can set up a Rust host manually using commands. Connect to your remote system via SSH and create a new superuser. Install SteamCMD and download the server components.
After configuring your server using a text editor, launch it by entering the startup command. To maintain a fair and enjoyable gameplay, regularly maintain your Rust server. This involves monitoring performance, moderating players, adjusting the in-game settings, and updating the server components – you can easily do it in Game Panel via graphical UI.

