How to set up a VPS and host a site + using Kodee AI assistant for effective server management
If you need a scalable and flexible web hosting service, a virtual private server (VPS) plan is a great choice. However, setting up a VPS platform can be tricky for beginners unfamiliar with a command line interface.
This tutorial will explain how to set up a VPS using Hostinger via a command line interface (CLI) and why it is important.
Then, we will explain how to host a website using a VPS. You will also learn to use Kodee, Hostinger’s AI assistant, to manage your virtual servers with minimal technical knowledge.
A brief overview of setting up a VPS:
| Required Knowledge | Basic understanding of Linux, SSH, and server management |
| Privileges Required | Root or sudo user privileges |
| Difficulty | Beginner |
| Main Goal | Setting up a VPS, hosting a website on a virtual private server |
| OS Compatibility | Various Linux distributions |

Understanding VPS configuration
With a shared hosting plan, the provider will set up the server and its software for you, including the control panel. You can configure the hosting account but not the host server settings.
On the other hand, virtual private servers give you more freedom. You can install your preferred VPS control panel and configure the server environment. The VPS provider will only set up the virtualization and web server technology, like LiteSpeed or Apache.
Since users must choose and install the control panel or software themselves, setting up a virtual private server takes more time. Users migrating from a shared hosting plan to VPS must learn server management tasks like installing a virtual operating system.
Developers commonly interact with a virtual private server using a secure shell (SSH) network protocol via applications like PuTTY. It lets them connect to the server, transfer files, and execute commands remotely, resulting in a more efficient workflow.
Alternatively, you can install a VPS control panel with a graphical user interface (GUI) for simpler server administration. We recommend it for beginners unfamiliar with code and CLI applications.
Important! A virtual private server differs from a dedicated server. A VPS uses a virtual machine to create multiple hosting environments in one system. Meanwhile, a dedicated server allocates a physical system for each user.
How to set up a VPS in 6 steps
There are six essential steps to ensure your VPS is secure and performs optimally. If it’s your first time working with a CLI, read our Linux command tutorial before proceeding.
1. Choose and purchase a VPS hosting plan
When choosing a web hosting plan, consider factors like support, performance, server resource allocation, pricing, and security features. To help you decide, check out our article to learn more about the 10 best VPS hosting providers.
For example, Hostinger offers various virtual server plans starting at $4.99/month.
Our VPS plans differ in server hardware resources, but they share similar features, including snapshot and root access support. You can upgrade your virtual private server plan anytime via our custom hosting control panel, hPanel.
These plans also include robust security features such as Suhosin PHP hardening. Moreover, Hostinger offers Kodee AI assistant to simplify management tasks.

After purchasing a VPS hosting plan from Hostinger, open VPS on the top menu of hPanel and click Setup on the plan in question. Enter all the required information and select your desired operating system template to finish the process.
Hostinger’s VPS hosting plans support most Linux distributions, including CentOS, Ubuntu, and Debian. Although you can switch to another VPS operating system afterward, it will wipe your data.

2. Log into your VPS using Secure Shell (SSH)
In the VPS management menu, navigate to Overview → SSH access to find your server IP address, default SSH port, and root login credentials. All this information is used to connect to your server using SSH service.

You can also find the command for connecting via Terminal in macOS or Linux. After executing the command in the Terminal, enter the root password to connect to your VPS.
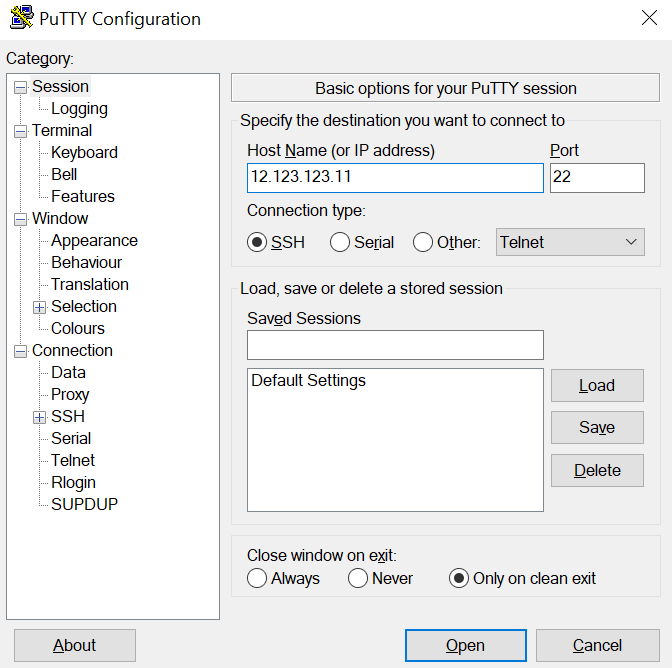
For Windows users, use an SSH client like PuTTY. After installing it, follow these steps to connect to your server:
- Launch PuTTY.
- Copy your server IP address and SSH port from hPanel. The default SSH port value is 22.
- Paste them into the respective fields. Click Open to proceed.
- Enter your VPS root username and password. For security reasons, the password won’t show when you type it.
After connecting to your VPS, execute commands in the new line to configure its settings. Enter help in the command line to list the available SSH commands.
Important! After successfully connecting to your VPS, we recommend changing the SSH default listening port to prevent hackers from accessing your server. You can do so by editing the SSH configuration file.
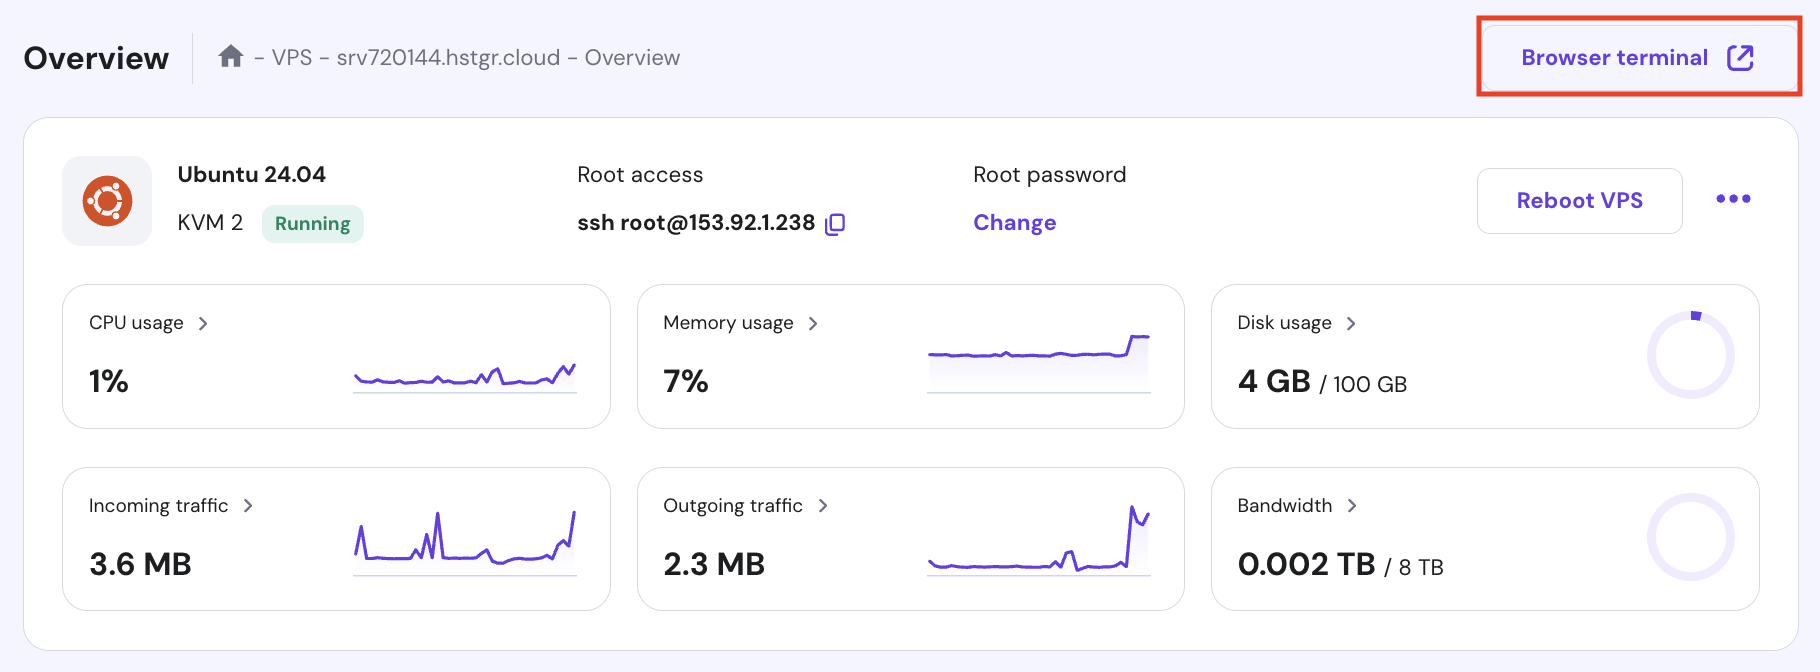
Alternatively, use hPanel’s built-in terminal, which users can use via web browsers. To access it, click the VPS you want to manage → Overview → Browser Terminal.
3. Update your VPS
Using outdated software may expose your server to security vulnerabilities and compromise your site visitors’ data. In addition to strengthening security, updating your VPS ensures you have the latest features and performance improvements.
To update your virtual private server, run the following to check and install all the available updates for your server. Note these commands work for CentOS-based distros:
dnf update

dnf upgrade
For other Linux operating systems, replace dnf with their respective package manager. For example, older CentOS uses yum, while Debian derivatives like Ubuntu utilize apt.
The process may take hours, depending on the number of updates, patch size, and internet speed. Once the update is completed, enter the reboot command to restart your VPS and reconnect using the SSH service.
Rebooting is crucial to ensure all updates are installed correctly. Otherwise, older software may still run in the background and prevent the updates from taking effect.
4. Create a new user and modify privileges
Adding new SSH users with different privileges enables collaboration and gives you more control over VPS administration.
Exclusively assigning root user privileges may expose your server to mismanagement and errors. Accounts with superuser permissions can access and modify all server aspects. Therefore, making mistakes with a root account may cause serious issues.
Creating a normal account with superuser permissions helps minimize risks since it requires the sudo prefix to execute a command with full administrative privileges, for instance:
sudo dnf update
In addition to sudo, your VPS will ask for administrator login credentials to prevent accidental command executions.
To create a new user account, connect to the server’s root user account and enter the following command. Replace username with your desired account name:
adduser username
Then, add the new user to the sudo group to grant the administrative privileges using this command. Replace username with the user in question:
# usermod -aG sudo username
Lastly, set a new password for the user. Use these login credentials to connect to the VPS using an SSH client or Terminal. Repeat the step to add more SSH users to your VPS.
5. Enable public key authentication
Public key authentication secures your SSH connection using a public-private key pair. This method improves VPS security as it is more difficult to decipher and safer than traditional passwords.
Your server stores the public key, which it will use to authenticate the private one. The private key is only accessible to authorized parties, like the system administrator. In addition to the private key, you need a passphrase to log in.
The steps of generating public key authentication vary depending on your VPS operating system and SSH client. Since we use Windows, check our tutorial to learn more about setting up SSH keys in Linux and macOS.
Otherwise, follow these instructions to generate SSH keys using PuTTYgen, which should come pre-installed with PuTTY:
- Launch the PuTTYgen application.
- Configure the settings, such as the key type and bit size. In this tutorial, we will use the default configuration. Click Generate.
- Wait until PuTTYgen generates the keys. Move around your cursor to randomize the key pair.
- Enter the key passphrase, which acts as a password for the key pair.
- Click Save private key to store the key on your computer.
Keep PuTTYgen open since we will move the public key to your VPS. Before proceeding, ensure you have installed the Nano text editor. Then, connect using PuTTY with root access and follow these steps:
- Enter the following command to switch to your new account. Replace username with your account.
su – username
- Run the following commands to create a new folder for the public key, restrict its permissions, and open the authorized_key file with Nano.
mkdir ~/.ssh

chmod 700 ~/.ssh

nano ~/.ssh/authorized_key
- Once the Nano text editor opens, paste your public key from PuTTYGen. Press Ctrl + X to close the text editor and Y to confirm the changes.
- Change the file’s permissions using the following command.
chmod 600 ~/.ssh/authorized_keys
- Return to the server’s root user to complete the process using this command.
exit
Now, follow these steps to change your SSH client settings to use your private key for authenticating the SSH connection:
- From PuTTY’s main menu, navigate to Connection → SSH → Auth.
- Click Browse on the Private key file for authentication field.
- Select the private key file you saved earlier and choose Ok.
Once the key pair is set, disable your VPS account’s password authentication mechanism for the new user. To do so, connect to your server as the new user and run this command:
sudo nano /etc/ssh/sshd_config
It will open the sshd_config file using the Nano text editor. Look for the PasswordAuthentication line, delete the # sign preceding it, and change the Yes value to No.
Close the text editor and enter the reboot command to restart your VPS. If the change is applied successfully, your server should request a private key and passphrase to authenticate the SSH connection.
Pro Tip
You can also add the SSH keys to your VPS through hPanel.
6. Configure a firewall for your VPS
Unlike a shared hosting service, users must manually configure security features for their virtual private server. Some web hosting providers apply some server-level security measures, but you may still need extra protection.
There are different ways to secure your VPS, one of them is configuring a firewall. A firewall lets you set a rule to automatically filter incoming and outgoing traffic on your server. Cybercriminals may exploit this to launch an attack.
We recommend setting up a firewall called iptables. Since the firewall setup process involves many steps and commands, refer to our iptables tutorial to learn more about it. You only need to configure it once unless you want to add other rules.
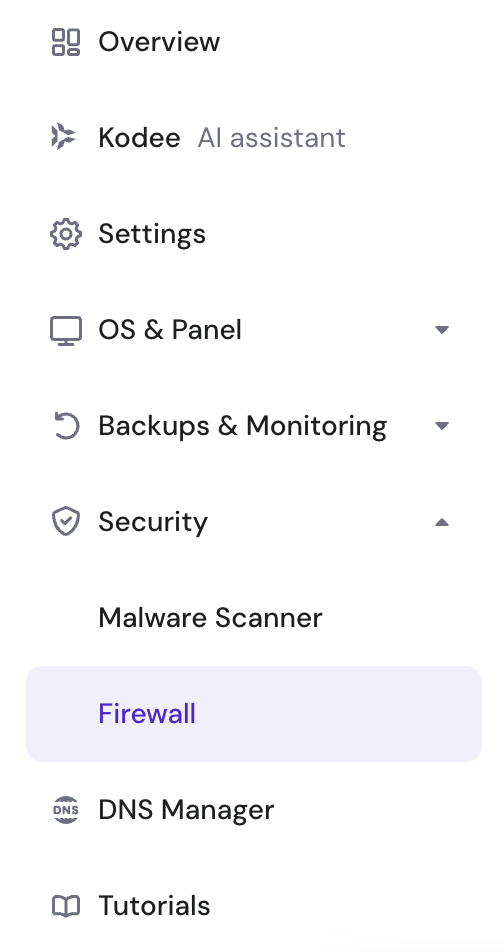
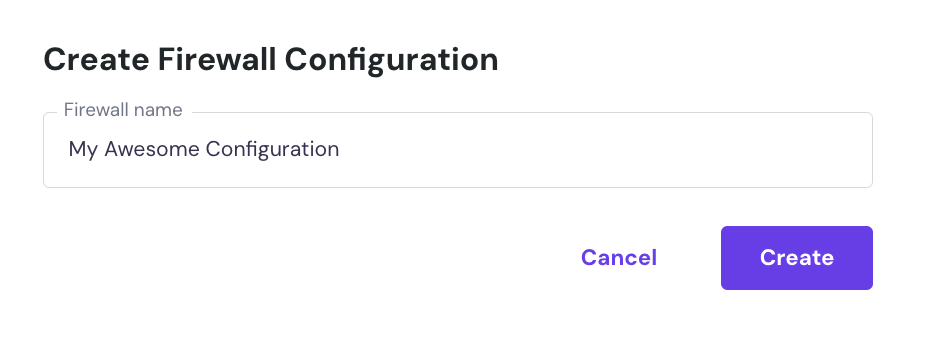
Alternatively, you can set up our integrated Hostinger VPS Firewall. Start by choosing your VPS and navigating to the Security → Firewall section:
Then, select Create firewall configuration and give your configuration a name:
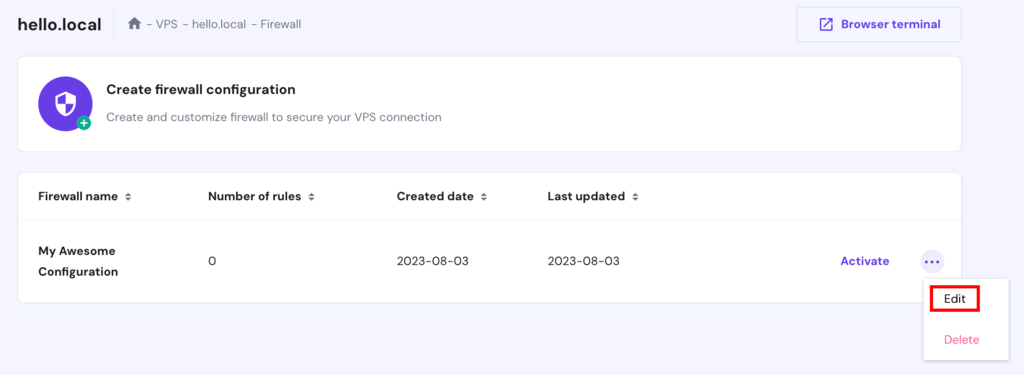
Choose Edit:
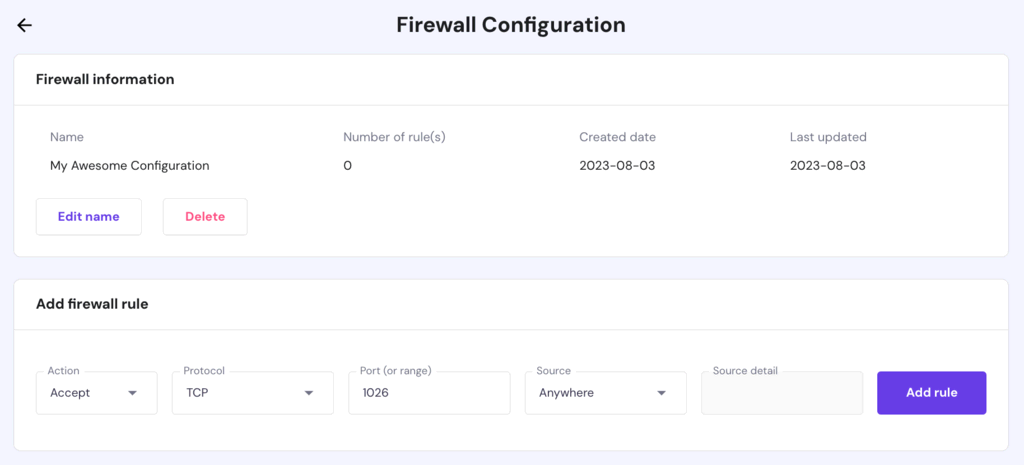
Add any preferred incoming traffic rules and add them to the list. Changes will take effect in real-time:
Hosting a website with VPS
After completing the virtual private server setup process, start hosting a site or web application. Instead of using a command line interface, you can install a GUI control panel to simplify the task.
1. Installing CyberPanel
Hostinger VPS website hosting supports various control panels, including cPanel, Plesk, DirectAdmin, and CyberPanel. Users can choose two installation methods – using a template or manually with a plain virtual operating system.
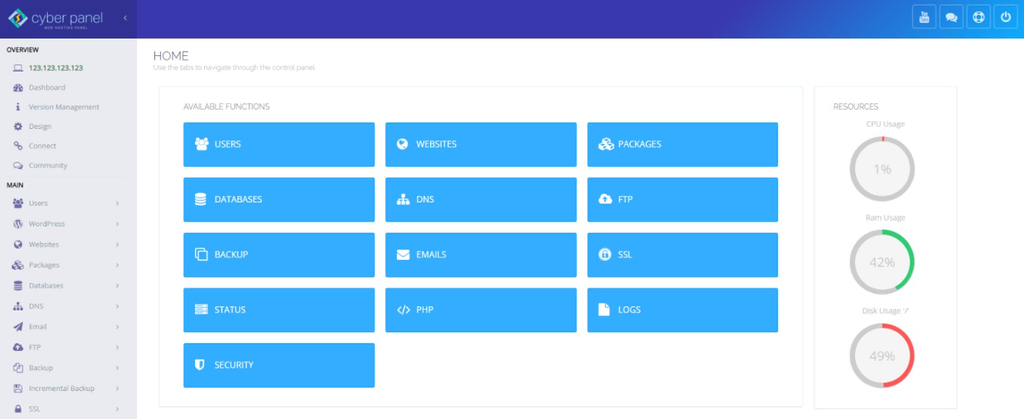
We recommend using the operating system template for beginners, as it is simpler.
Keep in mind that users can’t freely choose the control panel and operating system combination. You can choose different Linux distributions, but as an example, we will install the AlmaLinux 8 64bit with CyberPanel.
Create a VPS backup before switching your server’s operating system.
Skip this step if you chose the template during the initial VPS setup process. Otherwise, do the following:
- Open hPanel. Navigate to the VPS section on the top menu.
- Click the VPS in question.
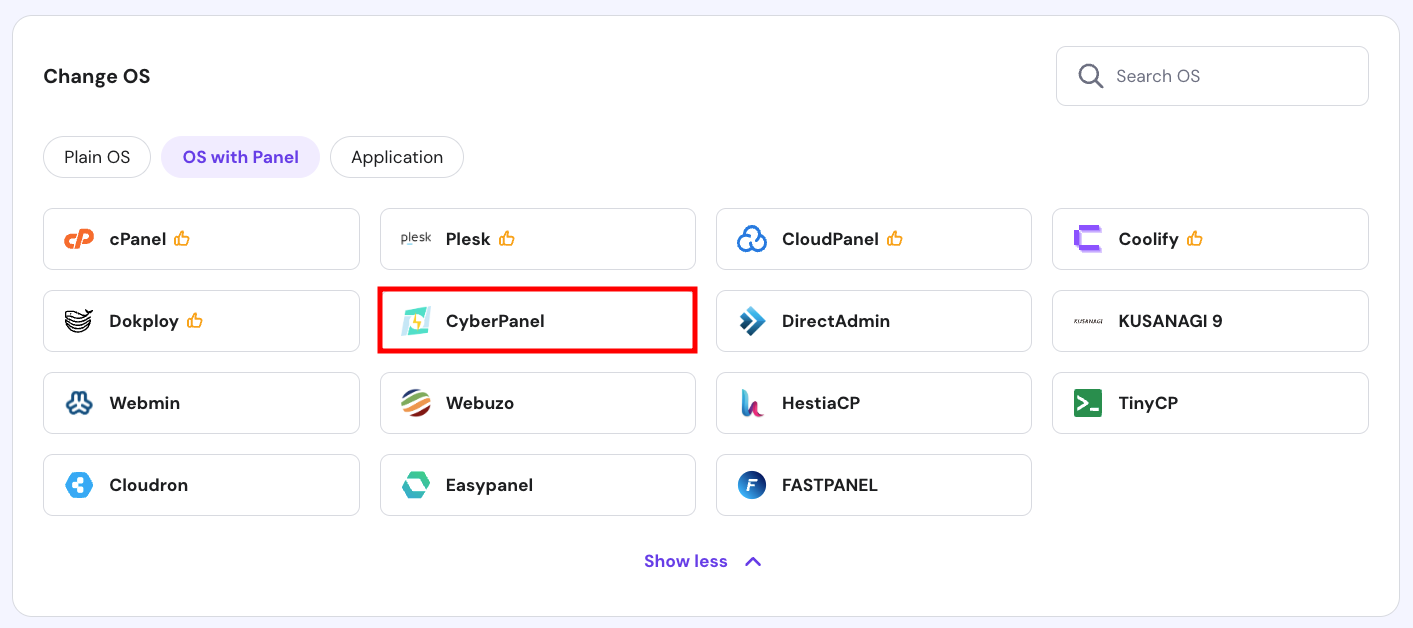
- From the sidebar, select Operating System → OS with Panel.
- Click the CyberPanel template from the list of options.
- Select Change OS.
2. Accessing the CyberPanel control panel
Once the control panel is installed, access your VPS CyberPanel dashboard using a web browser using your VPS’ IP address.
For the first method, enter https://vpsipaddress:8090 in your web browser. Replace vpsipaddress with your server’s IP address used for the previous SSH connection.
For the second method, navigate to the Panel access tab in the VPS management menu and enter the Login URL in your web browser.
Both methods require you to enter the login credentials to access the control panel, namely the root user’s username and password. You can change this information in the VPS overview area.
If your VPS doesn’t have a secure sockets layer (SSL) certificate, the web browser will send a warning message. Ignore it and accept the untrusted SSL certificate for now.
3. Creating websites and managing domains
Before proceeding, purchase a domain from Hostinger if you haven’t got one. Then, follow these steps to add it to CyberPanel:
- Log in to your CyberPanel dashboard.
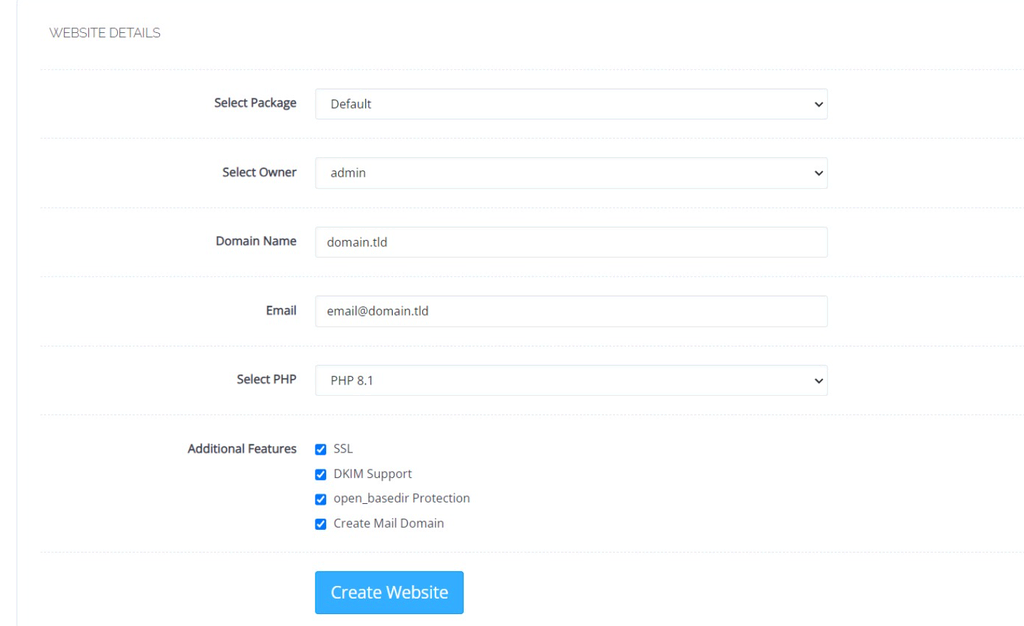
- Click Websites → Create Website.
- Under the Website Details section, enter the following information:
- Package – a settings template for your server. Choose Default if none is created.
- Owner – the domain owner. Select admin.
- Domain name – the domain you want to add to CyberPanel.
- Email – the email address for the domain.
- PHP – the PHP version to install on your VPS. Select the latest one.
- Additional features – extra functionalities to enable on the VPS. We recommend checking them all.
- Click Create Website.
You can change all settings anytime.
Make your website accessible by updating your VPS DNS configuration to point the domain name to your server. The easiest way to do it is by changing the DNS A Records. Here’s how to do it at Hostinger:
- Open hPanel and click Domains on the top bar.
- Select the domain in question.
- Click DNS / Nameservers on the sidebar.
- Go to the DNS records tab.
- Delete the existing A records containing @, www, or cloudflare-resolve-to. Skip this step if you don’t have one.
- Add two new A records with this information:
- Type – select A for both.
- Name – enter @ and www.
- Points to – use your VPS IP address for both
- TTL – keep the default value. It should be 14400.

Important! After pointing a domain name to your VPS, wait for the DNS propagation to finish. This may take up to 24 hours.
Pointing your domain name also lets you enable custom email for your VPS. Check out our tutorial to learn more about hosting an email server on a VPS using CyberPanel.
Once the domain is set, start building your website. If you have an existing one, download the website backup as a ZIP file and upload it to CyberPanel’s file manager. Here’s how to do so:
- In CyberPanel’s dashboard, go to Website → List websites.
- Select the website in question and click File Manager.
- Open public_html and click Upload. Select the ZIP file.
- Right-click on the file and choose Extract.
- Choose the directory and wait for the extraction process to finish.
4. Using CyberPanel to Host a Site
After adding a domain, issue an SSL certificate and force HTTPS to establish a secure connection to your website. Here are the steps:
- From the CyberPanel dashboard, navigate to SSL → Manage SSL.
- Choose a domain name and select Issue SSL.
- Return to the dashboard and go to Website → List websites.
- Select Manage on the website in question.
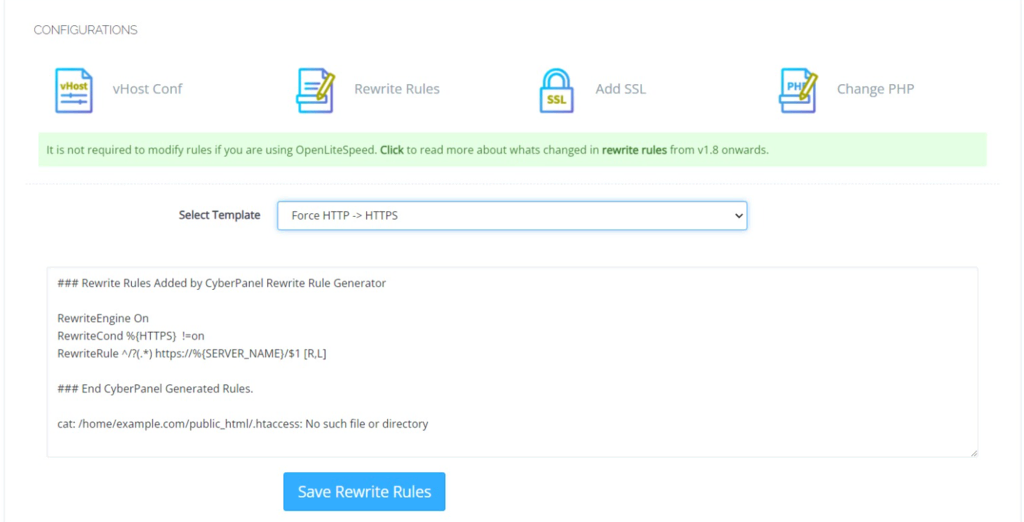
- Scroll down to the Configurations section and click Rewrite Rules.
- From the drop-down list, select Force HTTP → HTTPS.
- Click Save Rewrite Rules to keep the changes.
In the SSL menu, you can also assign the login page to a domain instead of an IP address for easier access. Once configured, you can log in using https://domain.tld:8090, with domain.tld referring to your VPS domain.
To use another domain as the login page, change your server’s hostname via hPanel. The process may take around 10 minutes, but it is typically instant.
5. Installing Applications and Managing Databases
After completing the control panel setup process, install applications for developing your website or web application. For example, we will show you how to install a content management system (CMS) like WordPress:
- In CyberPanel’s dashboard, go to Website → List websites.
- Click Manage on the website in question.
- Scroll down to the Application installer section and select WP + LSCache.
- Enter the required information:
- Blog title – your WordPress website’s title.
- Login user – the admin username for your WordPress website.
- Login Password – the password for your admin account.
- Email – the email account for logging in to your WordPress website.
- Path – the WordPress installation directory. It is set to the home directory by default.
- Click Install now.

Pro Tip
If you are redirected to the default CyberPanel page, delete the index.html file in the public_html folder.
Since some applications are unavailable in CyberPanel’s installer menu, you must manually add them via File Manager. To do so, download the desired application installer and unpack it to the public_html folder.
If you manually install a CMS, you must also create the database. Here’s how to do it:
- On the CyberPanel dashboard, navigate to Database → Create database.
- Select the website you want to install the database for.
- Enter the database’s name and login credentials.
- Click Create Database.
To access the database, navigate to Database → phpMyAdmin. You can manage the database settings from this menu, including uploading and importing file backups.
6. Website management and administration
In addition to a GUI, CyberPanel offers various features to simplify your website management and administration tasks.
It has a built-in file manager that lets you efficiently manage your website data without setting up an FTP client like FileZilla. If you prefer using FTP, CyberPanel lets you easily create an account by going to FTP → Create FTP Account.

Cyberpanel also lets you create a new user account in your VPS without using Terminal or PuTTY. You can set the user’s website limit and access permissions – root, reseller, or normal. To access this feature, go to Users → Create new user.
In addition, you can manage your VPS firewall and SSH keys via the control panel. You may also disable the root access to prevent unauthorized modifications of your VPS.
7. Advanced features and customizations
Hostinger’s CyberPanel virtual private server uses the LiteSpeed web server and LSCache plugin to ensure optimal website performance. You can also install the LiteSpeed Memcached (LSMCD) to enable object-caching on your VPS.
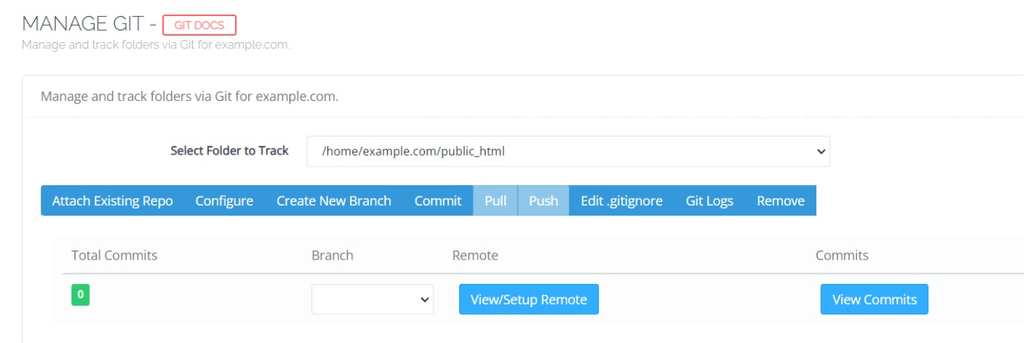
CyberPanel also has several features that improve developers’ workflow. For instance, it integrates with Git for easier collaboration and version-controlled development. It also has an API access feature to simplify the remote deployment process.
Users can also install CyberPanel add-ons to add more features to their control panel. Some hosting providers may include some of these add-ons with their plans. Otherwise, users must purchase the one-time license or subscribe to them.
Managing VPS hostname
If you have multiple VPSs within the same network, using the same hostname can cause conflicts. To help you avoid such an issue, this section will explain what a hostname is and how to change it.
What is a VPS hostname
A hostname is a label for identifying your server. In addition to helping you distinguish your VPS in a network, other systems and applications can use it to identify your machine for data transmission.
Often, a computer’s hostname is set to localhost by default. We recommend changing it since using the same name as others within a network can cause domain resolution issues and complicate system identification.
While there are no specific guidelines for a VPS hostname, use a descriptive name for easier identification. The best practice is to use a domain or subdomain hosted on the same server as the hostname, like vps.domain.tld or vps.tld.
How to change VPS hostname
There are two methods to permanently change your Hostinger VPS hostname – via hPanel and a command-line interface.
Option 1 – using Hostinger hPanel (recommended)
We recommend changing your VPS hostname via hPanel because it is more intuitive. This method is also suitable for beginners as it uses a graphical user interface and doesn’t involve commands.
However, keep in mind that other hosting providers may not offer the same feature on their control panel. For Hostinger users, follow these steps to change the VPS hostname:
- Open hPanel → VPS on the top menu.
- Select the server that you want to change the hostname.
- Click Settings on the sidebar.
- Scroll down to the Change hostname section.
- Enter your new VPS hostname and click Save.
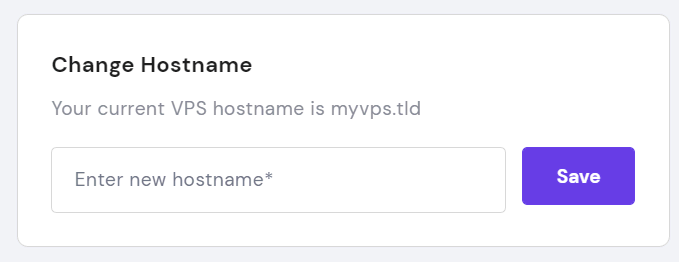
Wait until the process is complete, which can take up to 10 minutes. To check if the hostname has successfully changed, enter the following command in the Browser terminal:
hostname
Option 2 – Using a Command-Line Interface
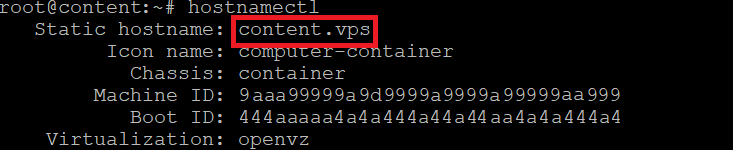
If you use another VPS hosting provider, we recommend changing the hostname using Linux commands. There are different commands you can run for this task, but we will use hostnamectl as it is the most straightforward.
Before proceeding, connect to your server using an SSH client, Terminal, or hPanel’s Browser terminal. After connecting as a root user, follow these steps in the command line interface:
- Skip this first step if you have already installed systemd. Otherwise, run the following command:
sudo dnf install systemd
- Enter the command below to view the current hostname:
hostnamectl
- Your server’s hostname is listed in the static hostname line. To change it, enter the command below. Make sure to replace hostname with your desired name:
hostnamectl set-hostname hostname
- The previous command doesn’t give an output. To check if the hostname is successfully replaced, run the following command:
hostnamectl
Since we use AlmaLinux 8, the commands may differ for another Linux distribution. However, they should work for other Red Hat Enterprise Linux derivatives like CentOS.
For other distributions and their derivatives, like Debian and Ubuntu, check our tutorial to learn the commands for changing a Linux VPS hostname.
Using Kodee to check the hostname
In addition to hPanel, you can check Hostinger VPS’s hostname using the Kodee AI assistant. Simply ask, “What is the current static hostname of my VPS?” and it should output your VPS’s hostname.
Using Hostinger Kodee to manage VPS effectively
Since managing virtual servers can be difficult, Hostinger offers a built-in AI assistant for VPS hosting plans to help simplify the task. In this section, we will discuss how to use it to assist your VPS automation and management.
Automate monitoring and alerts
You can ask Kodee for steps to automate server monitoring and alerting. For instance, use prompts like “How do I automate server uptime monitoring and alerting?”
Kodee will provide you with a step-by-step guide to do so. You can also give a follow-up question to expand each step for more detailed instruction. Here are some example prompts:
- I have chosen Grafana. How do I install it on my VPS?
- After installing Grafana, how do I set up automatic alerting with the tool?
- How to automate VPS network management with Grafana?
- How do I set up Slack as my notification channel in Grafana?
Our VPS AI assistant can also provide you with a code template for Grafana, which will help speed up the setup process.
Automate security measures
Kodee can give instructions for automating security measures in your virtual server. Depending on the security features to install, the prompts may differ. Here are several examples:
- How do I automate security measures on my Hostinger VPS?
- How do I set up automatic security and software updates on my Ubuntu Hostinger VPS?
- Can you give me cron job scripts to enable automatic daily backup on my VPS?
Always provide comprehensive information about your VPS operating systems and other software when asking for code templates, scripts, or commands. It’s important since some Linux distributions may use different commands.
Automate troubleshooting and diagnostics
Users can ask the AI assistant for steps to automate troubleshooting and diagnostics in their virtual private servers. When unsure which measures to implement, use a more general prompt like:
- What are the measures to automate troubleshooting and diagnostics in VPS?
- How to automate troubleshooting and diagnostic tasks in VPS?
Once they decide which one to apply, use a more specific prompt for more detailed instructions. Here are some examples:
- How do I enable logging and log analysis in my VPS?
- What are the steps to set up automatic diagnostic tools in my VPS?
- How to install automated recovery scripts for my VPS?
- How to analyze Ubuntu VPS network configuration for troubleshooting?
Perform performance optimization
Kodee can provide tips and assistance to improve your server performance using the following prompts:
- How to optimize VPS performance?
- Can you give a guide to enable caching in an Ubuntu VPS?
- What are the steps to change the number of worker processes in a VPS with a LiteSpeed web server?
Conclusion
Switching from regular web hosting to a VPS plan can be difficult for beginners with minimal server administration experience. Virtual private servers require users to manually configure the hosting environment and use the command line interface.
Let’s review the six steps to set up virtual private servers:
- Purchase a VPS plan from a hosting provider like Hostinger.
- Connect to your VPS via an SSH network protocol using root login credentials via Terminal or PuTTY.
- Update the VPS software.
- Create non-root access users to improve VPS security.
- Enable authentication keys.
- Configure a firewall called iptables.
You can start hosting a website on a VPS by installing CyberPanel. But first, add a domain and configure the SSL certificate. Then, import your website file or install WordPress to create a new one from scratch. To improve web development tasks, this CyberPanel also offers features like Git integration and API access.
To efficiently manage your server, Hostinger offers Kodee, an AI assistant that is accessible via hPanel. Users can submit various prompts, including how to automate VPS monitoring and management.
How to Set Up a VPS FAQ
In this section, we will answer a few questions about setting up a VPS to help you understand it more.
How Much Does It Cost to Operate a VPS?
It depends on the VPS provider, your chosen plan, and whether you manage it yourself or with professional help. Also, consider the domain and software subscription.
For example, Hostinger’s virtual private server plans start at $4.99/month. If you hire professionals to help manage your virtual server, expect to spend an additional $200-4,500/month.
What Software Can Be Installed on a VPS?
You can install any software on your virtual private server, including a CMS like WordPress and a web application. You may also install software for development, like Docker, Composer, or Lavarel.
Can I Scale Up or Upgrade My VPS After the Initial Setup?
Yes, Hostinger VPS hosting users can upgrade their plans for more resources anytime via hPanel. To do so, open the billing section and select the VPS you want to upgrade.
Click Upgrade, then select your new plan and duration. Complete the payment process and wait 10 minutes until the upgrade process is complete.

Aris is a Content Writer specializing in Linux and WordPress development. He has a passion for networking, front-end web development, and server administration. By combining his IT and writing experience, Aris creates content that helps people easily understand complex technical topics to start their online journey. Follow him on LinkedIn.

Comments
August 27 2020
Thanks dear Will. I have a few questions to ask. 1. How can I make multi-shared-hosts using a single VPS? 2. Does it need to purchase multiple cPanel apps or with one I can share it with my clients? Thanks a million!
November 06 2020
Hey Shayan. You are very welcome. Let me answer your questions :) 1. You'd need a panel which supports that. For example you mentioned cPanel. Something like WHM/cPanel license would support that. 2. For that you'd need to check with cPanel directly, but they offer multiple different packages for more than one user/account! :)
July 30 2021
Hey, i just need to know about wheather i will be able to view any interface or everything will be from the terminal??? As i am new to VPS concept can't able to figure out how it's GUI will look alike..
September 17 2021
Hi there :) You can choose a control panel for your VPS along with the OS - that will provide you an easy-to-use interface. Here's the full list of pre-installed options we offer at Hostinger!