FreePBX tutorial: Fundamentals of setting up a FreePBX server
FreePBX is an open-source platform that enables phone systems over a network, typically used for internal communication within a company.
This FreePBX tutorial will explain everything about this platform, from installing it on your server to setting up the phone system in your network. You will also learn how to install modules to expand FreePBX’s functionality.
Getting hosting for FreePBX
To host FreePBX, you need a virtual private server (VPS). While you can use a computer as a physical server, it can be more expensive and inconvenient since you must keep it running 24/7.
A virtual server is generally more affordable and provides features that help simplify the process of setting up FreePBX.
To choose the best VPS provider for your FreePBX project, we recommend purchasing a plan with at least a single-core CPU, 2 GB of RAM, and 20 GB of storage. Also, ensure your web host has a minimum of 100 Mb/s connection for smooth and responsive communication.
Running on a 1 Gb/s network, Hostinger’s FreePBX VPS hosting is a great fit. It starts at $4.99/month, and you can easily upgrade your plan anytime to accommodate your growing phone system needs.
With our Kodee AI Assistant, you can easily write code, commands, and instructions for managing your FreePBX server. Moreover, our global data centers let you host the tool in the location closest to you for minimal latency.

After purchasing a VPS plan from Hostinger, complete the onboarding process, which involves setting up a new password and choosing an operating system.
Installing FreePBX
The steps to install FreePBX vary depending on its version, your server’s operating system, and your preferred configuration setup.
In this section, we will go over the two easiest methods.
Installing FreePBX automatically at Hostinger
Hostinger users can easily install FreePBX in a few clicks using VPS operating system templates. If you selected the Debian 12 with FreePBX template during the onboarding process, you can skip the following steps:
- Log in to hPanel → sidebar → VPS → Manage.
- From the sidebar, go to the side menu → OS & Panel → Operating System.
- Select the Application tab and search for Debian 12 with FreePBX.
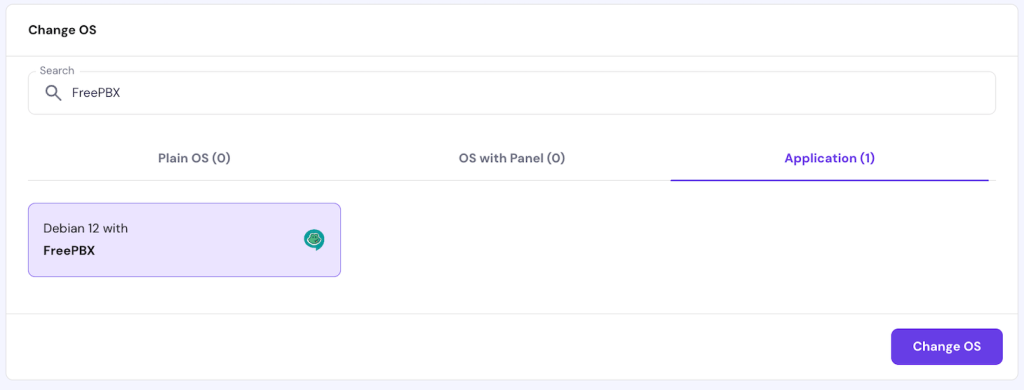
- Click Change OS.
- Check the box to accept deleting the data.
- Enter a new root password and click Confirm.
Wait until the process is complete.
Installing FreePBX manually with commands
If you’d rather install FreePBX manually, it has installation scripts that simplify the process, but they only work with Debian.
First, access your VPS as root using an SSH client like PuTTY or Terminal. Once connected, follow these instructions to install FreePBX on Debian 12:
- Enter the following command to access the installation directory:
cd /tmp
- Run the following to download the FreePBX 17 installation script:
wget https://github.com/FreePBX/sng_freepbx_debian_install/raw/master/sng_freepbx_debian_install.sh -O /tmp/sng_freepbx_debian_install.sh
- Enter the following to start the installation process:
bash /tmp/sng_freepbx_debian_install.sh
Wait until the installation process is finished. Depending on your internet connection, it might take 30 minutes or longer.
Once the installation is complete, you should see the following confirmation screen.
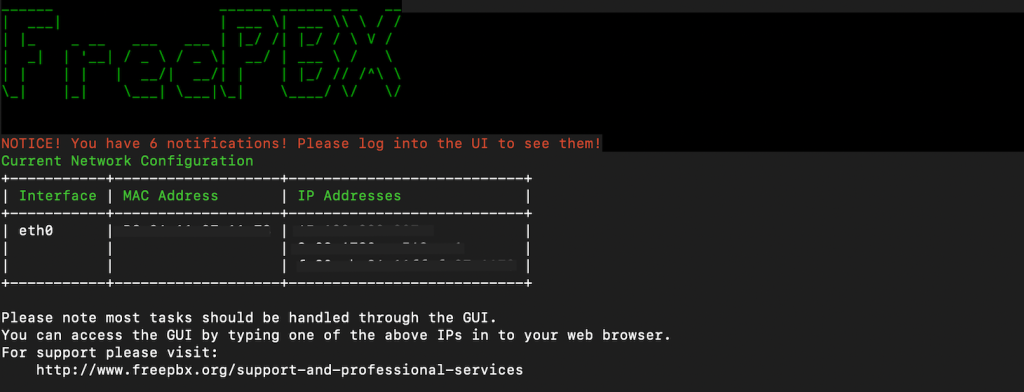
The script automatically configures other software required for the FreePBX setup, including the Asterisk server, Apache, and the MariaDB database.
If you run another operating system or don’t want the optional dependencies, install these components individually.
Learn more about setting up FreePBX without scripts
Check out this FreePBX wiki guide to learn more abouthow to manually install FreePBX 17 with Asterisk 21.
Finish installing FreePBX
Whichever method you choose, follow these steps to complete your FreePBX installation:
- Access the FreePBX login page by entering your VPS IP address into a web browser.
- Fill out the following information:
- Username – the FreePBX admin username.
- Password – the default password for your admin account.
- Notification email address – the email account that will receive all notifications about your FreePBX service.
- System identifier – the name of your FreePBX server, preferably the same as your VPS hostname.
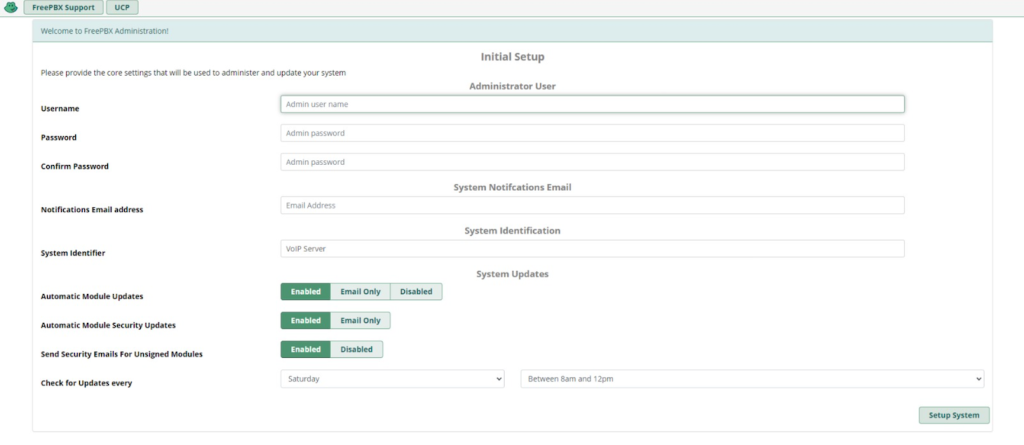
- Adjust the settings for your modules and updates. If you’re not sure what to change at this point, you can leave it as is.
- Click Setup System.
When you first access the main FreePBX web interface, you might see multiple activation screens. Feel free to skip them and circle back later.
Basic configuration
To start using FreePBX, you must configure the following settings to allow telephone communication over your server.
Setting up extensions
In FreePBX, extensions are endpoints for connecting calls within the same network and to external services. Here’s how to set it up:
- Open the FreePBX admin dashboard and log in as an admin.
- Go to the top bar → Connectivity → Extensions.
- Click Add Extension to add detailed information about your extensions. Since we will create a basic one, choose Quick Create Extensions.
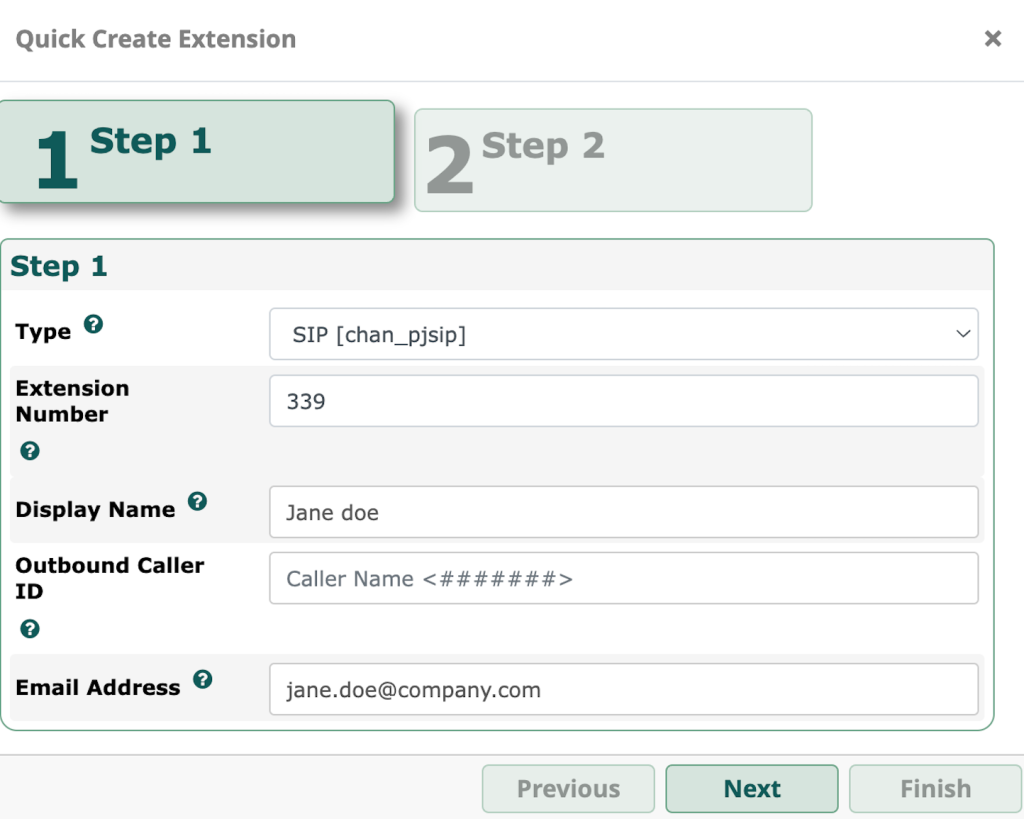
- On the Step 1 page, adjust the following settings:
- Extension Type – the type of communication protocol your extension uses. We’ll pick SIP [chan_pjsip] since it is the most common.
- Extension Number – the number other users use to dial the current extensions. Use a three to five-digit number that doesn’t start with 1 to avoid overlaps with existing services.
- Display Name – the extension’s owner.
- Outbound Caller ID – the identifier of the current extension when dialing outbound. We can leave it empty.
- Email Address – the extension owner’s email address.
- Click Next.
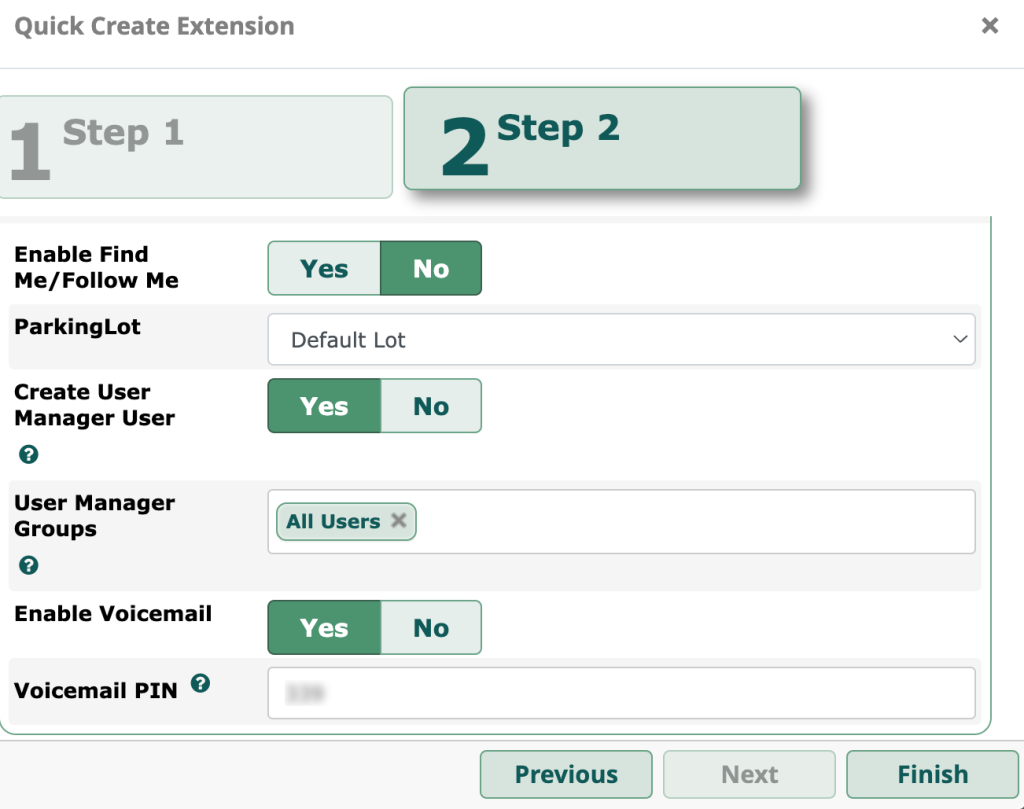
- On the Step 2 page, change other settings:
- Enable Find Me/Follow Me – the feature that redirects calls to another phone when the extension doesn’t respond.
- ParkingLot – the module to queue and forward unanswered calls to different extensions. By default, you only have the Default Lot option.
- Create User Manager User – the toggle to add the user to the User Manager list.
- User Manager Groups – the group that your new extension user belongs to.
- Enable Voicemail – the toggle defining voicemail is available for the current extension.
- Voicemail PIN – the password for your extension’s voicemail service.
- Click Finish to save the settings.
If you want to add more extensions, simply repeat the steps above. To change their settings, go to the All Extensions tab and click the Edit icon under the Action column.
After changing any FreePBX settings, remember to hit the Apply Config button on the top right of the screen.
Configuring SIP trunks
Session Initiation Protocol (SIP) enables your internal phone system to dial external numbers via the internet. A trunk is a connection endpoint that includes multiple communication channels, including phones.
Before proceeding, you need an external VoIP service from SIP trunk providers like Voxtelesys to route digital data from the internet to the analog phone service.
After purchasing a VoIP service, follow these steps to configure trunks in FreePBX:
- Log in to your FreePBX dashboard → Connectivity → Trunks.
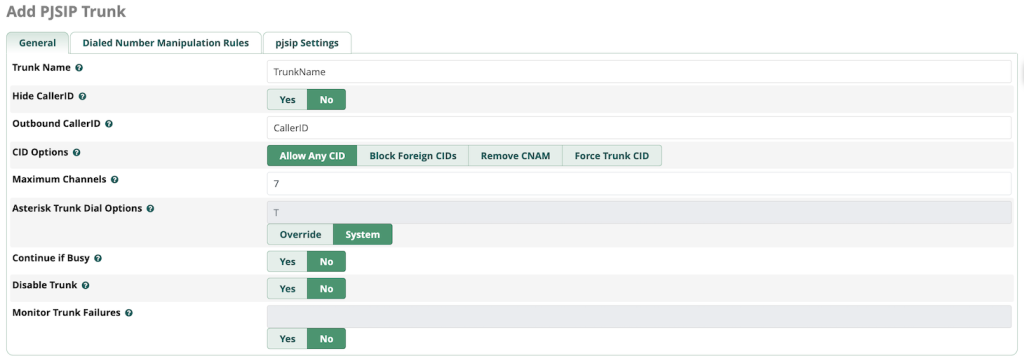
- Click Add Trunk and select Add SIP (chan_pjsip) Trunk.
- Under the General tab, enter your trunk’s name, outbound caller ID, and maximum channels.
- Go to the pjsip Settings tab. Enter information like SIP username, server IP address, and port based on your SIP trunking service provider.
- Click Submit to save the changes.
Outbound and inbound routes
Routes define which components in your FreePBX phone system will handle calls, whether it is an extension, group, or voicemail. Inbound routing sets the rules for incoming public dials, while outbound configures the outgoing ones.
A route can direct calls to different destinations depending on your rules. For example, you can set extension B to take over a dial if A doesn’t respond. It helps distribute calls more evenly and minimize missed dials.
Here are the steps for inbound route configuration in FreePBX:
- From your FreePBX admin menu → Connectivity → Inbound Routes.
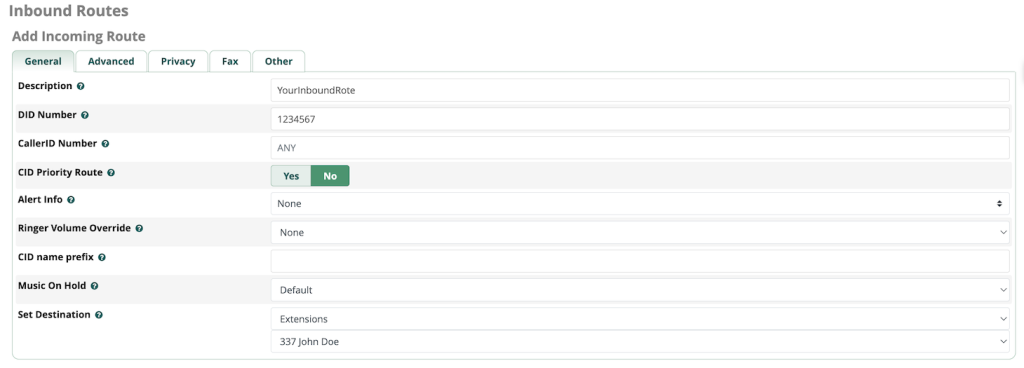
- Click Add Inbound Route.
- Enter the following information:
- Description – the name of your incoming route.
- DID Number – the number outside callers will use to dial this route. You must get it from the VoIP or DID provider.
- Set Destination – the component to which this route will direct incoming calls.
- Click Submit to confirm.
To set up an outbound route, you need a trunk since your FreePBX system uses it to reach the public phone service. Follow these steps:
- Go to your FreePBX dashboard → Connectivity → Outbound Routes.
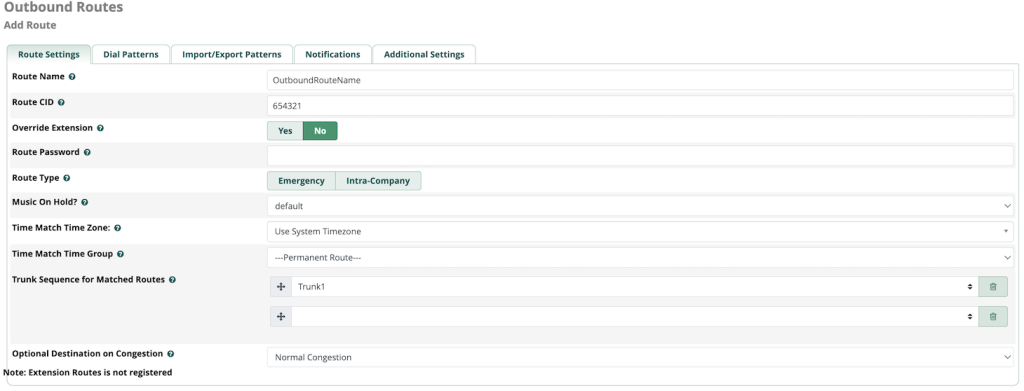
- Click Add Outbound Route.
- Enter the following information:
- Route Name – the name of your outgoing route.
- Route CID – the call ID that will show up on the dialed number.
- Runk Sequence for Matched Routes – the SIP trunk directing outgoing calls to the public phone system.
- Navigate to the Dial Patterns tab and specify phone numbers that you can call through this route. Click the + icon to show the guide.
- Click Submit to confirm.
That’s it! Now, phones in your local network should be able to make and receive calls from the public line.
Essential modules and features
Let’s explore several essential modules and features to enhance your FreePBX phone system.
IVR (Interactive voice response) setup
IVR automatically responds to callers using an automated message and redirects them to a specific route based on their choice.
For example, it can ask users to press a number on their phone to access a specific customer service menu.
Before getting into the IVR setup, record a message with software like Audacity. You can save the file as any extension and convert it later, but we recommend using WAV.
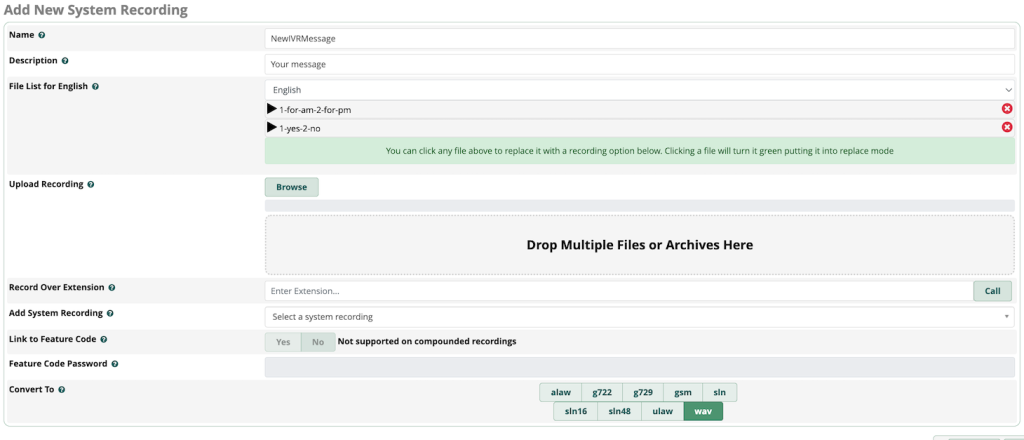
Follow these steps to upload the audio message to FreePBX:
- From your FreePBX dashboard → Admin → System Recordings.
- Enter the name and description of your recording.
- Click Browse and select the audio files you want to upload.
- You should see new items under the File List setting. If you want to remove one, click the red X icon.
- Select the audio codec. If you choose a different format from the uploaded files, FreePBX might take some time to convert them.
- Once finished, click Submit.
Next, proceed with the IVR configuration:
- Go to Applications → IVR → Add IVR.
- Enter the IVR name and description.
- Go to IVR DTMF Options → Announcement. From the drop-down menu, select which IVR recording to play when a caller dials you.
- Scroll down to the IVR Entries section. Enter the following information:
- Digits – the number callers must press on their phone to access a specific IVR menu.
- Destination – the action to take when callers enter a specific digit, like playing a recording or redirecting them to another IVR.
- Return – the action after the caller reaches specific IVR destinations.
- Click Submit and Apply Config to finish.

Ring groups
Ring groups are collections of extensions that get notified at the same time when receiving a call. Only the first operator who picks up the call will connect to the line.
This setup helps minimize the number of missed calls when you have many operators with the same function. It’s very handy for a company with multiple secretaries or receptionists.
Here’s how to set up ring groups in FreePBX:
- From your FreePBX dashboard, go to Applications → Ring Groups.
- Click Add Ring Groups.
- Enter the Ring-Group Number. It is similar to extension numbers, allowing users to dial the ring group.
- Add a description for your ring group.
- Add extensions to the ring group by listing their number separated by line breaks. Alternatively, select them from the User Quick Select drop-down menu.

- Scroll down to the Destination if no answer section. Select a redirection that will answer the call if no extensions pick up.
- Click Apply Config to save the changes.
Voicemail configuration
Voicemail lets callers leave an audio note to an extension when no one answers. Here’s how to set it up in FreePBX:
- Go to your FreePBX dashboard → Connectivity → Extensions.
- From the All Extensions tab, click the Edit icon under the Actions column.

- Select the Voicemail tab and hit the Voicemail toggle.
- Enter the email address that will receive the voicemail. By default, it is set to the extension’s user.
- Click the Email Attachment toggle to have FreePBX send the voicemail message to the specified address.

- Click Submit and Apply Config to save the changes.
Advanced FreePBX configurations
Here are several advanced FreePBX configurations to improve its security and functionality.
Security measures
Securing your FreePBX server is important to prevent cyber criminals from infiltrating your communication network and exposing sensitive information.
To maintain optimal security, consider the following measures:
- Set up a firewall – FreePBX ships with a built-in firewall that blocks traffic from unauthorized IP addresses. Enable it by going to your FreePBX dashboard → Connectivity → Firewall.
- Secure trunks – trunks can expose your internal network to the public phone line, potentially creating a security risk. To secure them, add a PJSIP password and change the default SIP port.
- Back up your server – regularly back up your VPS to make sure your data is safe. Hostinger users can easily enable automatic weekly VPS backups.
- Keep all software up to date – using outdated software might expose your server to vulnerabilities. Enable automatic updates for FreePBX and its modules by going to your FreePBX dashboard → Admin → Updates.
In addition to safeguarding your FreePBX phone system, apply VPS security best practices. For example, regularly scan your system for malware. Hostinger users can do this automatically using the built-in Monarx scanner.
Using add-on modules
FreePBX modules are add-ons that expand this tool’s functionality. Official modules are downloadable from the FreePBX module page, while many third-party options are available on GitHub.
Note that most official modules are paid. Purchasing them in a bundle is usually more cost-efficient. Meanwhile, third-party modules are usually free.
To install official FreePBX modules, follow these steps:
- From your FreePBX dashboard → Admin → System Admin.
- Click Activation from the sidebar.
- If you have purchased a license, you should see an activated screen with a list of modules you can install. Otherwise, click Activate.
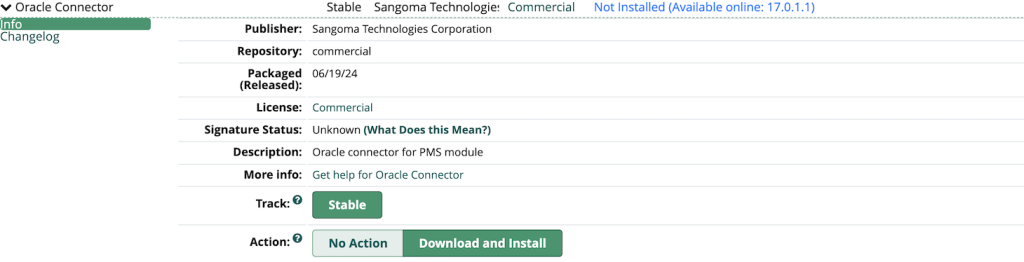
- Go to the top menu → Admin → Module Admin.
- Select the Commercial tab and click Check Online.
- Find the module you want to install and click the Arrow icon to expand the menu. Click the Download and install button. Repeat this step for other extensions.
- Scroll back to the top and hit Process.
- Click Confirm to start the installation.
To install third-party modules, you must upload their archive files or enter the download URLs into FreePBX:
- From your FreePBX dashboard, go to Admin → Module Admin.
- Click Upload Modules.
- You can upload modules from the download page or your local computer. Enter the download URL if you choose to upload the module using its URL. Otherwise, click Choose File to upload it from your computer.
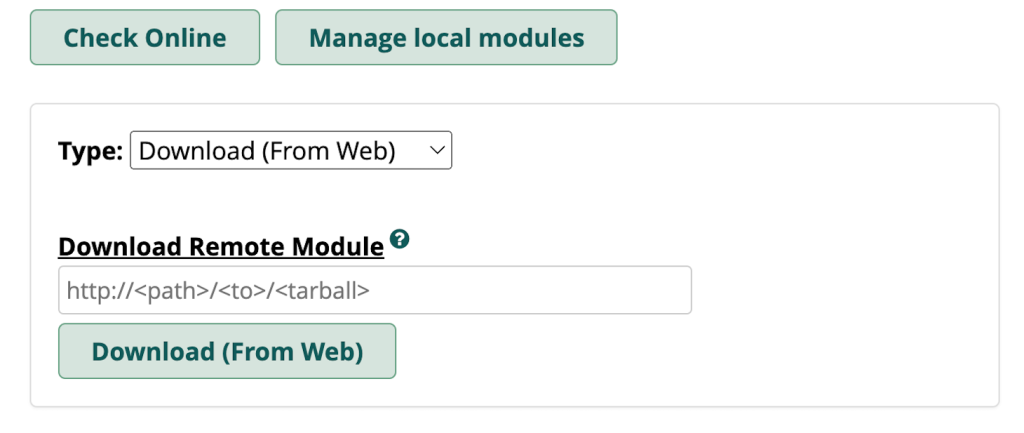
- Once the upload process is complete, click Manage local modules.
- Find your new module, click the arrow icon to expand the menu, and select Install.
- Scroll up and hit Process.
- Click Confirm to start the installation.
Always remember to click Apply config after installing or updating modules to ensure the changes are in place.
Conclusion
FreePBX is a platform for setting up an internal phone system for your organization.
To configure FreePBX, purchase a Debian VPS plan and install the software on the server. Hostinger users can easily configure FreePBX by running the available template.
Once installed, open the FreePBX admin dashboard by entering your VPS IP address into a web browser. Then, configure the following components:
- Extensions – the endpoint for phones in your system.
- SIP trunks – a collection of endpoints that enable your phone system to connect to the public line.
- Inbound and outbound routes – rules in your phone system that define which extensions will handle incoming and outgoing calls.
Additionally, set up an IVR system, ring groups, and voicemails to manage calls more efficiently. Finally, don’t forget to apply security best practices like enabling a firewall and using strong SIP passwords.
FreePBX tutorial FAQ
What is FreePBX and how does it work?
FreePBX is a tool that provides a graphical user interface for setting up an internal phone system, typically in a company, organization, or school environment. It works on top of the Asterisk server, which facilitates communication via telephone over a network.
What are the system requirements for installing FreePBX?
We recommend a server with at least a single-core processor, 2 GB of RAM, 20 GB of storage, and 100 Mb/s connection. Although FreePBX runs on any Linux distribution, it is easiest to set up on Debian.
Can I integrate third-party applications with FreePBX?
Yes! You can add more features to FreePBX by installing modules. For example, install the CRM Link add-on to integrate platforms like Salesforce.

Aris is a Content Writer specializing in Linux and WordPress development. He has a passion for networking, front-end web development, and server administration. By combining his IT and writing experience, Aris creates content that helps people easily understand complex technical topics to start their online journey. Follow him on LinkedIn.