Redmine tutorial: Starting and streamlining project management
Redmine is a versatile, open-source project management tool that helps teams simplify processes and improve collaboration. It offers powerful features like time tracking, customizable workflows, and Gantt charts.
Redmine provides an all-in-one solution for any project manager looking to enhance productivity and maintain control.
In this article, you’ll learn how to set up Redmine, manage user roles, handle tasks and issues, and customize the interface to suit your team’s needs. By the end of this guide, you’ll be able to manage projects using Redmine to boost team performance efficiently.
Getting started with Redmine
From preparing the environment and installing Redmine to using collaboration features, we’ll guide you through the essential steps to get the most out of this tool.
1. Preparing your VPS for Redmine
To get started with Redmine, you’ll need a reliable virtual private server (VPS) provider to handle its requirements. Hostinger offers an ideal solution with our specialized Redmine hosting service. Built on a VPS, it provides several benefits:
- Preinstalled tool. Redmine and all its required components are automatically set up, saving you time and minimizing the risk of errors during manual installation and configuration.
- Sufficient resources. Our Redmine VPS plans offer up to 8 CPU cores, 32 GB of RAM, 400 GB of storage, and 32 TB of bandwidth to meet the needs of various projects. You can also scale up your resources to handle an expanding array of tasks.
- Powerful performance. With AMD EPYC processors, NVMe SSD storage, and a 1 Gb/s network speed, Hostinger’s Redmine hosting ensures top-notch performance and quick access to your Redmine instance.
- Strong security measures. We provide a built-in firewall, DDoS protection, and malware scanner to secure your projects. Our automatic weekly backups also ensure you always have copies of essential data.
- Plugin and customization support. Hostinger’s Redmine plans grant you full root access, meaning you can install third-party plugins and customize your Redmine instance as needed.
When setting up Redmine, you should have at least 4 GB of RAM, 20 GB of storage, and one CPU core. Based on these requirements, we suggest getting the KVM 1 plan, starting at $4.99/month.
For larger projects or teams, consider purchasing KVM 2 for $6.99/month, which comes with two vCPU cores, 8 GB of RAM, and 100 GB of NVMe disk space, ensuring enhanced performance for more demanding workloads.

2. Installing and setting up Redmine
This section will guide you in installing Redmine on Hostinger and setting it up manually on a VPS.
Redmine installation on Hostinger
As previously explained, if you choose Hostinger’s Redmine plans, the tool and all supporting packages are automatically configured for you.
However, if you’ve switched your operating system or reset your server, you can still reinstall Redmine as a VPS template.
Here’s how to do so:
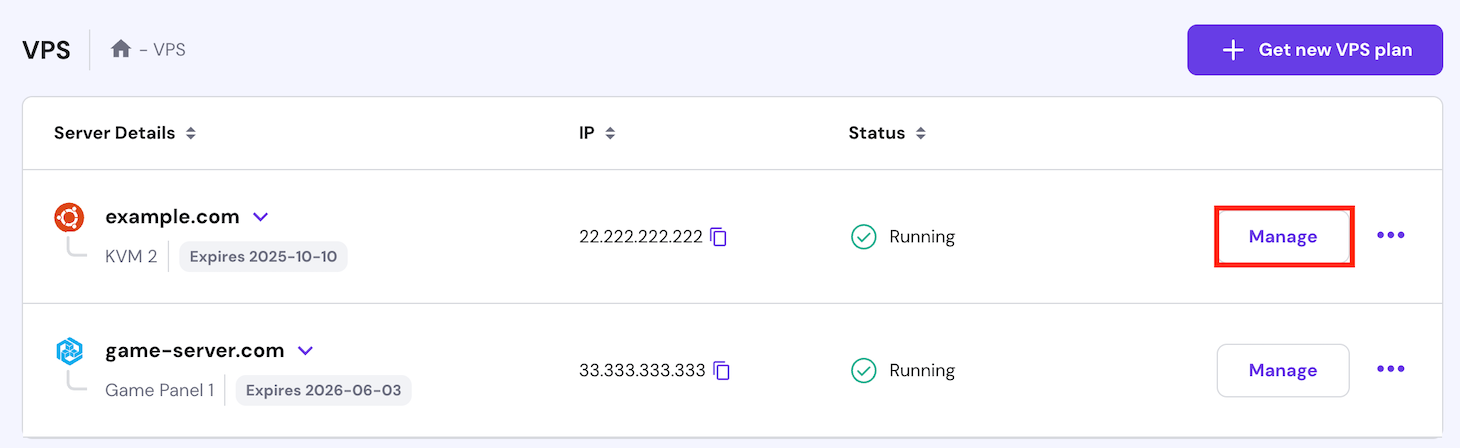
- Log in to hPanel with your Hostinger account and navigate to VPS → Manage.
- In the left sidebar, go to OS & Panel → Operating System.
- Select the Application tab and click Redmine.
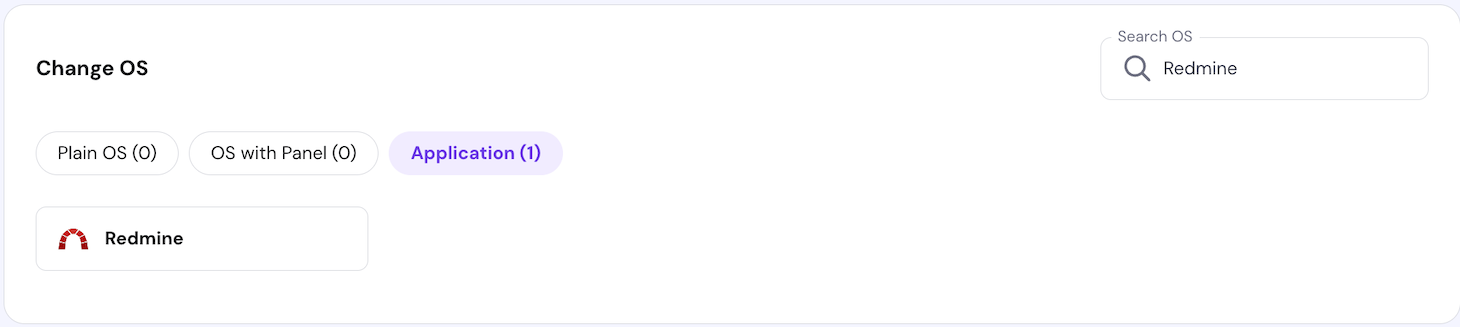
- Scroll down and hit Change OS.
Follow the on-screen instructions to set up a new password for your VPS. After that, wait for the installation process to complete, which should take around five minutes.
Manual Redmine installation
For users who prefer to install Redmine manually or use a VPS without the pre-configured template, here are the steps:
- Open a terminal or SSH client app like PuTTY. Then, access your server with this command, replacing your_vps_ip with your VPS’ IP address:
ssh root@your_vps_ip
- Install the Apache web server and Passenger module:
sudo apt install apache2 libapache2-mod-passenger
- Install the MySQL server and client:
sudo apt-get install mysql-server mysql-client
When prompted, set a password for the MySQL root user.
- Install the Redmine package and MySQL adapter from the official repository:
sudo apt install redmine redmine-mysql
Select Yes to allow dbconfig-common to configure the Redmine database. Enter the MySQL root password you set earlier. Then, choose mysql as the database type and provide a new password for the Redmine database.
- Install the Bundler gem:
sudo gem update

sudo gem install bundler
- Open the Apache default site configuration file with the nano text editor:
sudo nano /etc/apache2/sites-available/000-default.conf
- Change the <VirtualHost> directive to use your VPS’s IP:
<VirtualHost your_vps_ip:80>
Once done, save your edits by pressing Ctrl + X → Y → Enter.
- Optionally, update /etc/apache2/ports.conf with nano to ensure Apache listens on all interfaces:
Listen 0.0.0.0:80
- Inside the /etc/apache2/sites-available/000-default.conf file, add or update the <Directory> section to point to the Redmine installation path:
<Directory /var/www/html/redmine>

RailsBaseURI /redmine

PassengerResolveSymlinksInDocumentRoot on

</Directory>
- Create a symbolic link to connect Redmine to the web document space:
sudo ln -s /usr/share/redmine/public /var/www/html/redmine
- Create the Gemfile.lock file and set the correct ownership:
sudo touch /usr/share/redmine/Gemfile.lock

sudo chown www-data:www-data /usr/share/redmine/Gemfile.lock
- After making these changes, restart Passenger and Apache to apply the new configuration:
sudo a2enmod passenger

sudo service apache2 restart
3. Accessing and managing Redmine
Once you have Redmine installed on your VPS, you can access your Redmine instance and explore its interface.
Log in to your Redmine instance
For Hostinger customers using the Redmine template, you can log in to the tool by navigating to VPS → Manage → Overview and clicking the Manage App button at the top.

You’ll see the Redmine login page. Use the default credentials, which are admin for username and password, for the first-time access. Then, you’ll be prompted to change the password immediately for security purposes.

If you installed Redmine manually, open your browser and enter your VPS’ IP address followed by /redmine, for example:
http://22.222.222.84/redmine
Similarly, use the default information provided by Redmine and set a new password after your first login.
Explore the Redmine interface
After logging in, you’ll be greeted with the Redmine overview page. Here are several key sections you’ll use frequently for project management:
- Projects. Found in the top menu, this is the central hub where you can view all your projects, create new ones, and access specific project settings.
- Issues. Located in the top menu within your projects, this is the core of Redmine’s issue-tracking system. It helps you manage tasks, bugs, and feature requests.
- Gantt. Also available within your projects, the Gantt chart view helps you visualize project timelines, tasks, and dependencies, providing a comprehensive overview of your project’s progress.
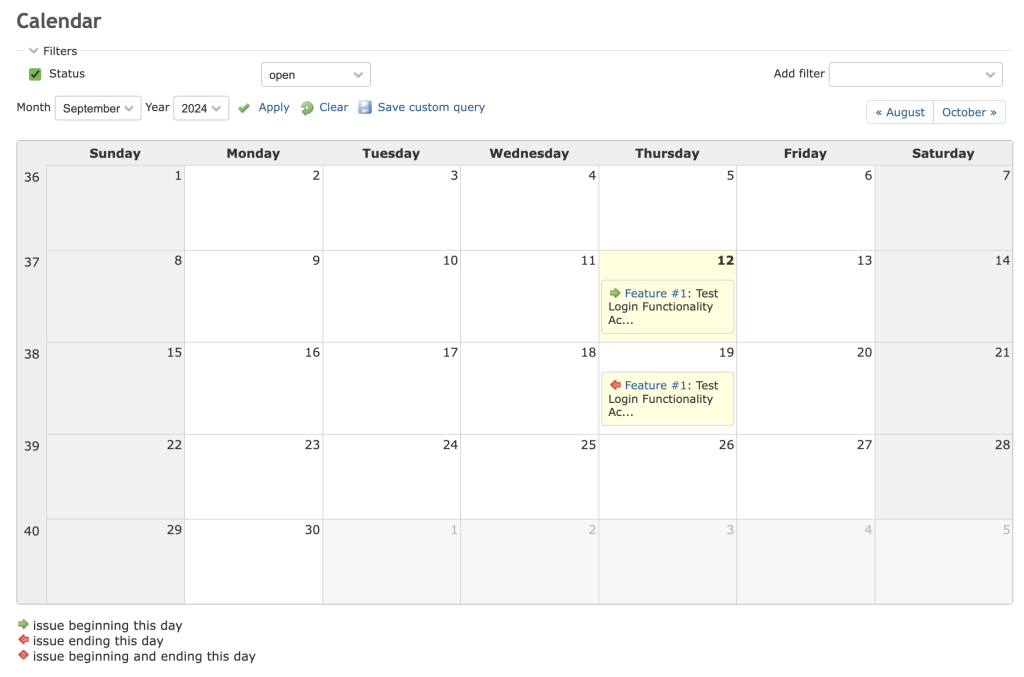
- Calendar. Found under each project, it shows milestones, due dates, and upcoming project activities, making it easy to track deadlines.
- Administration. This section, accessible only to admins via the top menu, lets you configure global settings, manage users, install plugins, and handle various administrative tasks.

Create your first project
Here’s a step-by-step guide to creating a project using Redmine:
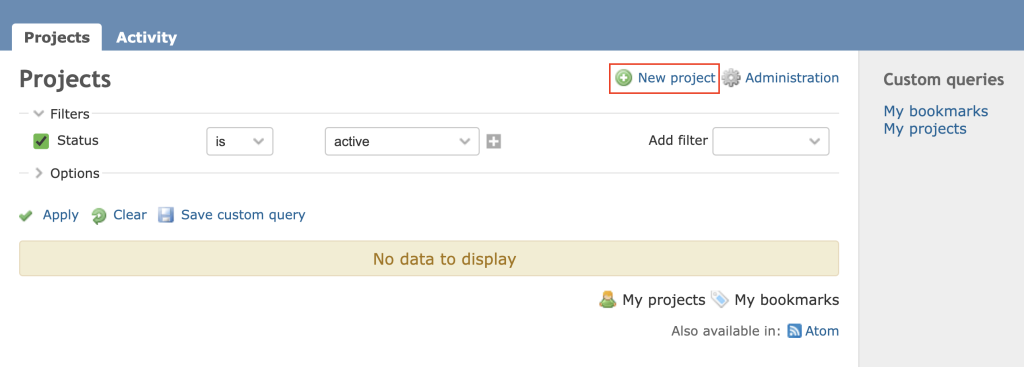
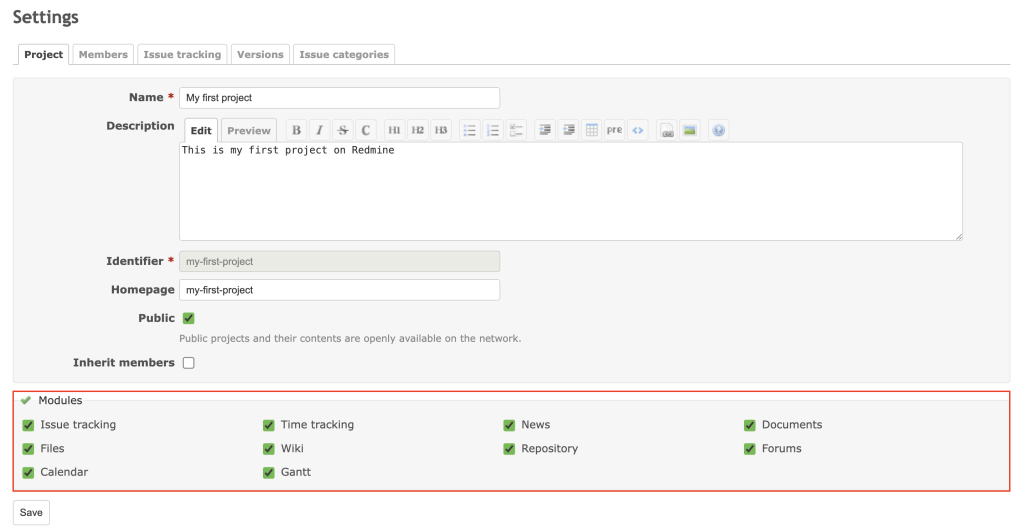
- Go to Projects → New project.
- Fill in the project details, including the name, description, and homepage. Make sure to use a unique project identifier for each one.
- Check the modules you want to activate for each project, such as Issue tracking, Calendar, and Gantt.
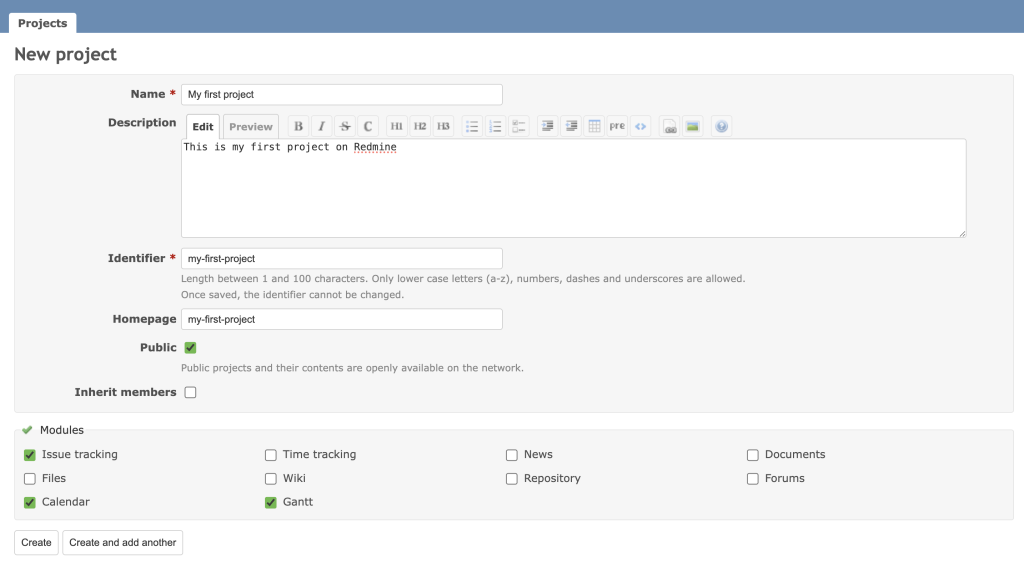
- Click Create to finalize or Create another to save the current project and continue creating another.
4. Customizing Redmine
Customizing Redmine allows you to tailor the platform to better fit your team’s needs and streamline project management.
Personalize your Redmine instance
To make Redmine more visually appealing and aligned with your brand or team’s preferences, you can change the theme and user settings:
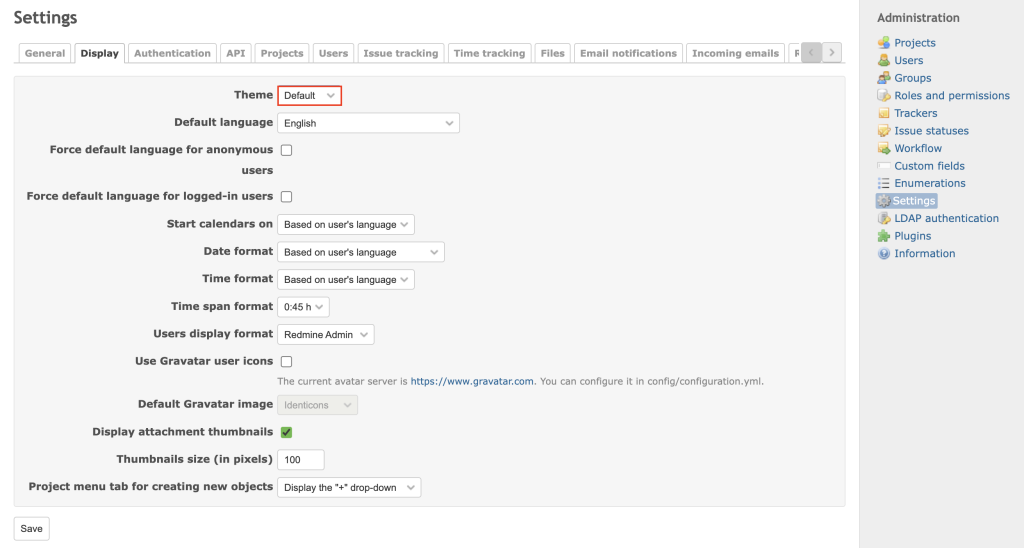
- Customizing themes. Redmine offers several themes that you can apply to change the look and feel of your interface. To change the theme, go to Administration → Settings → Display. Choose one from the available built-in Redmine themes. You can also adjust other visual settings on this page.
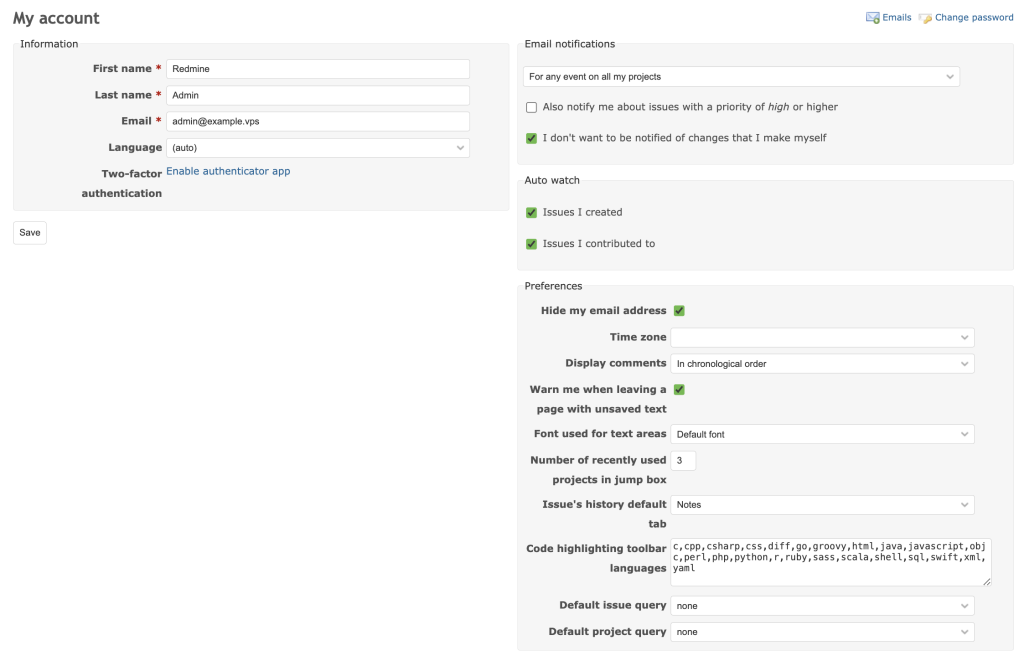
- Configuring user preferences. Each user can further personalize their account by configuring individual settings. To access user preferences, click My account in the top right corner. Here, adjust options like language, time zone, and email notifications.
Pro tip
To add new themes, place them in public/themes under your Redmine installation directory. Then, select the new theme from the same Display tab.
Set up workflows
With Redmine’s flexible workflow management capabilities, you can define custom issue statuses and create workflows that cater to different project requirements:
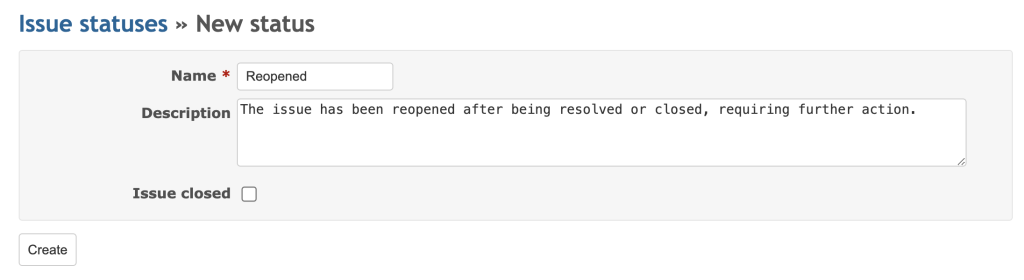
- Defining custom issue statuses. Custom issue statuses help in managing project tasks more effectively. In the Administration area, click Issue statuses → New status to create a new one. Then, enter the status name and description.
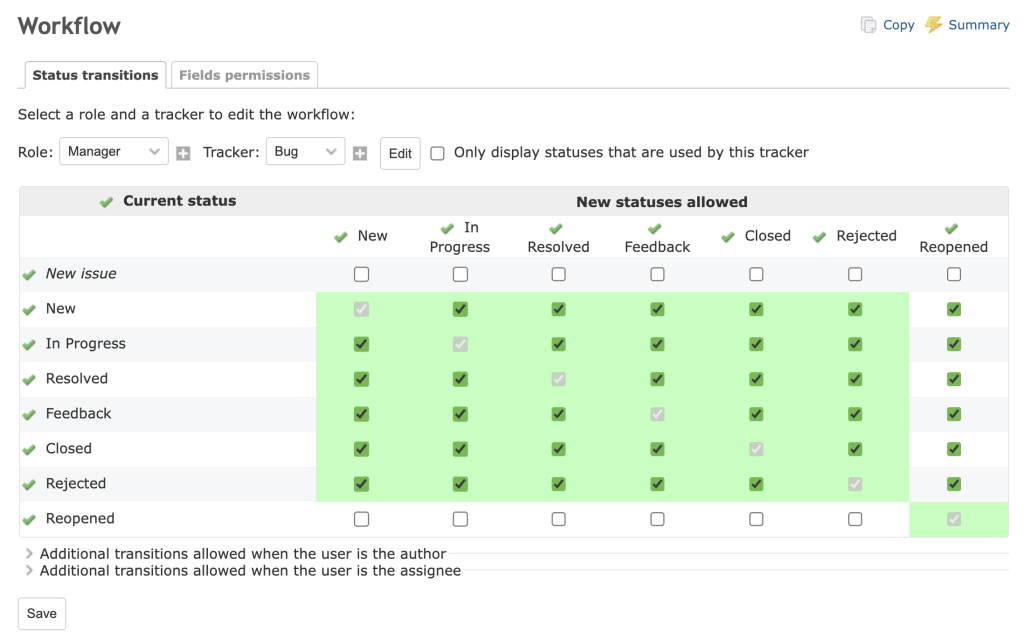
- Creating workflows. In Redmine, workflows define an issue’s lifecycle and determine which statuses it can transition to, depending on its current state. To create a workflow, navigate to Administration → Workflow, select a role and tracker, and click Edit to define the transitions. This ensures that the correct process is followed for every task.
5. Managing user roles and permissions
Effectively managing user roles and permissions in Redmine helps maintain control over project access and ensures that team members have the appropriate capabilities to perform their daily tasks.
Understand roles and permissions
Roles define a user’s actions within a project, such as creating issues, editing project settings, or viewing private notes. Redmine has several default roles, including Manager, Developer, and Reporter. Each role has predefined permissions, although you can customize these settings, making it easy to set roles based on a user’s responsibilities.
On the other hand, permissions determine users’ access to specific areas within a project. For instance, you can control who has access to view or modify issues, manage the project wiki, or access SOP files.
Create and edit roles
While Redmine provides default roles, you may need to create custom ones tailored to your specific project needs:
- Head to Administration → Roles and permissions.
- Click New role and enter a name for it. You can also set the issue’s visibility and copy workflows from existing roles.
- Select the appropriate permissions from the available options to customize what users with this role can do. For example, you can grant or restrict access to specific project areas, like tracking issues or viewing repositories.

- Once done, hit Create.
If you want to edit existing role permissions, return to Roles and Permissions, select the role you wish to modify, and adjust the settings as needed.
Manage user access
It’s crucial to manage user access by creating user accounts and assigning them to the appropriate projects:
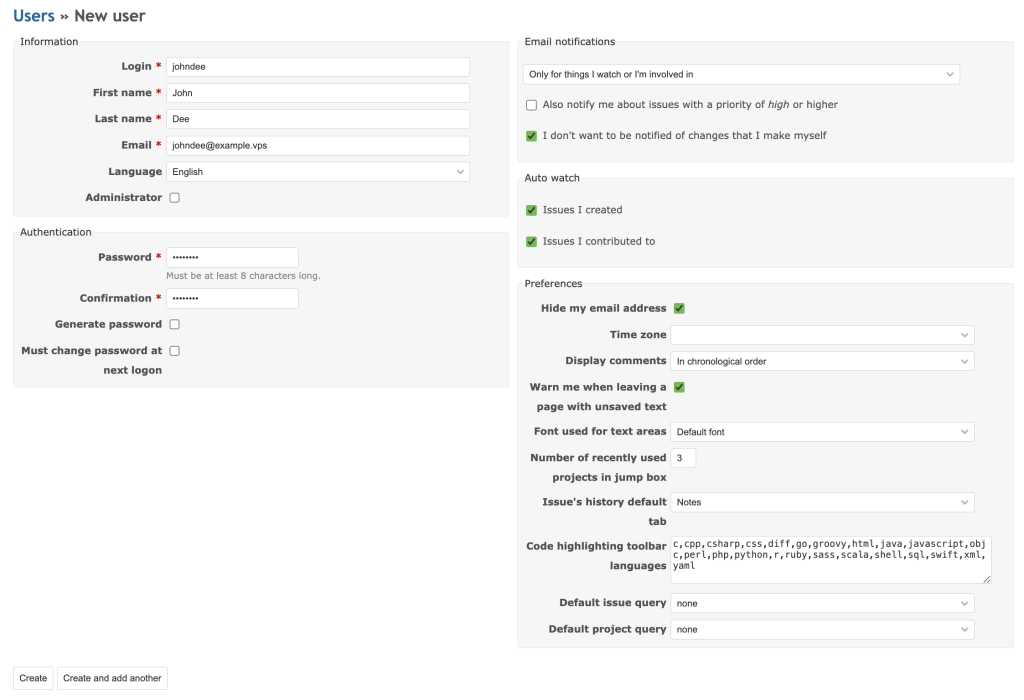
- Creating a new user account. To create a new user, go to Administration → Users. Click New user and fill in the necessary information, such as the username, password, and email address. Make sure to check the Administrator box if the user needs admin rights.
- Adding users to a project. Once a user account is created, add them to a specific project. Click Projects in the top menu and select your desired project. Then, go to Settings → Members. Click New member, select the user from the list, and assign them the appropriate roles for that project.

- Removing users from a project. To remove a user from a project, go to the same Members tab of the project. Find the user you want to remove and click the Delete button next to their name.

6. Handling issues and tasks
Redmine provides extensive features for creating, assigning, and tracking issues, as well as tools for filtering and reporting tasks to improve project management.
Create and assign issues
Follow these steps to create and assign issues in Redmine:
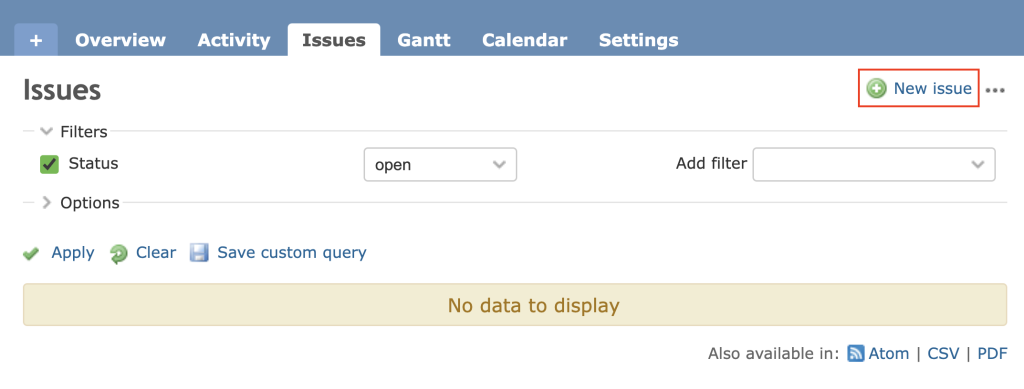
- Navigate to your project and select Issues → New issue.
- Enter the necessary details, such as Subject, Description, Status, and Tracker. The latter defines the issue type, such as Bug, Feature, or Task.
- Select a priority such as Low, Normal, High, Urgent, or Immediate to indicate its importance.
- Use the Assignee field to select the user responsible for handling the task. You can also add Watchers to inform other team members about the progress of the issue.
- Set the start and due date to help team members understand the task’s urgency and manage their schedules accordingly.
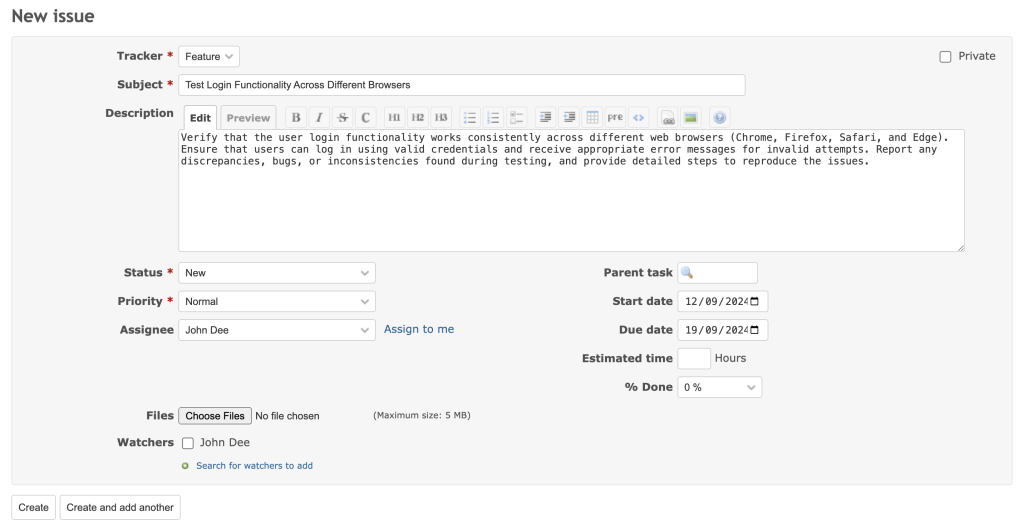
- Once you’ve entered all the details, click Create to save the issue.
Track issue progress
Once issues are created and assigned, track their progress to ensure tasks are moving forward and deadlines are met:
- Using the Gantt chart and calendar. The Gantt and Calendar views visually represent your project’s timeline. Use Gantt to see the project timeline, adjust task durations, or manage dependencies between tasks. Meanwhile, the Calendar is handy when you need a simpler, date-focused view of upcoming tasks and milestones.
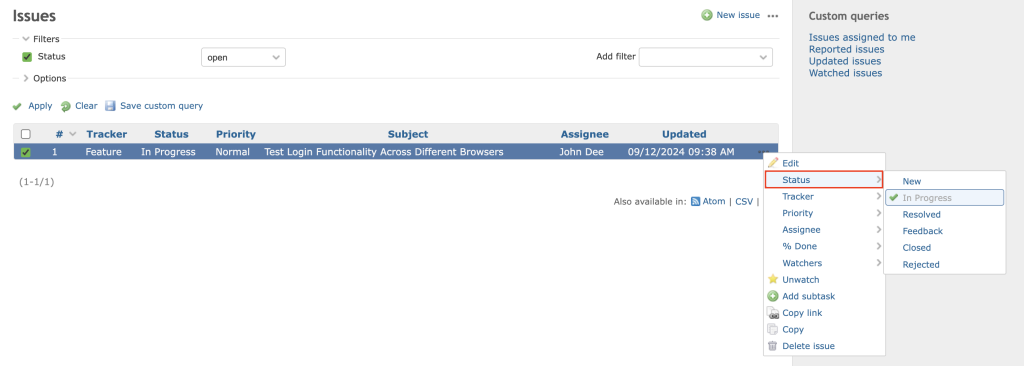
- Updating issue statuses. When you create an issue, its status will be set to New. As work progresses, update the status to reflect its current state, such as In Progress, Resolved, or Closed. You can do this via Issues → three-dot horizontal icon → Status.
Use filters and reports to manage tasks
Redmine offers powerful filtering and reporting tools to help you manage tasks more efficiently:
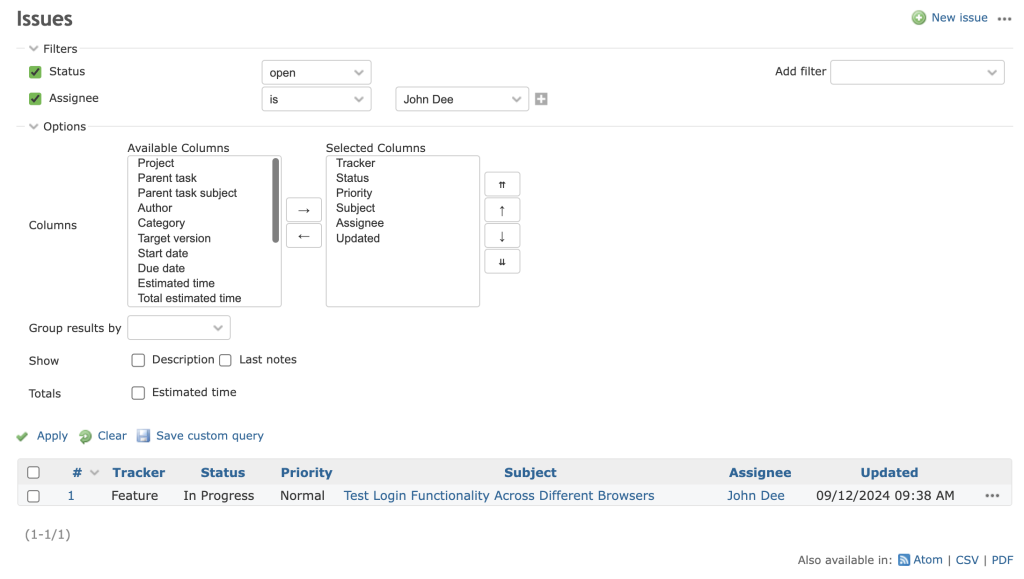
- Customizing issue filters. You can create custom filters to sort and search for issues based on specific criteria, such as Priority, Status, Assignee, or Due date. In the Issues tab, click Add filter and select your desired criteria. Expand the Options section to narrow down the results. Click Save custom query to store your custom filter for future use.
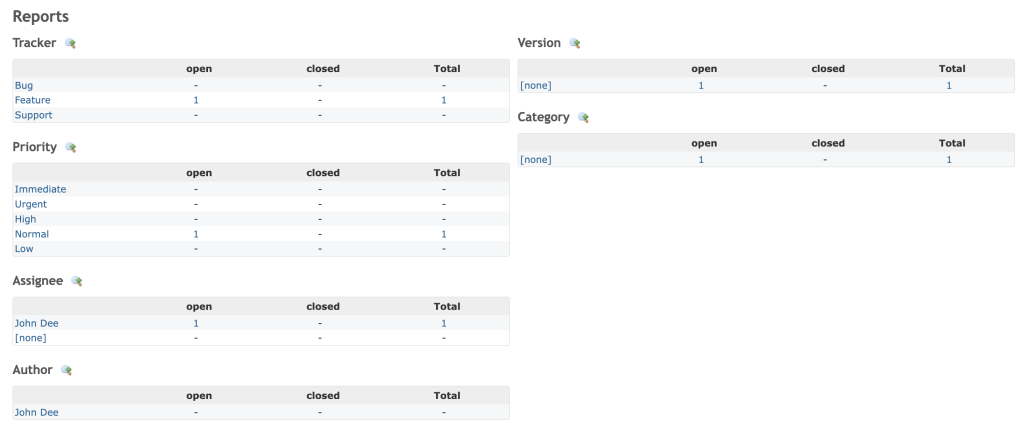
- Generating task reports. Task reports summarize the current state of issues within a project. You can generate these reports based on various criteria, such as the number of resolved issues, time entries, or issues assigned to specific users. To create a report, go to Overview → Summary.
7. Using collaboration and communication tools
Using communication and collaboration tools in Redmine can boost team engagement and keep everyone informed about project updates.
Use Redmine’s built-in collaboration modules
Redmine comes with several built-in modules for team interaction:
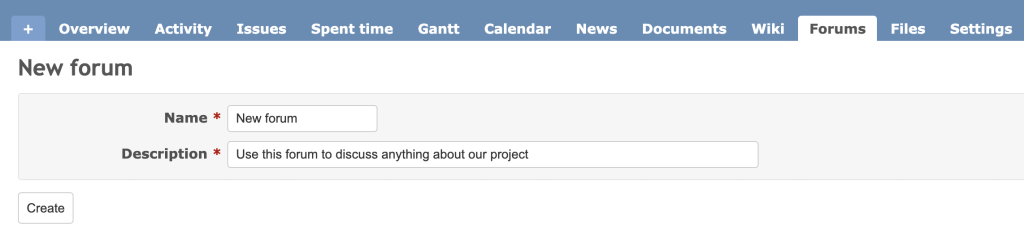
- Forums. Facilitate discussions among team members by creating forums for specific topics or project areas.
- Wikis. Create collaborative documentation that team members can edit to share knowledge, SOPs, or project-related information.
- News. Share important updates, announcements, and project-related news with your team.
- Documents. Upload and organize documents directly within a project for easy access and reference.
To activate these modules, select your desired project and go to the Settings tab. Check the modules you want to enable and click Save.
Specifically for Forums, after activating the module, go to Forums → New forum and enter a name and description to create a new discussion space.
Set up and manage email notifications
Email notifications keep team members up-to-date with new issues, updates, and changes within your projects. Before configuring email settings in Redmine, you need to set up a mail server. Here are the steps:
- Log in to your VPS and install Postfix:
sudo apt install postfix
During installation, select Internet Site when prompted, and enter your System mail name, which should be your domain name.
- Open the /etc/redmine/default/configuration.yml file using nano and add the following lines under the production environment:
production:

email_delivery:

delivery_method: :sendmail
- Save the file and restart Apache to apply the configuration:
sudo service apache2 restart
After setting up the mail server, go to Administration → Settings → Email notifications in your Redmine instance and check the settings. Send a test email to ensure everything is configured correctly.
8. Installing additional plugins
Plugins let you tailor Redmine to your team’s needs by adding extra features or integrating external tools. This customization enables more efficient project management and collaboration.
Find and choose plugins
The official Redmine plugins directory is the best place to find various plugins. You can explore categories such as the latest releases or top-rated selections. Each plugin has a description, version compatibility, installation guide, and user ratings and reviews to help you decide.
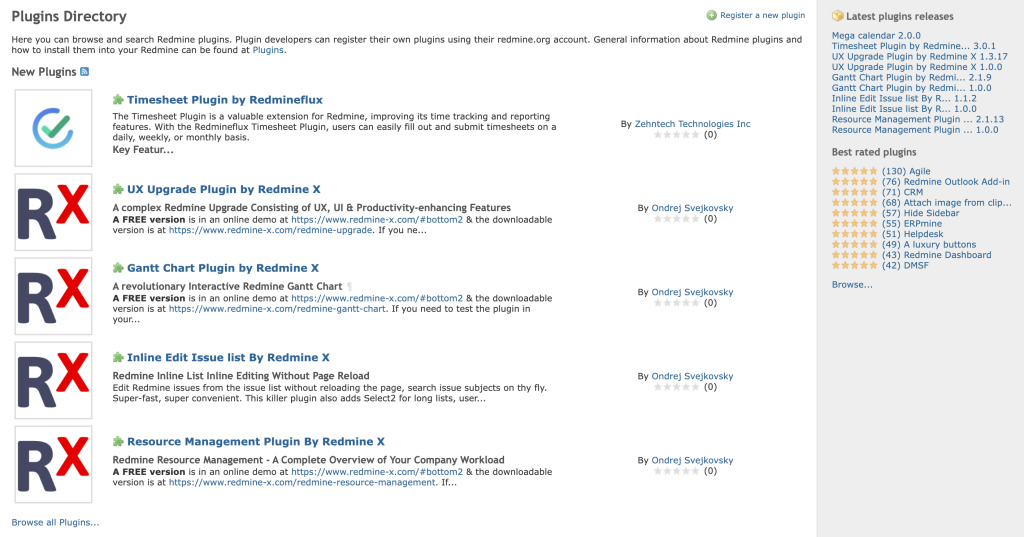
Here are some popular plugins to install:
- Redmine Messenger. Integrates with chat tools like Slack or Discord to send notifications about project updates.
- Agile. Adds project management features like Kanban boards and Scrum charts to help visualize workflows.
- CRM. Provides customer relationship management tools within Redmine to track leads and interactions.
- Helpdesk. Transforms Redmine into a helpdesk tool to manage customer support tickets directly within projects.
Install and configure a Redmine plugin
Installing plugins in Redmine typically involves downloading the plugin, placing it in the correct directory, and configuring it within the Redmine interface. Here’s a guide for the Microsoft Teams chat plugin as an example:
- Access the Redmine plugins directory and clone the plugin from its official GitHub repository:
cd /path/to/redmine/plugins

git clone https://github.com/wellbia/redmine_microsoftteams.git
- Go back to the Redmine root directory to install the plugin and any necessary dependencies:
cd /path/to/redmine

bundle install
- Restart the web server to load the new plugin:
sudo service apache2 restart
- Create a new Microsoft Teams Incoming Webhook for Redmine. Once done, copy the provided webhook URL, which will look something like this:
https://outlook.office.com/webhook/your-webhook-url
- In your Redmine interface, go to Administration → Plugins. You should see the Redmine Microsoft Teams Chat plugin listed. Click Configure to open the plugin settings and paste the webhook URL you copied earlier.
- Specify the Microsoft Teams channel where notifications will be sent.
- Choose which events, such as new issues, status updates, or comments, should trigger notifications in Microsoft Teams.
- Create an issue or update an existing one to test the Microsoft Teams integration. Verify that the notifications are correctly sent to the designated channel.
Conclusion
Redmine is a versatile platform you can customize to suit your team’s unique needs. From managing user roles and permissions to handling issues and tasks and integrating collaboration modules, this comprehensive Redmine guide has helped you set up efficient project workflows.
To fully leverage Redmine’s potential, continue exploring its extensive features and consider installing third-party plugins, which provide additional functionality for your instance. With the proper setup, Redmine can help streamline your project management tasks and significantly improve team efficiency.
Redmine tutorial FAQ
What is Redmine and what can it be used for?
Redmine is an open-source project management tool that helps teams manage projects, track issues, and collaborate efficiently. It supports multiple projects and custom workflows and integrates with various tools for enhanced productivity.
What are the key features of Redmine?
Redmine provides features like issue tracking, Gantt charts, calendars, time tracking, customizable workflows, role-based access control, and plugin support. It allows teams to collaborate, manage tasks, and monitor project progress efficiently.
How do I create a new project in Redmine?
To create a new project in Redmine, go to Projects in the top menu, hit New project, fill in the project details like name and description, set a unique identifier, select modules, and click Create.
How can I generate reports and track progress using Redmine?
Use custom filters, Gantt charts, and calendars to generate reports and track progress in Redmine. These tools visualize timelines, monitor issue statuses, and create summaries to monitor project performance.

Ariffud is a Technical Content Writer with an educational background in Informatics. He has extensive expertise in Linux and VPS, authoring over 200 articles on server management and web development. Follow him on LinkedIn.