How to configure n8n queue mode on VPS?
As your n8n automation workflows grow in complexity, running them efficiently can become a challenge. Running everything on a single process can lead to slow execution times, unnecessary system strain, or even cause your automation to fail.
The solution for this problem is n8n queue mode. It introduces a job queue that distributes your tasks across multiple worker processes rather than running everything in one place. This allows your workflows to run independently, improving the performance and scalability of your automation.
In this guide, we’ll walk you through the step-by-step process of setting up queue mode on a Hostinger VPS. By the end of this guide, you’ll be able to make your n8n automation ecosystem more reliable and scalable.
How does queue mode work?
By default, n8n operates within a single-threaded main process where all of its tasks are handled sequentially. This works well for low-volume automations, but can lead to bottlenecks when your workloads increase.
Queue mode effectively splits your entire n8n back end into three distinct areas:
- Management segment – this is responsible for the visual interface, configuring the workflows and managing all your triggers.
- Storage segment – this is where all your data, such as tasks, workflows, credentials, and logs are stored. Where it differs from a standard n8n setup is that it incorporates Redis, a key-value database, to act as a message broker.
- Worker segment – this is where all the automation logic happens and your automation steps are executed in parallel.
Here’s how it looks visually:
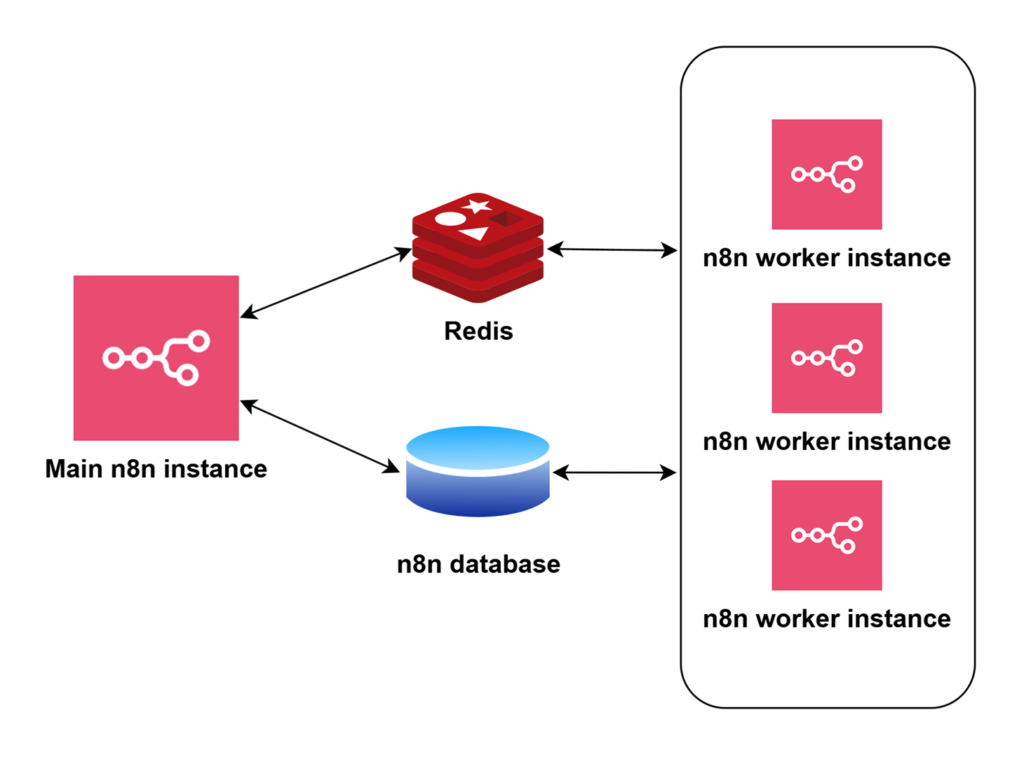
| Service | Role |
| Main n8n instance | Handles the visual interface, workflow configurations, and their triggers |
| Redis | Acts as the message broker for the job queue |
| n8n database | Stores workflow execution data such as logs and results |
| n8n worker instances | Picks up pending jobs from Redis and executes the automation steps |
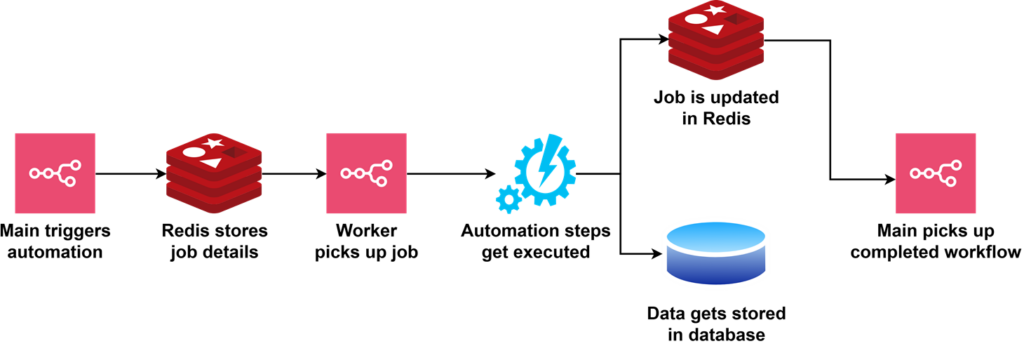
This is how the general process flow looks in queue mode:
To help put this into perspective, we can compare this setup to other popular work orchestration platforms:
- Kubernetes manages infrastructure in an inherently similar way, by creating pods that are managed by a control plane, while individual containers handle application workloads.
- Batch jobs in popular cloud service providers operate exactly as n8n’s queue mode does, with a job queue that gets picked up asynchronously by other solutions.
- Load balancers operate in a similar fashion, distributing traffic to multiple duplicate instances for parallel execution.
At its core, it’s a very simple way of scaling your automation capabilities. To enable more automation runs at the same time, you execute more automation processes. Queue mode acts as a load balancer for the distribution of that workflow.
Prerequisites
To host n8n in queue mode with Redis, your minimum system specifications are:
- 1 vCPU, 2 vCPUs recommended
- 1 GB of memory, 2 GB of memory recommended
You’ll also need:
- Docker, or Node.js with npm installed on your VPS.
- Basic Linux command knowledge and familiarity with the terminal.
- You will need to be comfortable with editing configuration files.
While you can run queue mode with the SQLite database that is installed and used by default, we recommend installing PostgreSQL instead, as outlined later in this guide.
n8n and Redis are not compute-intensive, so memory is the primary consideration here. A Hostinger KVM 2 VPS with Ubuntu is a comfortable choice for a basic n8n queue mode setup, fitting in:
- The n8n main process
- Redis cluster
- PostgreSQL database
- Three n8n worker processes
This should handle small-medium workflow setups very comfortably and give you plenty of headroom to scale.

Configuring queue mode in n8n
In this tutorial, we will implement n8n queue mode on a single VPS KVM 2 instance running Ubuntu 24.04, with n8n installed manually via Docker. This is the recommended approach as it’s the easiest to implement and scale.
1. Prepare a Redis container
n8n’s queue mode depends on Redis as a message broker to manage job queues, making it a critical component in this setup. To prepare a Redis container on your n8n instance, follow these steps:
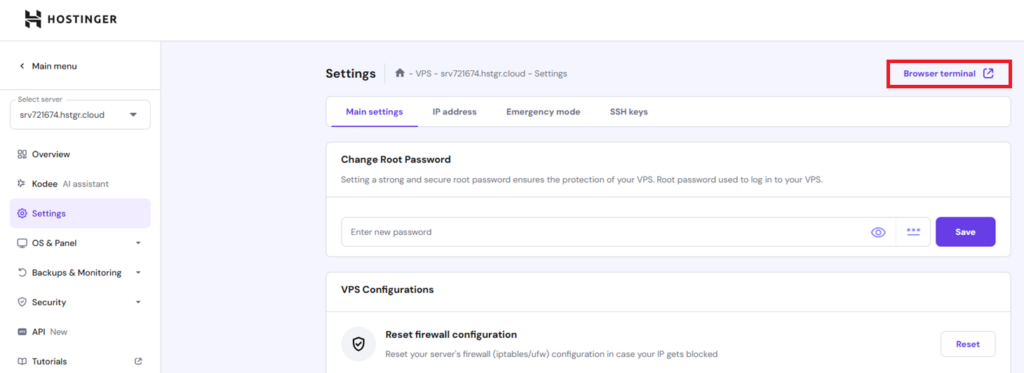
- Log in to hPanel.
- Navigate to VPS and press Manage on your instance.

- Click Settings → Browser terminal.
- Create a directory where Redis will store persistent data:
mkdir -p ~/redis-data
- Create a directory to store your working files.
mkdir ~/n8n-queue-modecd ~/n8n-queue-mode
- Create the docker-compose.yml file:
sudo nano docker-compose.yml
- In it, paste the YAML configuration for a Redis 6 container:
version: "3.7"
services:  redis:    image: redis:6    container_name: redis    restart: always    volumes:      - ~/redis-data:/data
- Save your changes by pressing Ctrl + X → Y → Enter.
Now that Redis is prepared and ready, you may want to add extra configuration to your Redis instance, such as a password. To do so, you can follow configuration steps outlined in our Redis installation guide.
However, since we are using a Redis container, you would also need to add a custom redis.conf file to store your settings and mount it as a volume & command.
For example, if you added redis.conf in the ~/redis-conf directory, you would need to add the following lines to your docker-compose.yml:
volumes: - ~/redis-conf/redis.conf:/usr/local/etc/redis/redis.conf command: ["redis-server", "/usr/local/etc/redis/redis.conf"]
2. Configure environment variables
Now that you have Redis prepared, you need to configure the necessary variables to enable queue mode. In our scenario, we have a n8n instance already set up with nginx. Next, we will move it to a containerized environment.
Here are the key variables you need to set:
| Variable | Purpose |
| EXECUTIONS_MODE=queue | Sets the queue mode execution method |
| QUEUE_BULL_REDIS_HOST=redis | Hostname of the Redis instance. Since we’re using containerized Redis, the value will be redis |
| QUEUE_BULL_REDIS_PORT=6379 | Port Redis is listening on (6379 by default) |
| N8N_RUNNERS_ENABLED=true | Toggles task runners. |
| OFFLOAD_MANUAL_EXECUTIONS_TO_WORKERS=true | Ensures that manual workflow executions also get sent to workers |
Some other important variables include:
| Variable | Purpose |
| QUEUE_HEALTH_CHECK_ACTIVE=true | Adds an internal health check to monitor the Redis connection |
| QUEUE_BULL_REDIS_PASSWORD | If you added a password to Redis, you also need to set it here |
Now that you know what the required settings are, let’s set them up.
- Move back to your working directory:
cd ~/n8n-queue-mode
- Create a .env file that will store your variables. If you’d like, you can rename it:
sudo nano .env
Store these values:
N8N_LOG_LEVEL=debugN8N_LOG_OUTPUT=console
N8N_BASIC_AUTH_ACTIVE=trueN8N_BASIC_AUTH_USER=<your_username>N8N_BASIC_AUTH_PASSWORD=<your_password>
N8N_HOST=srv721674.hstgr.cloudN8N_PORT=5678N8N_PROTOCOL=httpsWEBHOOK_URL=https://srv721674.hstgr.cloud/GENERIC_TIMEZONE=UTC
N8N_EXPRESS_TRUST_PROXY=trueN8N_SECURE_COOKIE=true
EXECUTIONS_MODE=queueQUEUE_BULL_REDIS_HOST=redisQUEUE_BULL_REDIS_PORT=6379N8N_RUNNERS_ENABLED=trueOFFLOAD_MANUAL_EXECUTIONS_TO_WORKERS=true
The extra queue mode values are highlighted in bold – if you have an existing environment file, you can add just the bold lines to your existing configuration.
Pro Tip
While the logging settings are optional, this will prove to be useful for checking the status of our containers, and for troubleshooting errors.
- Save your changes by pressing Ctrl + X → Y → Enter
3. Deploy the main n8n process
So far, you’ve defined all the environment variables needed for queue mode to work. Now, let’s define our n8n container for the main process:
- Open up docker-compose.yml by running:
sudo nano docker-compose.yml
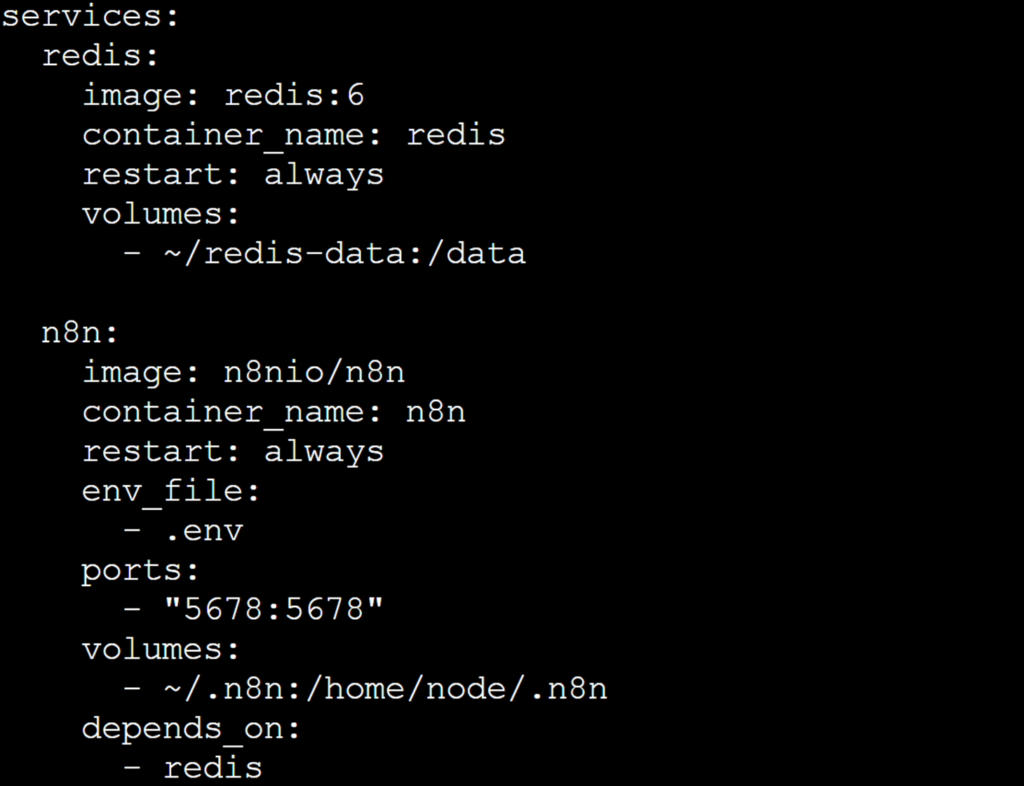
- Add the following code under services:
  n8n:
    image: n8nio/n8n
    container_name: n8n
    restart: always
    env_file:
      - .env
    ports:
      - "5678:5678"
    volumes:
      - ~/.n8n:/home/node/.n8n    depends_on:      - redis
- Save your changes by pressing Ctrl + X → Y → Enter
Your docker-compose.yml file should look something like this:
At this point, you can run your n8n process by executing:
docker compose up -d
Now you should be able to log in to your instance and see the same view you typically would. Let’s try running a simple workflow that executes a web request to Google:
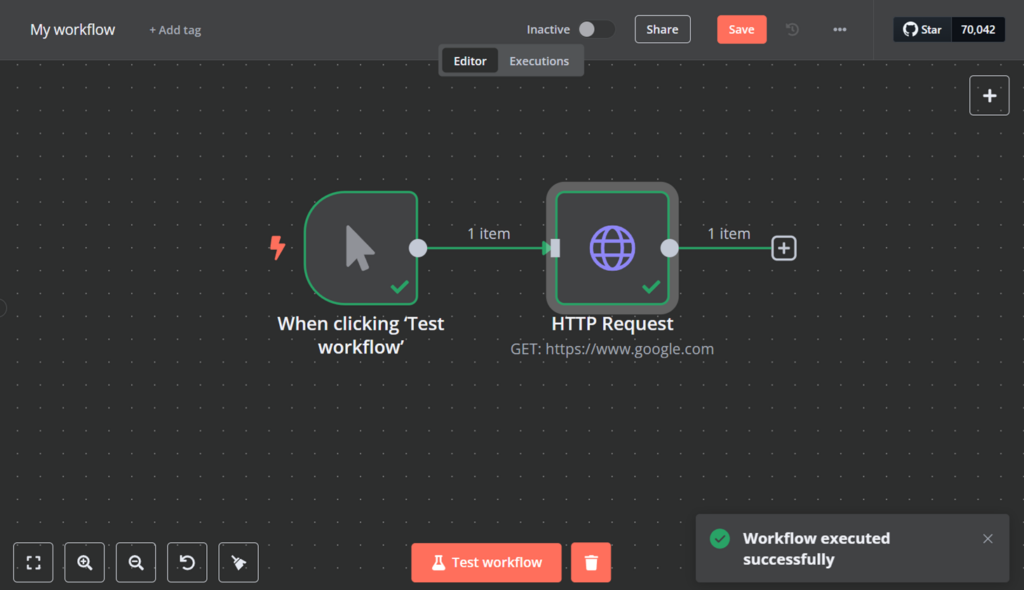
It should work, even though you have enabled queue mode and configured the main process to act as a queue orchestrator.
This is a failsafe mechanism in n8n: if you have no available workers to handle your executions, the main instance will pick up the work instead of orchestrating it to Redis.
In spite of all this configuration, you’re still not running n8n in queue mode. Let’s go ahead and change that by deploying some workers.
4. Deploy PostgreSQL database
With the main process configured, now let’s move to defining the PostgreSQL database. While it is optional, it’s recommended for production-level workloads that SQLite is simply not designed to handle. Luckily, getting a Postgres database ready is quick and easy:
- Open docker-compose.yml:
sudo nano docker-compose.yml
- Add the following content at the bottom:
postgres:
    image: postgres:15
    container_name: n8n-postgres
    restart: always
    environment:
      POSTGRES_USER: n8n
      POSTGRES_PASSWORD: <your_password>
      POSTGRES_DB: n8ndb
    volumes:
      - pgdata:/var/lib/postgresql/data

volumes:  pgdata:
- Save with Ctrl + X → Y → Enter.
- Open your .env file:
sudo nano .env
- Add the following Postgres database configuration details:
DB_TYPE=postgresdb
DB_POSTGRESDB_HOST=postgres
DB_POSTGRESDB_PORT=5432
DB_POSTGRESDB_DATABASE=n8ndb
DB_POSTGRESDB_USER=n8n
DB_POSTGRESDB_PASSWORD=<your_password>
- Save with Ctrl + X → Y → Enter.
Let’s try running it:
docker compose up -d
You can also check if the PostgreSQL database works by running:
docker exec -it n8n-postgres psql -U n8n -d n8ndb
\dt
Optionally, you can now delete SQLite:
rm ~/.n8n/database.sqlite
rm ~/.n8n/*.sqlite*
Important! In the event that the encryption key value is not set for your main instance, it will generate a fresh key upon config file recreation. To avoid this, we recommend setting N8N_ENCRYPTION_KEY in both environment files to ensure reliability.
5. Launch worker processes
Once n8n is in queue mode, it relies on dedicated worker processes to pull jobs from Redis. Let’s set up a worker process:
- First, you need to fetch the encryption key for the workers. You can set it yourself when creating a new n8n instance, or n8n will automatically generate one for you if not provided. Run:
cat ~/.n8n/config
Copy the encryptionKey value, as you will need to store it in your environment variables.
- Prepare a new environment file for the workers. While you can use one file for all n8n instances, separating them to a main and worker file is going to be easier to manage:
sudo nano .env.worker
- Insert the following configuration details:
N8N_LOG_LEVEL=debugN8N_LOG_OUTPUT=console
EXECUTIONS_MODE=queue
N8N_RUNNERS_ENABLED=true
OFFLOAD_MANUAL_EXECUTIONS_TO_WORKERS=trueN8N_ENCRYPTION_KEY=<your_encryption_key>

QUEUE_BULL_REDIS_HOST=redis
QUEUE_BULL_REDIS_PORT=6379

DB_TYPE=postgresdb
DB_POSTGRESDB_HOST=postgres
DB_POSTGRESDB_PORT=5432
DB_POSTGRESDB_DATABASE=n8ndb
DB_POSTGRESDB_USER=n8n
DB_POSTGRESDB_PASSWORD=<your_password>
- Save with Ctrl + X → Y → Enter.
- Open docker-compose.yml:
sudo nano docker-compose.yml
- Add this service just below the PostgreSQL service:
n8n-worker:
    image: n8nio/n8n
    restart: always
    command: worker
    env_file:
      - .env.worker
    depends_on:
      - redis
      - postgres
- Save with Ctrl + X → Y → Enter.
- Start the worker node:
docker compose up -d n8n-worker
Important! In the event that the encryption key value is not set for your main instance, it will generate a fresh key upon config file recreation. To avoid this, we recommend setting N8N_ENCRYPTION_KEY in both environment files to ensure reliability.
To get more workers running, run docker compose with the scale argument:
docker compose up -d --scale n8n-worker=3

6. Test the setup
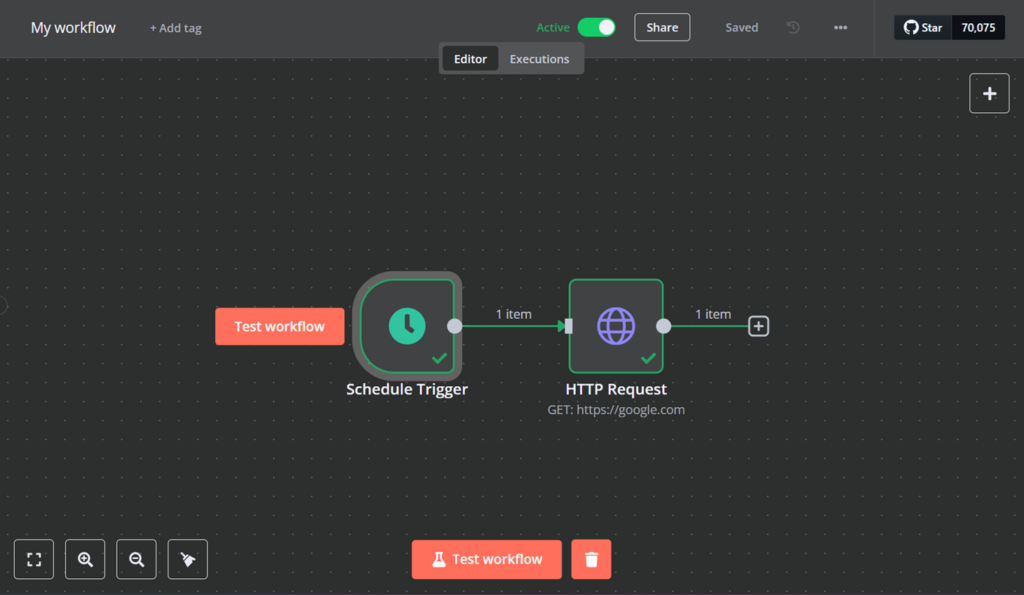
To test whether n8n queue mode is working, go ahead and run some test workflows, or put a workflow on a schedule. Here, we will use a simple active workflow running on a ten second interval:
After a few minutes, go back to your terminal and check n8n worker logs:
docker logs <worker name> -f
You should see something like this:

The key things to look out for are logs like Worker started execution <number>, which indicate that n8n is successfully pulling jobs from the message broker.
And that’s it – you have successfully configured n8n queue mode and it is now ready to tackle your workloads!
7. Monitor and scale
It’s important to maintain your n8n queue mode automation to keep it performant. Here are some things to look out for:
- Monitor your CPU and Memory metrics in hPanel, or with the htop command in the terminal.
- Run docker stats to check individual container performance.
- Use redis-cli commands like info memory or info stats to monitor Redis.
If you see that containers are struggling, it’s time to scale. You can do that by running docker compose up -d –scale service=number.
For what Hostinger’s KVM 2 VPS offers in hardware capacity, 2-3 workers should be a safe baseline, although you could get away with 5 or more depending on your automation usage.
If you start running into issues with infrastructure resources, here are some steps you may want to consider:
- Move Redis and PostgreSQL to a separate, dedicated VPS.
- Consider implementing an orchestrator like Kubernetes to dynamically scale n8n workers based on load instead of manual scaling.
- Scale up your infrastructure to meet your growing needs.
Conclusion
Running n8n in queue mode unlocks better scalability, stability, and control over your workflow executions. Separating job scheduling from execution and offloading work to dedicated worker processes reduces the risk of performance bottlenecks.
With this guide, you’ve configured queue mode, deployed workers, and learned how to monitor and scale your system on a Hostinger VPS. As your automation grows, you can scale horizontally by adding more workers or hosting Redis and PostgreSQL on separate servers.
Ready to take your automation further? Set up a more robust monitoring system, implement more complex orchestration solutions, and take n8n to its limits!
n8n queue mode FAQ
What is queue mode in n8n?
Queue mode is a n8n configuration that decouples workflow dispatching from execution by utilizing a job queue, typically backed by Redis. In this mode, the main instance enqueues workflow executions while dedicated worker processes retrieve and process the jobs asynchronously. This separation enhances scalability and stability in high-load and distributed environments.
How do I enable queue mode in n8n?
To enable queue mode in n8n, set the environment variable EXECUTIONS_MODE to queue in your configuration files for both the main instance and worker processes. Additionally, configure your Redis options for the queue and optionally set OFFLOAD_MANUAL_EXECUTIONS_TO_WORKERS and QUEUE_HEALTH_CHECK_ACTIVE to true.
What are the benefits of using queue mode in n8n?
Queue mode in n8n offers several benefits, including enhanced scalability and better resource utilization. By offloading workload execution to dedicated n8n workers, it prevents the main process from becoming a bottleneck. This is helpful for both error handling and enabling asynchronous processing in n8n, resulting in a faster and more stable system for high-demand environments.

Alanas is a Content Writer with a foundation in IT and Operations. His expertise spans cloud engineering, DevOps, and process definition and optimization, gained through his experience in fintech and data-driven organizations of various sizes. Outside of work, he enjoys traveling, exploring history, gaming, and spending quality time with his family. Find him on LinkedIn.