How to Redirect To Another Domain Without Losing Search Engine Ranking
A URL redirect is a server function that sends users from one URL to another, typically using HTTP status codes like 301 or 302 redirects.
Also known as domain forwarding, URL redirects help direct visitors to the correct website. It can also maintain search engine optimization (SEO), preventing duplicate content, and changes to site structure without impacting rankings.
We will guide you through the steps of setting up a URL redirect through your hosting provider and domain registrar settings, as well as using DNS and .htaccess files. You’ll also learn how to test and troubleshoot URL redirects using various redirect types.

What Is a URL Redirect?
A URL redirect points one URL to another. This method helps website owners direct visitors to the correct destination, even if they enter a different domain or URL. For example, if a user types googl.com, Google redirects them to google.com to ensure users reach the right site.
Prerequisites for Domain Redirection
You must meet the following requirements to set up a URL redirect:
- Access to domain settings ‒ you should be able to use the URL redirect tool and manage DNS settings in your hosting provider or domain registrar’s account.
- Website backup ‒ back up your website’s content and settings to prevent data loss.
- Email forwarding ‒ If your email is linked to the domain and you plan to redirect your web address, set up email forwarding to receive emails on the new domain.
- FTP or SSH access ‒ you need access to your website’s server configuration files to set up URL forwarding using the .htaccess file.
4 Ways to Redirect a Domain Name
This section will cover four domain redirection methods, starting with the easiest. Feel free to choose the one that works best for you.
From the Web Hosting Account
Most hosting providers allow users to set up redirects through domain settings. Here’s how to redirect a domain through Hostinger‘s hPanel:
- Navigate to the Websites page and click on the Manage button next to the website you want to redirect.

- Access Domains → Redirects on the left sidebar.
- Fill in the required information:
- Redirect – choose a domain you want to redirect.
- /path – if needed, specify a custom path to redirect.
- Redirect to URL or IP – pick your preferred type of destination.
- Redirect to – enter the destination for the domain redirect.
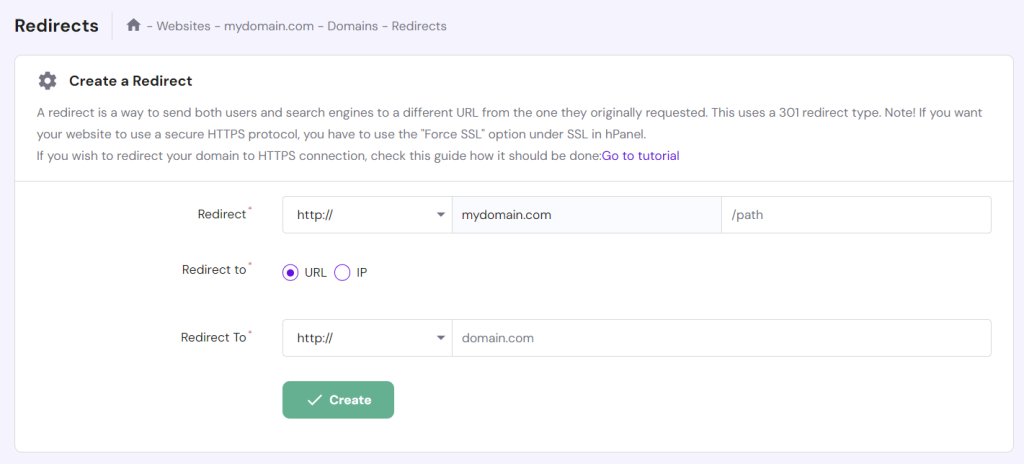
- Hit Create once you’re done.

From the Domain Registrar Account
If you don’t have a hosting plan, Hostinger provides a forwarding feature for domain-only accounts. Like domain redirection, domain forwarding automatically redirects traffic from one domain to another.
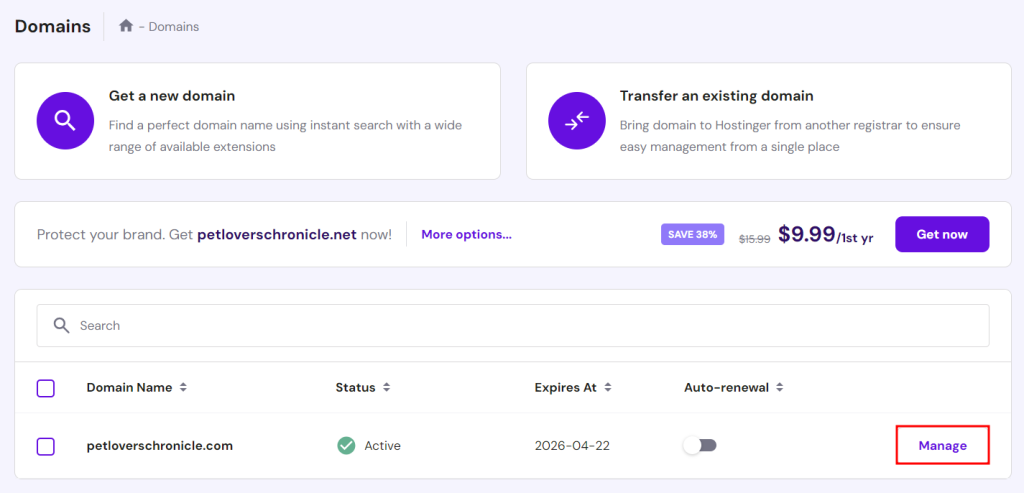
Here’s how to set up domain forwarding from a Hostinger domain registrar account:
- On hPanel, go to the Domains page and select Manage next to the domain you want to redirect.
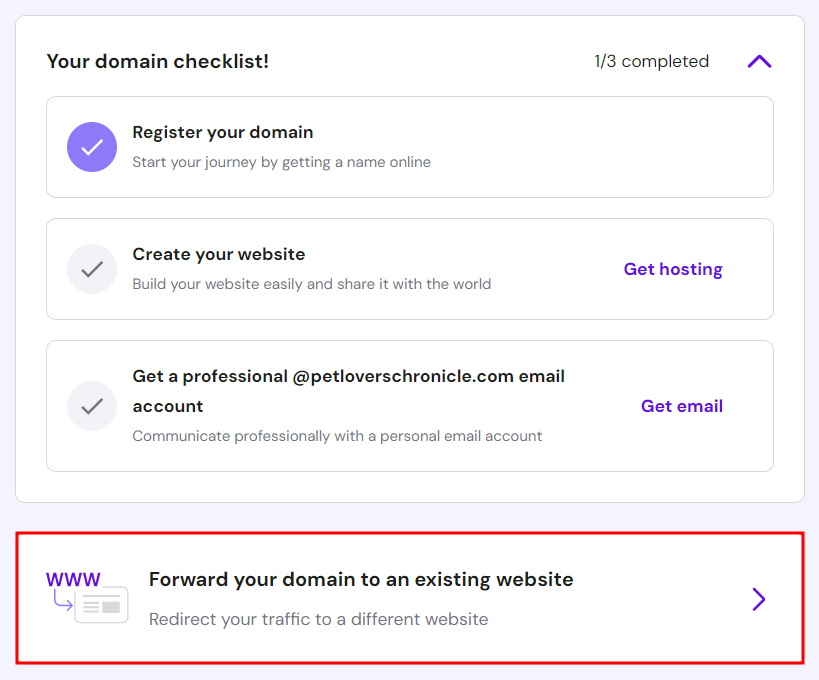
- In the Domain Overview section, scroll down and select Forward your domain to an existing website.
- Enter the destination URL within the Forwarding tab.
- Hostinger defaults to 302 Temporary Redirect. Click Advanced options and choose Permanent (301) to configure a permanent redirect.
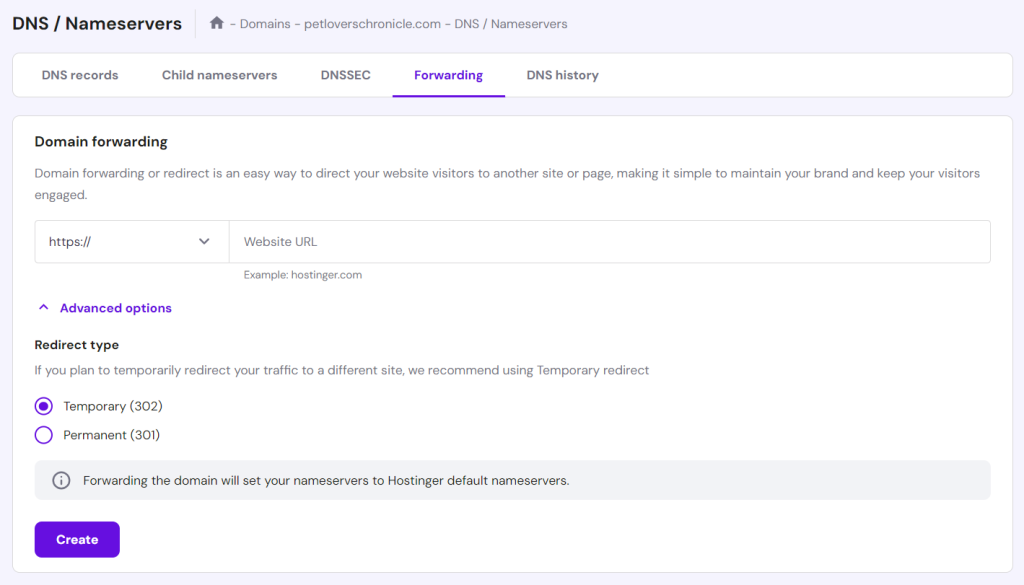
- Hit Create once you’re done.
Using DNS Records
The domain name system (DNS) translates domain names into IP addresses. When a user enters a domain name into their browser, the DNS system finds the matching IP address for that domain and directs the user to that website.
To redirect domains with DNS records, create CNAME or A records linking the old domain to the new destination’s domain or IP address.
Here’s how to do it using a Hostinger account:
- On hPanel, navigate to the Websites page and click on the Manage button next to the website you want to redirect.
- Access Advanced → DNS Zone Editor on the left sidebar.
- Fill in the new DNS record in the Manage DNS records section:
- Type ‒ pick CNAME from the drop-down menu.
- Name (host) ‒ enter @, which represents your old domain name.
- Points to ‒ add the destination web address.
- TTL ‒ keep the default TTL value at 14400 seconds.

- Select Add Record to save the settings.
- Scroll down to the list of DNS records and Remove any conflicting records set for the same @ host.
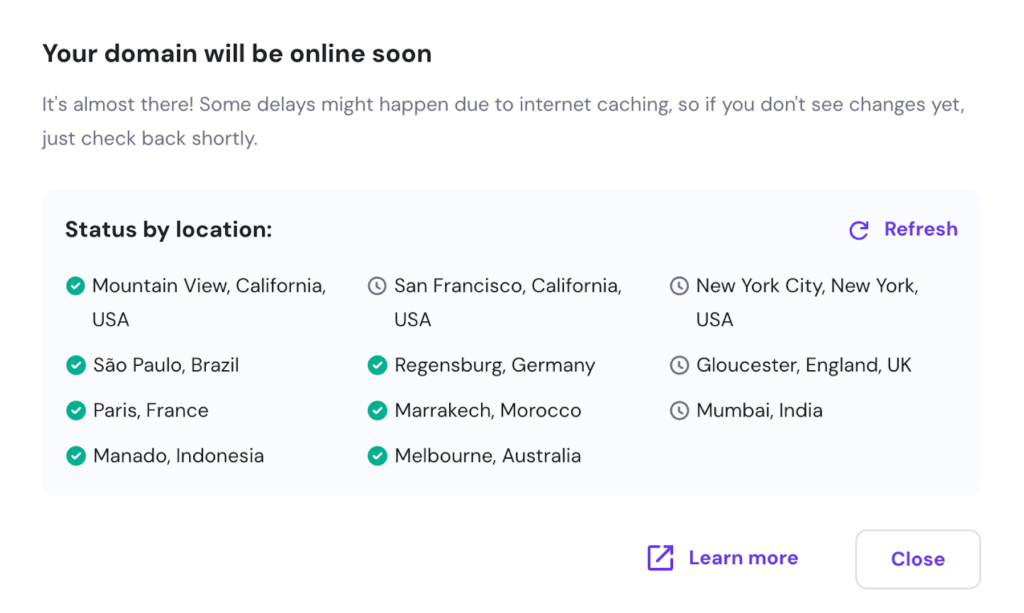
DNS propagation takes up to 24 hours to complete. Once it’s done, the old domain will redirect visitors to the new web address. You can monitor your propagation status by location for domains using Hostinger nameservers.
Modifying the .htaccess File
This method works best for configuring advanced redirects. It lets you implement complex redirect rules and manage multiple redirects, giving you more control over your website’s URL structure.
You can use a File Manager or FTP client to locate and modify the .htaccess file. In the following steps, we’ll explain how to do it hassle-free with Hostinger’s File Manager:
- Head to Files → File Manager from hPanel.
- Access files of the website linked to the domain you want to redirect.

- Enter the public_html directory and double-click the .htaccess file to modify it.

- Add the following redirect rules below the RewriteEngine On line to set up a 301 Permanent Redirect:
RewriteCond %{HTTP_HOST} ^mydomain.com [NC,OR]

RewriteRule ^(.*)$ https://targetdomain.com/$1 [L,R=301,NC]
Remember to replace mydomain.com and targetdomain.com with the correct web addresses.
To configure 302 Temporary Redirect, replace the R’s value with 302 instead.

- Hit Save once you’re done.
Testing and Troubleshooting Domain Redirects
After redirecting your domain, make sure it works properly by entering your old web address into different browsers and devices and checking whether it takes you to the new URL.
We also recommend testing your domain redirect with a redirect checker. You can look one up on search engines, such as Redirect Checker and Sitechecker, as most of them are free.

If the domain redirect doesn’t work, try the following troubleshooting tips:
- Check the redirect type ‒ clarify whether the redirect is intended to be permanent (301) or temporary (302). If you use the wrong redirect type, delete the old one and create a new redirect by following the steps above. Check the next section to learn the difference between the two types of redirects.
- Clear browser cache ‒ ensure you’re seeing the website’s latest version.
- Check DNS records ‒ if you changed your DNS record, make sure it has fully propagated using the DNS Checker.
- Look for typos and incorrect settings ‒ check whether the redirected URL matches the target URL.
If the error persists, contact your hosting provider or domain registrar for assistance. Hostinger’s Customer Success team is available 24/7 to assist you with any redirection issues.
Types of Domain Redirects
Domain redirect types vary based on duration and state, and they can impact your SEO score. Let’s explore each type to determine the best one for your needs.
301 Redirect
Also known as a permanent redirect, 301 redirect is commonly used when moving a website to a new domain. It passes on link equity and maintains links coming from other websites, allowing you to retain the old domain’s search ranking. This redirect type is also unmasked, meaning visitors will see the URL change in their browsers.
302 Redirect
A 302 redirect is a temporary redirection method often used in the short term for purposes like heavy website maintenance or A/B testing. Although it won’t pass on SEO value to the target URL, visitors will still see the URL change in their browsers.
Masked Redirect
A masked redirect or URL frame shows the destination content while retaining the original URL in the browser’s address bar. This redirection type creates the illusion that the content is on the original domain when it’s actually elsewhere.
Although many marketers use masked redirects for affiliate marketing or branding purposes, they can negatively impact SEO in the long run. Search engines might identify them as duplicate content, which can harm the destination domain’s SEO authority.
For these reasons, not all hosting providers and domain registrars support masked redirects. That said, you can edit the .htaccess file to set up a masked redirect manually.
Conclusion
Redirecting a domain or URL is a common practice to maintain user experience and SEO during website migration, rebranding, or restructuring. There are four ways to redirect one domain to another:
- Use the hosting provider’s domain redirect tool.
- Use the domain registrar’s forwarding feature.
- Modify the DNS records.
- Add redirection rules to the .htaccess file.
Choose the correct redirect type for your needs to achieve the best results for your website.
We hope this article helped you understand how to set up domain redirects without losing search engine rankings. If you have any questions, check out the FAQ section or leave a comment below.
How to Redirect a Domain FAQ
This section covers some of the most common questions about domain redirection.
Why Would I Need to Redirect a Domain?
Redirecting domains is a common practice during website rebranding or restructuring, domain consolidation, or protocol change. Redirects allow visitors to access the correct website, even if they enter the wrong web address or click on an outdated link. It also helps preserve SEO authority and prevent broken links.
Can I Redirect Multiple Domains to the Same Website?
Yes, you can redirect multiple domain names to the same website. You can also redirect each one to a specific page on the destination domain.
Is There Any Impact on SEO When Redirecting a Domain?
When done correctly, redirects preserve SEO authority by consolidating link value and preventing duplicate content. However, incorrect redirects can lead to 404 errors or redirect chains, which occur when there’s more than one redirect between the original URL and the destination page.


Comments
April 24 2017
Hello! Is the hostinger redirect is a 301 type? Thank you!
April 25 2017
Hello, Yep, that's correct. Of couse, you can use 302 redirect if you wish.
April 29 2020
Has the menu system changed? I don't see this menu.
April 30 2020
Hey, Stuart, in order to find this menu, go to your hPanel -> press Manage on the domain where you will be adding Redirects -> Scroll down a bit and you will find the Redirects option.
May 23 2021
Experiencing the same problem as Stuart, I can't see this menu at the end of the "Domain Overview" page or anywhere else
May 27 2021
Hi Alex, To find the menu, go to your hPanel -> press Manage (on the domain where you will be adding Redirects) -> Scroll down a bit and you will find the Redirects option.
July 28 2021
Where would I look to see if a meta refresh is set up? I've checked the site's header code and also the header.php file but I am stumped. The issue is that I have a domain redirected but I can't find where it's redirect is set up. Checked domain DNS (not set up), checked add on domain and cPanel redirects (also not setup), checked .htacess and index.php (not there) so now I am trying to see if a meta refresh is set up but I can't find that either. It seems possible though as it takes at least 4 seconds to wait for the redirect to happen. Thanks for any help
September 17 2021
Hi Tess, for meta refresh, check the section of your page using Inspect Tool. Additionally, make sure to look through parked domains section on your control panel and the database of your website to see if you can find the redirect. Good luck!
August 19 2021
When you redirect via your cpanel, does the old site have to remain active for a period of time until this redirect propagates to the internet, or does it happen immediately where you can take the old site down right away??
September 20 2021
Hi Dave! If you set the redirect well, the redirection from control panel should be immediate. However, if the old website goes down (e.g. domain expires, it's removed from a hosting plan, etc.), the redirect will disappear. This doesn't mean that you cannot remove the old website's files and associated data, you can surely do that as they're not reflected online anymore - just make sure to keep the domain name alive and added to your hosting plan :)
June 17 2022
How can I use redirect websites to get backlinks?
July 14 2022
Hey! If you wish to redirect website while maintaining the backlinks, you would need to use 301 redirect ?
June 25 2022
I want to use url frame redirection option how to do that
July 01 2022
If you wish for your website's content to be reflected on another domain without creating a redirect from one domain to another, you can simply park the domain. You can learn how to do it here! ?
June 11 2023
i've redirected my domain using the 301 redirect in the panel and when i access the root of the domain, it correctly bounces to the new url. but if i click on a previously indexed page from google, it gives a 404 instead of redirecting to the new domain. how do you fix it so that ALL URLs from the old domain are sent to the new domain? thanks!
September 02 2023
Hello. I'm trying to redirect not only the main domain but also all the pages under that domain. I tried using a path of "/*" to catch everything but it does not work. What can I use to establish a wildcard redirect?
September 08 2023
Hello there. I would highly suggest trying to set up the redirects via Cloudflare using their bulk redirects feature.
October 23 2023
I have several domains with you. Two domains have hosting packages and the third doesn't. One of my hosting packages allows subdomains. I set one up and uploaded a website to it. The subdomain site displays correctly. I've redirected the domain (the one without a hosting package) to the subdomain. Everything works great except I can't mask the redirected URL. When I set the redirect my only type options were 301 and 302. I need the URL FRAME type to mask the transfer URL. Remember there is no hosting attached to the domain so I can't mask with HTML code. So how do I mask the domain?
November 07 2023
Hi there! I apologize URL masking without hosting is not available in Hostinger. If you want to mask the URL, one possible solution is to consider purchasing a hosting package for the domain that you want to redirect. This will allow you to set up the necessary configurations and use HTML code to mask the URL ?