How to mod Valheim to enhance your gameplay
Valheim has already captured the hearts of 12 million players with its immersive gameplay, stunning visuals, and challenging adventures. And, thanks to the Valheim community, you can enrich your experience even further with mods.
Valheim’s modding community has grown enough that you can find plenty of cool mods to improve the UI, add new features, tweak game mechanics, and enhance the game’s visuals.
Some platforms offer more flexibility in accessing their files, making it easier to mod Valheim compared to others. In addition, most Valheim mods need to be installed on your PC, but some can only be set up on a dedicated server.
In this tutorial, we’ll use Nexus Mods, specifically Vortex Mod Manager, as an example of one of the most popular mod hubs and provide a few alternatives. We’ll also learn the different ways to install Valheim mods.
Prerequisites
To ensure stable gameplay, your machine must meet the following requirements:
- CPU. A modern multi-core processor such as Intel i5 or i7 or AMD equivalent.
- RAM. At least 4GB, but 8GB or more is recommended.
- Storage. Preferably an SSD with enough space for game files. In addition, around 10GB or more is recommended to accommodate future updates or additional mods.
- Software. BepInEx modding framework installed.
Note that running the game on the same computer that hosts the Valheim modded server and other apps can significantly impact your gaming experience.
Consider a dedicated Valheim VPS hosting plan for the best performance and convenience. These plans offer several advantages, including simple management, a user-friendly control panel, and instant setup.
By using a dedicated server, you can ensure that your Valheim experience remains smooth and uninterrupted. This allows you to focus on the adventure without worrying about technical hiccups.
If you want to learn how to set up a dedicated server for your game, read our article on setting up a Valheim server.

How to install mods on Valheim
While it’s entirely possible to manage and keep all your mods up to date manually, this can be time-consuming, especially if you plan to use multiple mods. Therefore, we highly strongly recommend using a mod manager instead.
Mod managers such as Vortex Mod Manager inform you when a newer mod version is available, and you can update it with a single click. You can also turn off mods without deleting the files, which can help with troubleshooting.
Important! The server and the computer on which you want to run your modded Valheim must meet the following BepInEx requirements.
Here’s a step-by-step guide to help you get started.
1. Install BepInEx
Before diving into modding Valheim, you need to install BepInEx, a popular modding framework essential for running Valheim mods. BepInEx provides the necessary tools and libraries for mod developers and ensures compatibility between different mods.
Follow these steps to install BepInEx and get started with modding your game.
Install BepInEx using a mod manager on Linux
- Go to the r2modman download page and select Manual Download.
- Extract the downloaded file.
- To install the mod manager, use the .AppImage release found in the extracted folder.
- Open the manager.
- To complete the setup process, follow the steps in the manager.
- In Mods → Online, search for BepInExPack Valheim.
- Click Download → Download with dependencies. The mod manager should now install all required dependencies, including BepInEx.
Install BepInEx manually
- From the BepInEx GitHub page, download the latest version of BepInEx for your operating system. For example, for Windows with 64-bit executables, download BepInEx_x64_x.zip.
- Extract the contents of the archive into the game installation folder. For example:
- Linux. Extract the appropriate ZIP file to the folder where Valheim.x86 or Valheim.x86_64 is located for both your computer and server.
- Windows (Microsoft Store). Extract to C:\XboxGames\Valheim\Content.
- Windows (Steam). Extract to C:\Program Files (x86)\Steam\steamapps\common\Valheim.
For more information, refer to the BepInEx configuration guide. If you encounter problems, go through troubleshooting.
Install BepInEx using a mod manager on Windows
- Go to the Vortex Mod Manager page and download the mod manager.
- Install Vortex and log in to your Nexus account. If you don’t already have an account, you can create a new one for free.
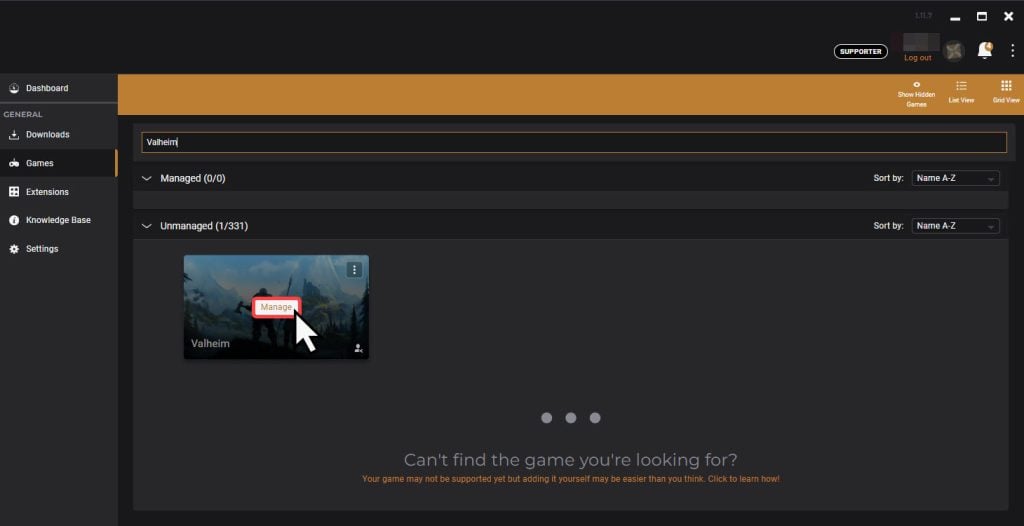
- In Vortex, click Games and search for Valheim.
- From the Unmanaged list, click Manage.
- In the popup, click Download. Vortex will install all required dependencies, including BepInEx, and restart afterward.
- If Vortex cannot detect Valheim’s installation folder, click Continue in the popup. Find Valheim’s installation folder and click Select Folder. BepInEx should now be installed and enabled.
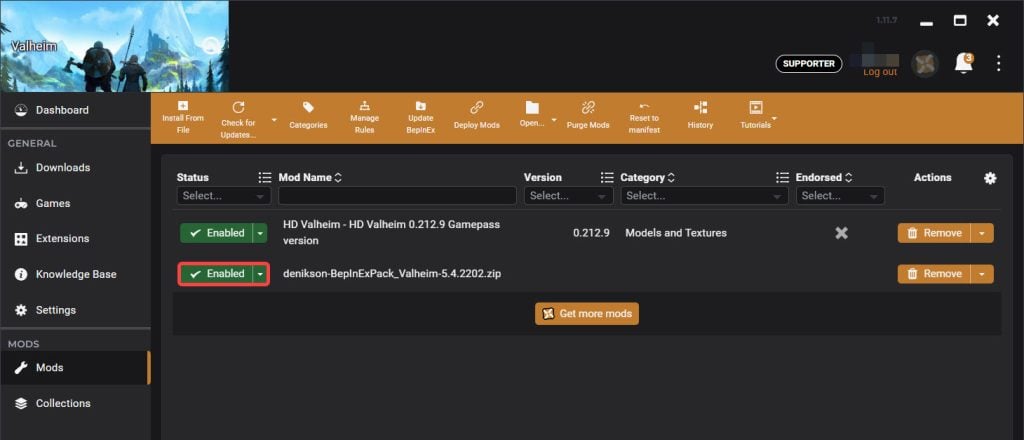
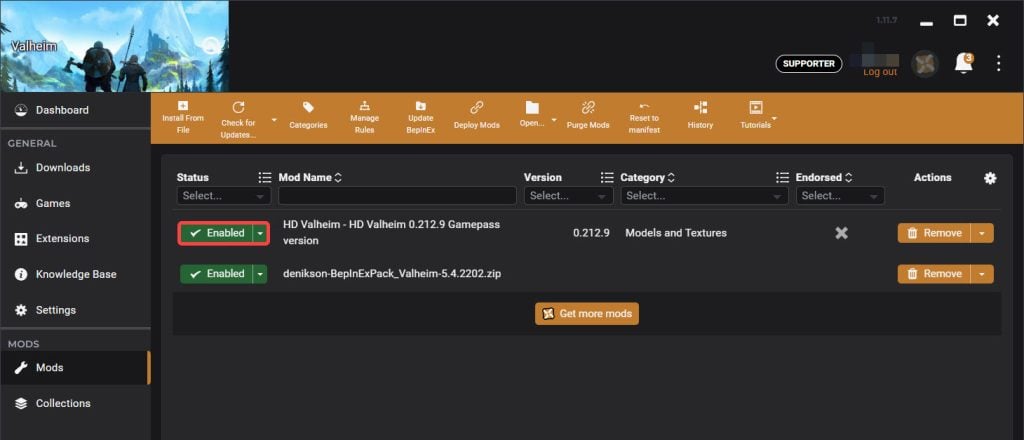
2. Find and download mods
Let’s learn how to find and download some Valheimmods:
Important! It’s important to review the documentation for each mod or test it to check whether it requires installation on servers only or both the server and the player’s computer.
- Go to the Nexus or Thunderstore mod sites to find your favorite mods.
- Depending on your installation method, select one of the following:
- For manual installation, select the manual download option. A ZIP file containing all mod files will be downloaded to your system.
- If you’re using a mod manager, select the mod manager download option. For example, on the Nexus page, select VORTEX.
- Confirm the download. For example, if you have a free account on the Nexus page, confirm the download by selecting SLOW DOWNLOAD.
- In the popup, select Open Vortex. Your mod should be automatically added and enabled in Vortex.
- If you downloaded the mod manually, extract its files to the BepInEx → plugins folder of your game installation directory. For example, extract the downloaded file to C:\XboxGames\Valheim\Content\BepInEx\plugins. Follow any additional instructions in the README file for further steps.
3. Install mods on your Valheim server
The simplest way to install mods on your Valheim server is to copy the files from the mod manager on your computer to your server.
- Stop your Valheim server.
- Copy your system’s required files and folders from your BepInEx → plugins folder.
- Access your server’s files using Hostinger’s File Manager or File Transfer Protocol (FTP) client.
- On your server, locate Valheim’s installation folder, then go to BepInEx → plugins folder.
- Paste the required mod files to the plugins folder on your server.
- Restart the server.
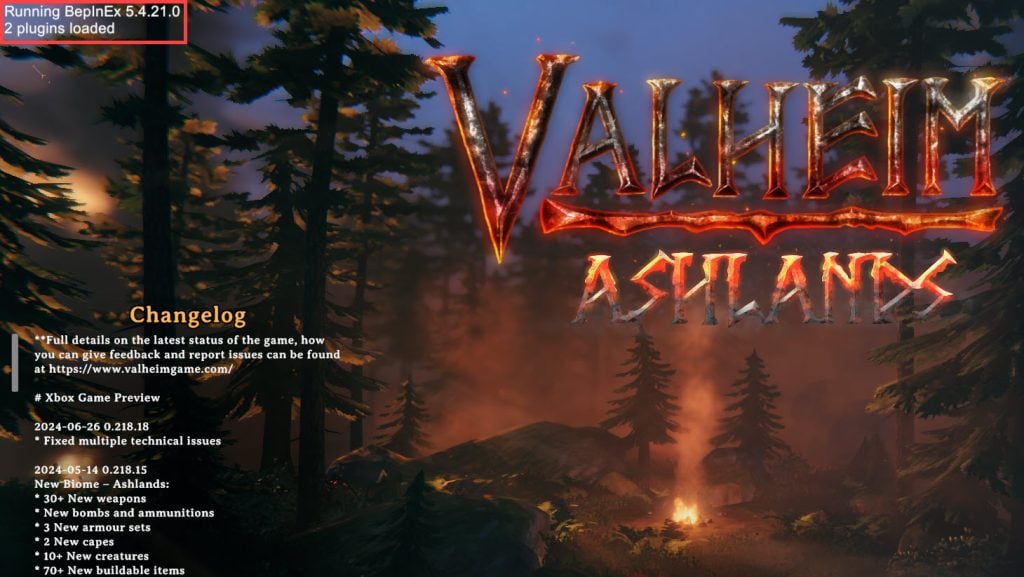
4. Test and verify the mod installation
- Start Valheim from your platform. If you’re using r2modman, click Start modded from the mod manager.
- In the top left corner of the main menu, confirm that BepInEx is running and that your mods are loaded correctly.
Maintaining and updating your modded Valheim server
While it’s not too difficult, maintaining a modded Valheim server involves a few steps to ensure optimal performance and a smooth gaming experience.
- Regular server maintenance. Keep the server software up to date. Monitor server load to address performance issues by setting up automated tools like Prometheus or Zabbix.
- Back up your server files. Before installing or updating any mods, back up your game and server files. If a mod causes unwanted changes, you can restore your unmodded copy from this backup.
- Manage mods. Use mod managers to stay on top of regular updates to your mods or prevent any unwanted conflicts. When using numerous mods simultaneously without a mod manager, read the mods’ documentation to check for compatibility issues.
- Warding bases and hubs. Consider using mods that enable wards to safeguard your well-earned structures. Ward mods can manage spawns and events within their protected area on the server, which is especially useful against players using harmful client-side mods that you can’t control otherwise. Better Wards is just one example.
- Admin privileges. Configure the adminlist.txt file to give selected players admin rights to help you control unruly players:
- Gather the Steam 64-bit ID of the players you want to add as admins.
- On your Valheim server, locate and open the root folder.
- Locate the adminlist.txt file.
- Edit the file to add each steamID64 in a separate line.
- Save the file and restart the server.
- Consider changing the game’s forwarding ports in your router if players find a way around your bans.
Keep in mind that Valheim modding allows players to join your server with mods that might disrupt the game for others.
Organize your community on platforms like Discord and clearly outline your guidelines regarding what is and isn’t allowed.
Conclusion
Valheim quickly became popular for its engaging gameplay loop and challenging difficulty. Initially, Valheim was created by just two people. As the community grew, players took the initiative to produce numerous game-enhancing mods.
Mods turn this already great game into an even better experience by updating its interface and adding new features like first-person mode, high-definition textures, and more.
Explore the libraries on Nexus or Thunderstore to experience the excitement of modded Valheim. Discover mods that match your preferences and learn how to enrich your Valheim adventure.
How to mod Valheim FAQ
In this section, we’ll cover the most frequently asked questions about Valheim mods.
Where can I find mods for Valheim?
Two of the most popular mod hubs for Valheim are Nexus Mods and Thunderstore. Both of them offer dedicated mod managers to help with mod installation and management. These tools make it easier to experiment with different mods by ensuring compatibility and simplifying the overall process.
Can I use multiple mods at once in Valheim?
Yes, you can use as many Valheim mods as you like. Check the mod documentation for compatibility issues with your other mods. Certain graphical improvement mods may increase the minimum requirements for the game and your dedicated server.
How do I uninstall mods from Valheim?
To uninstall Valheim mods, open the mod manager you used for installation and select the appropriate uninstall options for each mod. To manually uninstall Valheim mods, delete the required folders and associated files. Use the mod site you downloaded the mods from to confirm which folders and files to remove specifically.

Valentinas Čirba is a VPS Product Manager. His physics degree and 10+ years of experience in the software industry make him an expert in virtualization and cloud technologies. He is passionate about making complex things simple for end users. When he's not working, Valentinas likes to spend time with his family and friends. He also enjoys playing chess and doing crossword puzzles.