How to deploy a Django application on a VPS

Deploying a Django app is the final step in bringing your application from development to production, making it accessible to users worldwide. This process involves following best practices to ensure your app is secure, scalable, and performs optimally in a live environment.
In this article, we’ll guide you through the essential steps every Django developer should know to deploy their app to a VPS successfully.
Prerequisites
Before deploying your Django application, ensure you have a VPS with sufficient resources based on your projected load and traffic. Since determining the exact requirements is tricky, we recommend starting with a system with a lower hardware allocation and upgrading as needed.
Starting at $4.99/month, Hostinger Django hosting’s KVM 1 plan can be an excellent option. Its 1 vCPU core, 4 GB RAM, and 50 GB NVMe SSD storage should be enough for a small-scale website or application.
As your project grows, you can upgrade to up to KVM 8, which has 8 vCPU cores, 32 GB RAM, and 400 GB NVMe disk space. Hostinger VPS upgrade process only takes a few minutes, and our system will migrate all your data automatically to simplify the process.
In addition to reliable hardware, Hostinger VPS has various features that help streamline server setup and management. For example, you install Django on your server without commands by simply choosing the OS template.
This helps save time since before deploying your project, you must install Django, Python, and other essential software on your server. Check out our tutorial to learn how to install Django in 4 steps.
You can also access your server’s command-line interface via a web browser using Browser terminal, which will log you in as root automatically. Moreover, Kodee AI assistant lets you easily write commands or code using simple prompts.

How to deploy a Django application
To get your Django application live and accessible to users, we’ll guide you through the steps to set up your server and configure the necessary services.
1. Preparing the Django project for deployment
To begin, prepare your Django application so it will be ready for deployment. Start by turning off the debug mode, which is typically enabled during development for troubleshooting and debugging.
While useful during production, enabling this setting in the live environment can be risky since it can expose important details about your application to the public. To disable it, open settings.py and set the DEBUG parameter to False:
DEBUG = False
Next, sanitize your code by removing sensitive data from your application, such as API keys and other credentials. This prevents important information from becoming public after you upload the project to a repository.
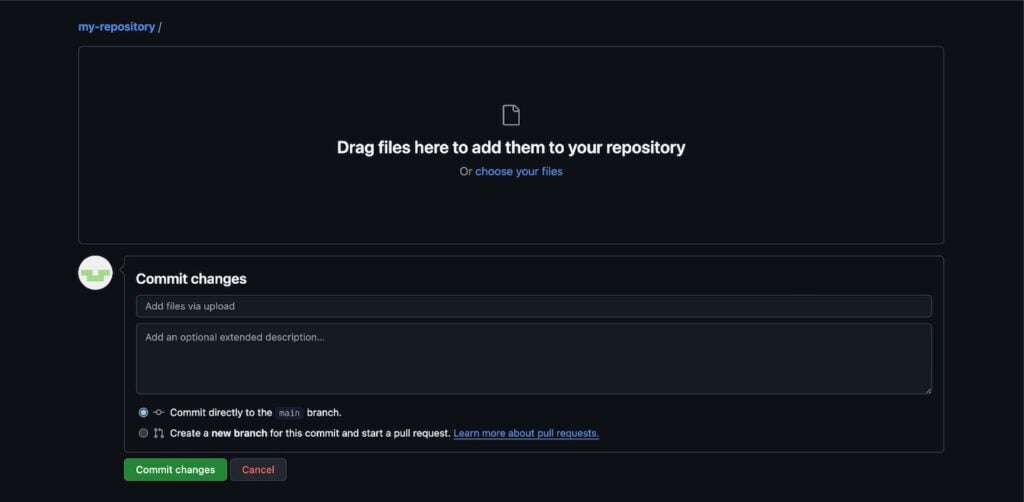
Now, upload all your project files to a Git repository. For this tutorial, we will use GitHub, but you can choose an alternative platform like GitLab.
If you haven’t created an account and a repository, check out our GitHub tutorial to learn how to do so. Once set, follow these steps to upload the project files:
- Navigate to the main page of your repository.
- Click the Add file button → Upload files.

- Select all the files and folders you want to upload.
- Add the commit message to inform other repo users about the new upload.
- Select the branch to which you want to upload the files. Since we are starting anew, choose the Main branch.
- Click Propose changes.

Alternatively, you can also upload new files to your GitHub repository by running commands in your integrated development environment (IDE) terminal. Check out GitHub’s documentation about adding files to learn more about it.
2. Setting up your server
Next, you need to prepare your VPS for deployment and download your code to it:
- Connect to your VPS via SSH. If you use Hostinger’s Browser terminal, skip this step since you will log in automatically:
ssh root@your_vps_ip
- Enter your root account’s password.
- Install the Nginx web server and Gunicorn application server:
sudo apt install nginx
sudo pip3 install gunicorn
- Retrieve code from GitHub. Remember to replace the URL with you actual repository address:
git clone https://github.com/your-repository/project-name.git
cd project-name
- Start a Python virtual environment and install dependencies:
python3 -m venv env_name
source env_name/bin/activate
pip3 install -r requirements.txt
- Run migrations and collect static files:
python manage.py migrate
python manage.py collectstatic
3. Setting up web servers
After configuring your VPS, follow these steps to set up the web and application server:
- Create a service file for the Gunicorn application server:
sudo nano /etc/systemd/system/gunicorn.service
- Add the following configuration. Make sure to enter your actual username and project directory path instead of your-username and /your/project/directory.
[Unit]
Description=gunicorn daemon
After=network.target

[Service]
User=your-username
Group=www-data
WorkingDirectory=/your/project/directory
ExecStart=/your/project/directory/env_name/bin/gunicorn --access-logfile - --workers 3 --bind unix:/your/project/directory.sock myproject.wsgi:application

[Install]
WantedBy=multi-user.target
- Start and enable Gunicorn:
sudo systemctl start gunicorn
sudo systemctl enable gunicorn
- Create a configuration file for your NGINX web server:
sudo nano /etc/nginx/sites-available/myproject
- Add the following configuration. Remember to replace /your/project/directory with the actual path:
server {
    listen 80;
    server_name yourdomain.com www.yourdomain.com;

    location / {
        proxy_pass http://unix:/your/project/directory/project-name.sock;
        proxy_set_header Host $host;
        proxy_set_header X-Real-IP $remote_addr;
        proxy_set_header X-Forwarded-For $proxy_add_x_forwarded_for;
        proxy_set_header X-Forwarded-Proto $scheme;
    }

    location /static/ {
        alias /your/project/directory/static/;
    }

    location /media/ {
        alias /your/project/directory/media/;
    }
}
4. Implementing environment variables
Environment variables enable you to call data in your application’s code without hard-coding them. In addition to simplifying modification, they allow you to store sensitive details like the API secret key in another location to improve security.
Since we created an environment variable called env_name in the previous step, we can set up the variables directly. If you haven’t set it up, run the following command:
python3 -m env env_name
Now, install Python dotenv so we can load environment variables into the application more easily:
pip install python-dotenv
Create a file called .env to store your project’s environment variables using this command:
sudo nano .env
Enter your environment variables in a key-value pair, which depends on the sensitive data you remove when sanitizing the code. For example, we’ll set two for a secret key and database URL:
SECRET_KEY=your_secret_key
DATABASE_URL=postgres://user:password@localhost:5432/dbname
Important! Since your .env file contains sensitive information, never commit it to the Git repository. Put it in .gitignore so Git will automatically exclude it.
Now, insert the variables into your project’s settings.py file. Your code might look like the following:
import os
from dotenv import load_dotenv

# Load environment variables from .env file
load_dotenv()

# Access environment variables
SECRET_KEY = os.getenv('SECRET_KEY', 'default_secret_key')
DATABASE_URL = os.getenv('DATABASE_URL')
5. Securing your Django application
After deploying your application, let’s safeguard it from cyber criminals. There are various security practices, but the most basic one is issuing an SSL certificate and enabling HTTP. To do so, run the following commands:
sudo apt install certbot python3-certbot-nginx
sudo certbot --nginx -d yourdomain.com -d www.yourdomain.com
6. Monitoring and troubleshooting post-deployment
After the deployment, it is crucial to monitor and troubleshoot your Django application to ensure it runs properly. Here are several important tasks to consider.
Enable logging
Logs give you details about all events that happened in your hosting environment, including errors, suspicious behaviors, or performance issues.
While you can use third-party tools, Django has a built-in framework that lets you easily enable logging. To use it, open your project’s settings.py file and add your configuration to the LOGGING dictionary.
You can change various settings, including where you want to output the log message. Read Django’s logging documentation to learn more about the configuration.
Track errors and handle exception
Automated error tracking enables you to respond quickly to exceptions in your application, preventing them from worsening and affecting more people. There are different ways to enable it, but a common one in Django is using Sentry.
Install it by running the following command:
pip install sentry-sdk
Then, add its configuration into your settings.py file. Your code might look as follows:
import sentry_sdk
from sentry_sdk.integrations.django import DjangoIntegration

sentry_sdk.init(
    dsn="https://your_sentry_dsn_here",
    integrations=[DjangoIntegration()],
)
Monitor performance and uptime
Actively monitor your server to identify potential performance issues or downtime. Although VPS hosting providers like Hostinger provide a built-in tool to track system usage, integrating a third-party tool makes the report more comprehensive.
There are various solutions for monitoring your server, but some of the most popular ones include New Relic and Datadog. Since the steps to set up these tools vary, check their documentation.
Importantly, set up automatic alerting in these tools so you get notifications when your server slows down or experiences downtime.
Conclusion
Deploying your Django project from your local development environment to your server is a crucial step in making your application accessible online. Before doing so, ensure the host has ample resources and has the framework installed.
Then, follow these steps to Deploy your Django application to your VPS:
- Prepare your Django application by changing sensitive settings and uploading it to your Git repository.
- Prepare your VPS by downloading the necessary web servers and cloning your project repository.
- Configure the NGINX and Gunicorn web servers so they can accept user requests.
- Set up environment variables to separate sensitive information from your application’s codebase.
- Issue an SSL certificate and enable HTTPS to secure your Django application.
- Monitor and troubleshoot your Django application using tools like Sentry and New Relic.
We hope this tutorial helped you deploy your Django application. If you need assistance, ask our Kodee AI assistant for a quick solution or leave us a comment below.
How to deploy Django app FAQ
What is the best way to manage dependencies in deployment?
The best way to manage dependencies in Django deployment is by using pip to install packages listed in a requirements.txt file. Generate it using pip freeze > requirements.txt, which records the exact versions of each dependency, ensuring consistency across environments. Use virtual environments to isolate dependencies per project.
Can I use Docker to deploy my Django app?
Yes, Docker is ideal for deploying Django apps by packaging the application and its dependencies in a consistent environment. Create a Dockerfile to define the app’s environment and a docker-compose.yml file to manage multi-container setups, such as the app server and database. This approach simplifies scaling and portability.
What monitoring tools can I use for my deployed Django app?
For monitoring a deployed Django app, consider tools like Prometheus and Grafana for real-time metrics, Sentry for error tracking, and New Relic or Datadog for full application performance monitoring. These tools help track performance, log errors, and visualize resource usage, improving app stability and user experience.


