How we built one of the most advanced LLM-based chat assistants: Lessons learned and tips
The best thing about artificial intelligence (AI) technology is that it can handle simple, monotonous tasks, while you can focus on more important projects.
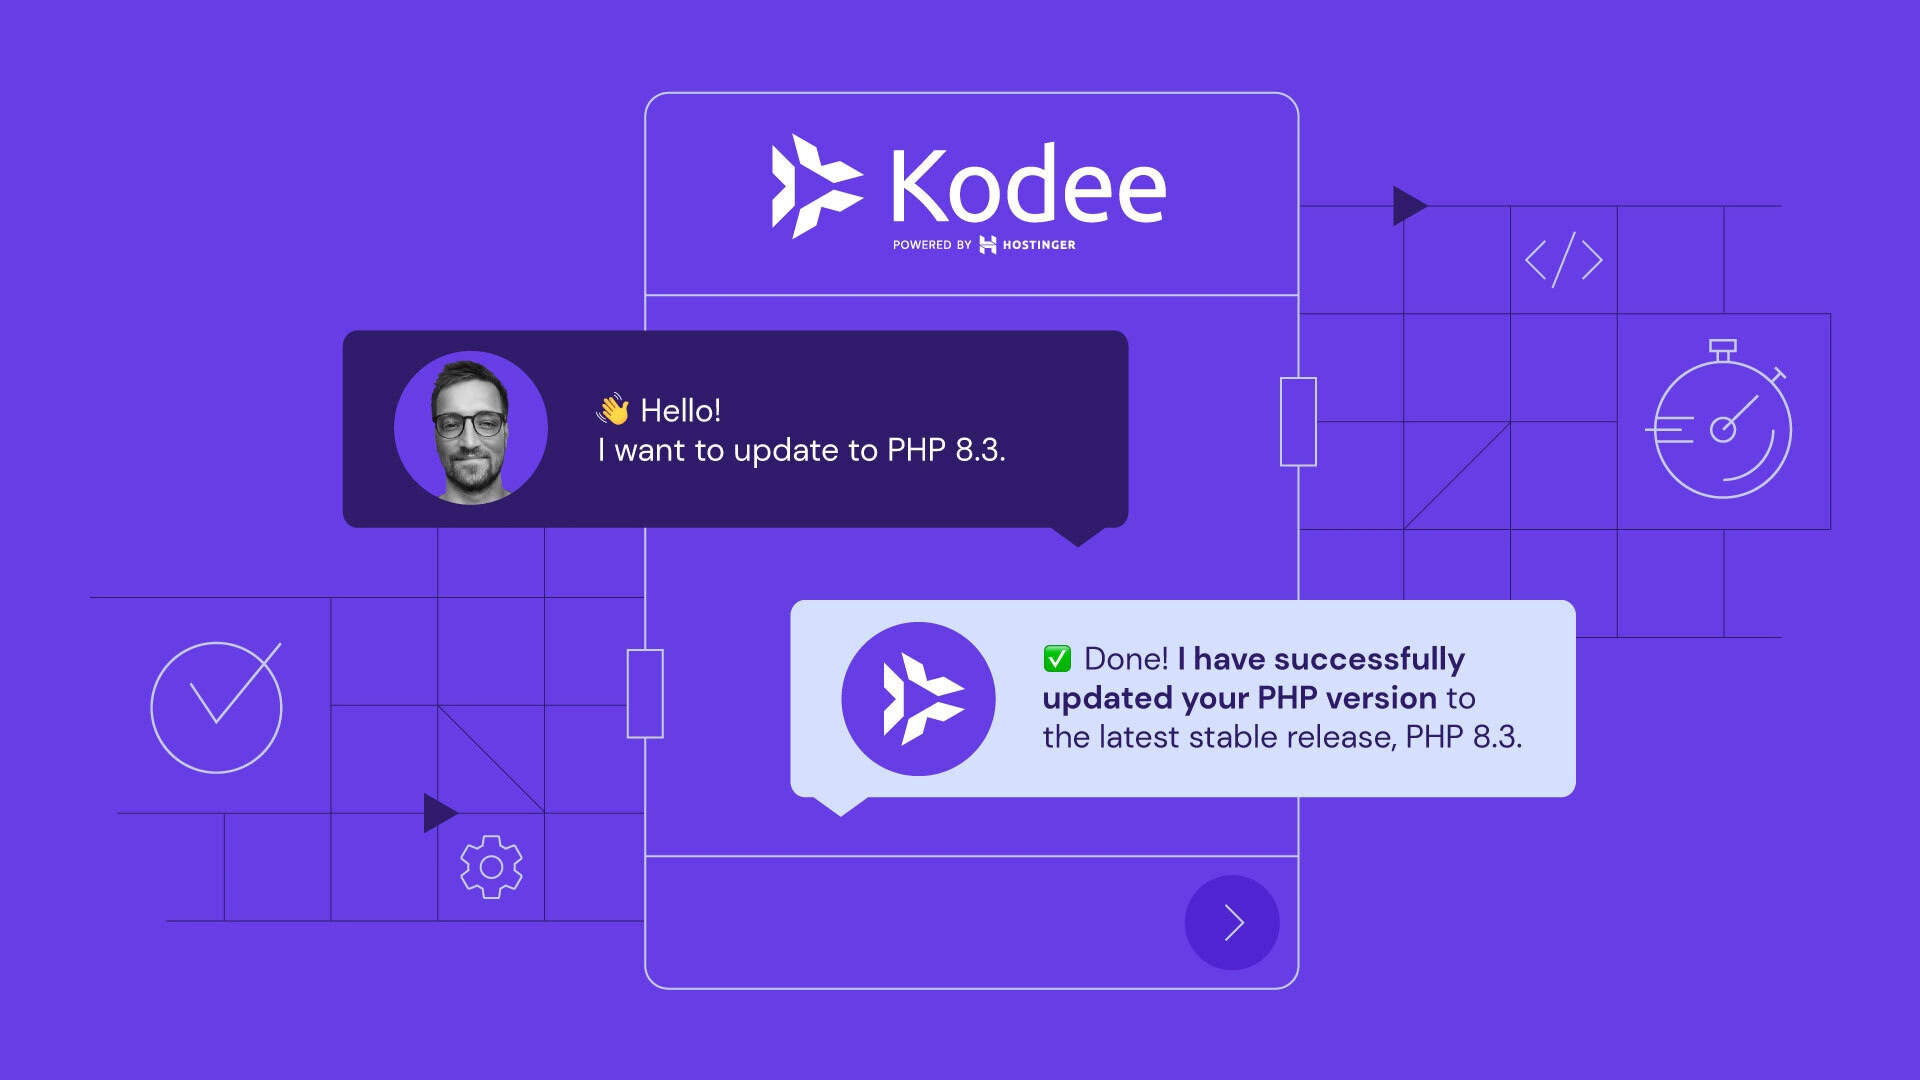
With this in mind, we started developing Kodee – our AI assistant that can deal with simple customer inquiries, enabling our agents to focus on more advanced issues.
Continue reading to find out how we integrated Kodee, a purely LLM-based AI assistant, into our Customer Success live chat support. If you’re thinking of doing it yourself, or if you’ve started but are struggling, this article is for you.
The first iteration with Rasa
Like many of you, we didn’t know where to start. So, we began with conducting market research.
We evaluated available solutions, their performance, and price. As some of our partners used Rasa, open-source conversational AI software for building text-and-voice-based assistants, we decided to give it a try.
Here’s how Rasa worked at that time (note that it is now more advanced):
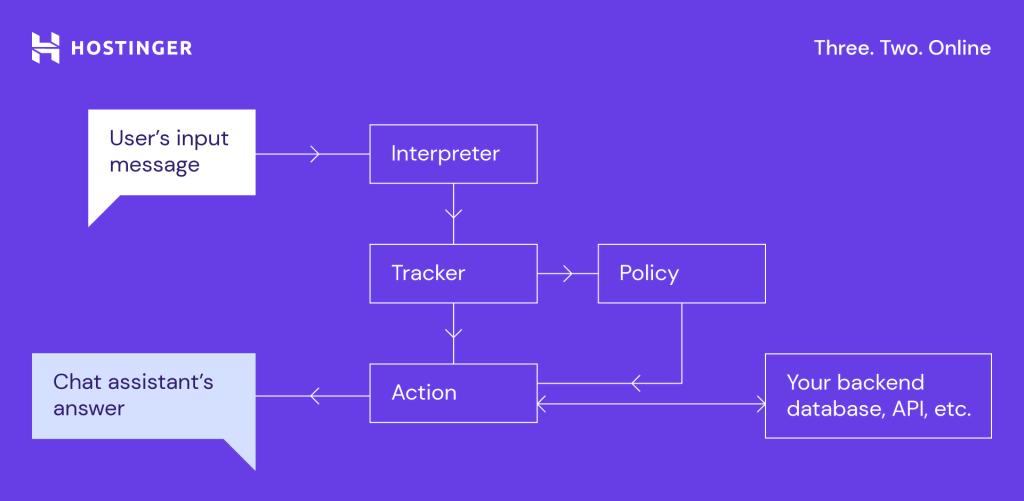
When a client writes a message, the interpreter – Natural Language Processor (NLP) – classifies it into some predefined intents.
As the tracker monitors the conversation, the policy uses this information to detect intent and execute the next predefined action. These include calling a function or writing a reply.
Rasa is a language framework based on rules and stories, so you need to describe the exact path the client will take and provide the tool with precise, specific instructions. If a client goes off script, Rasa won’t be able to answer properly. Instead, it will send the user a predefined fall-back message.
After analyzing the most common questions our clients ask, we chose domain transfers as our pilot project. Here is an example we used with Rasa for only one intent – pointing a domain to Hostinger:
- intent: domain_point
  examples: |
    - I need to point my domain to [Hostinger]{"entity": "provider", "role": "to"}
    - My domain is not pointing
    - How can I connect my domain
    - I need to point my domain [domain.tld](domain_url) to [Hostinger]{"entity": "provider", "role": "to"}
    - Your domain is not connected to [Hostinger]{"entity": "provider", "role": "to"}
    - how can I connect my domain [domain.tld](domain_url)
    - Please point my domain [domain.tld](domain_url) to [Hostinger]{"entity": "provider", "role": "to"}
    - How to connect my domain?
    - How to point my domain [domain.tld](domain_url) from [Provider]{"entity": "provider", "role": "from"}
    - I want to connect my domain [domain.tld](domain_url)
    - Where can I find information about pointing my domain [domain.tld](domain_url)
    - Don't know how to connect my domain
    - Don't know how to point my domain [domain.tld](domain_url)
    - I'm having trouble referring domains
    - Why my domain is not pointing
    - Why [domain.tld](domain_url) is not pointing to [Hostinger]{"entity": "provider", "role": "to"}
    - Where can I point my domain [domain.tld](domain_url)
    - How to point the domain from [Provider]{"entity": "provider", "role": "from"} to [Hostinger]{"entity": "provider", "role": "to"}
    - I want to point my domain from [Provider]{"entity": "provider", "role": "from"} to [Hostinger]{"entity": "provider", "role": "to"}
    - I want to point my domain [domain.tld](domain_url) from [Provider]{"entity": "provider", "role": "from"} to [Hostinger]{"entity": "provider", "role": "to"}
We added a large language model (LLM) to decrease the number of fall-back requests. If Rasa couldn’t answer a question, we instructed the LLM to step up.
We used OpenAI’s Generative Pre-training Transformer (GPT) for the purpose. It was a general GPT-3.5 model; we did not fine-tune or train it at first.
After about a month, our virtual agent was ready for live tests. We were eager to see how the LLM strand would fare.
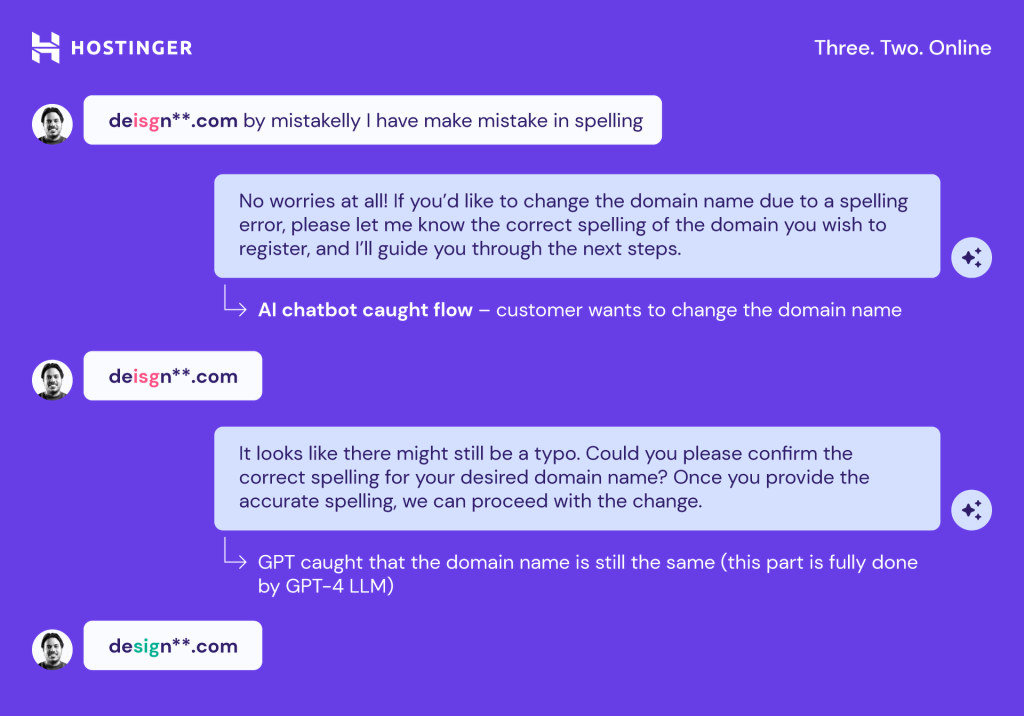
This is the first AI assistant’s conversation with a real customer who asked a question that Rasa wasn’t able to answer. So, instead of replying with a pre-defined answer, GPT-3.5 gave it a try:
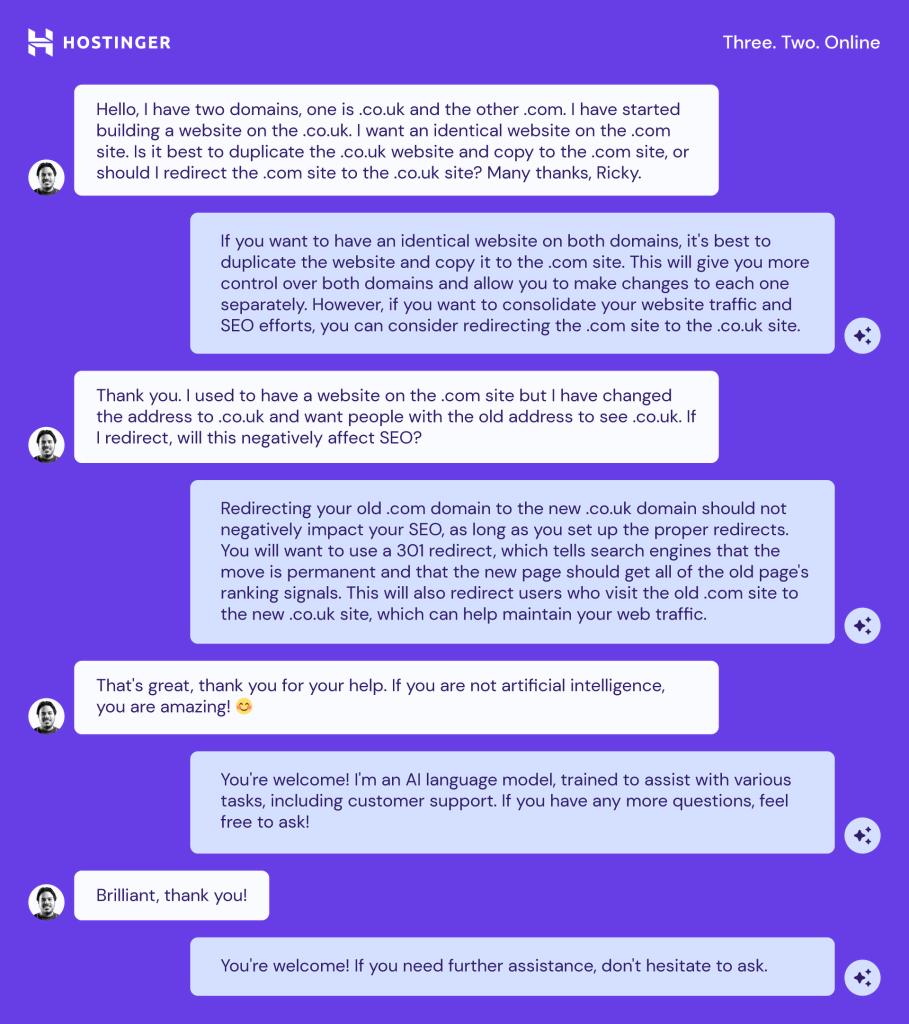
The initial results looked promising: Rasa was great with well-described flows, and GPT-3.5 took over some of the fall-back requests.
We decided to follow this approach and cover as many new flows, intents, and rules on Rasa as possible. At that time, our main goal was to have the first iteration for the most frequent client queries.
Reasons for switching to an LLM-only solution
By September 2023, the chat assistant was fully operational, and the number of queries it handles has grown exponentially:
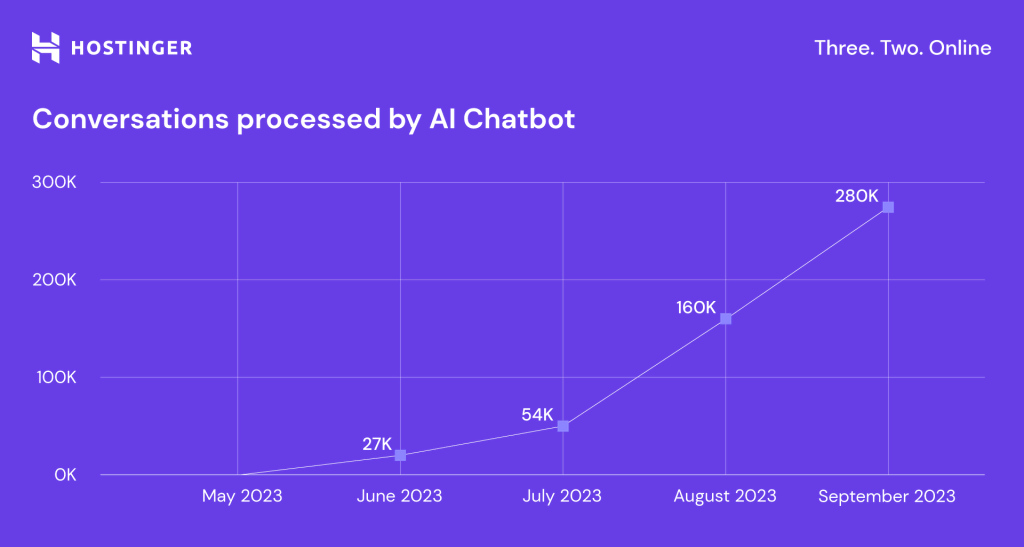
However, we soon realized that our chat assistant with strict flows was inflexible and couldn’t really understand what clients wanted. It fully answered around 20% of the conversations, and the rest went to our Customer Success team.
As the first fall-back conversation shows, the LLM understood requests and communicated with customers quite well. The problem was that it only provided generic information.
We wanted the AI to help our customers with more guidance and actual data, reducing the load on the Customer Success team. To achieve this, we needed to create more flows and reduce the inaccurate answers the LLM provided due to the lack of knowledge.
Generally speaking, Rasa played a more technical role, guiding the LLM in the right direction to do most of the work. Ditching Rasa meant rethinking the principle and logic of the assistant, but it wasn’t about building a chat assistant from scratch – we needed to change the engine, but not the entire car.
Rasa works perfectly fine for small, deterministic paths, as it has lots of adaptation and customization possibilities. However, it wasn’t the right solution for us due to the depth and complexity of our operations.
Deploying an LLM-based chat assistant
Now that we’ve told you the background and why we decided to use an LLM-only solution, let’s get to the fun part: what we’ve built and how it works.
This is a simplified diagram of our AI assistant architecture in Customer Success:
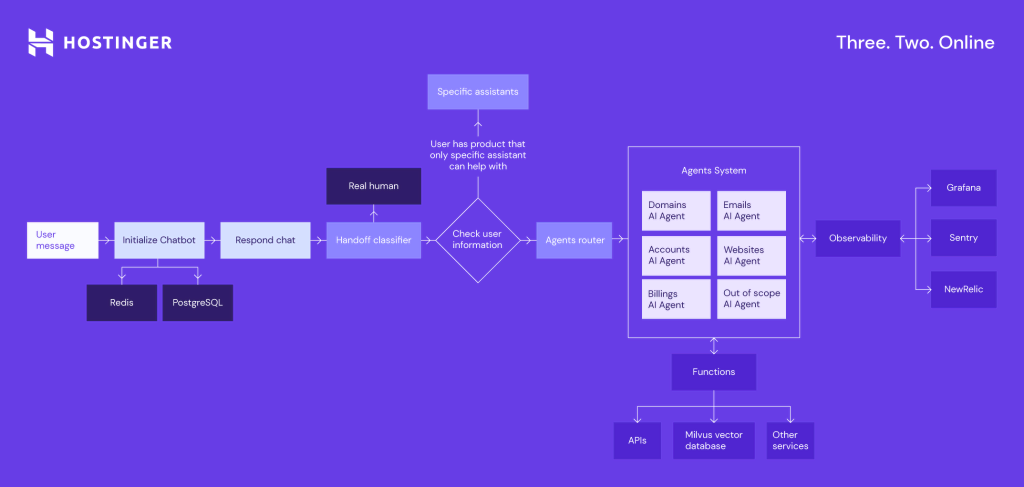
This is how the LLM-based chat assistant, now called Kodee, flow works:
- A user sends a message to our assistant.
- The handoff classifier determines whether a client wants to talk to a live agent.
- The system forwards the message to the LLM-based agent router or a specific assistant if the user has just one service.
- Agent router classifies the message and decides which AI agent should handle the chat.
- AI agent processes the input message to generate an initial response. It can be a response to the user or requirements to call extra functions.
- Based on the input or initial response, the LLM identifies if it needs to invoke any function, external or internal, to gather information or perform an operation. The functions include:
- Calling external APIs for data.
- Performing predefined operations or accessing internal databases.
- Executing specific business logic.
- The result from the function execution is retrieved and passed back to the LLM.
- LLM uses the data from the function to refine and generate a final response.
- The final response is sent back to the user.
Though it might seem like a long process, it takes just 20 seconds on average, even with message batching.
We employ additional technologies and tools to keep Kodee running smoothly and fast, including:
- Redis – in-memory storage for saving short chat history.
- PostgreSQL – for data storage.
- Alembic – for database management.
- Grafana – for monitoring and tracking system performance and metrics.
- Sentry – for capturing and analyzing application logs and errors.
Kodee runs on a single Kubernetes infrastructure based on GitHub Actions for deployment. We use the FastAPI web framework and Gunicorn web server gateway interface (WSGI) HTTP server to build and deploy our APIs.
Our journey of building Kodee
In this section, we’ll tell you how we actually built Kodee. You’ll also learn how you can set up a similar system using our open-source Kodee demo repository.
1. Setting up the environment
The first step in creating any sophisticated application is setting up the environment. For Kodee, this involved configuring various environment variables such as API keys and database credentials.
To connect OpenAI’s API to it, we first needed to obtain our OpenAI API key. You can save everything for the local development in the .env file. For Kodee’s demo, you will find the .env.example file with the required environment variables.
2. Building the backend with FastAPI
Next, we needed a server that could handle requests efficiently. For this, we chose FastAPI, a modern, high-performance web framework for building APIs with Python. Here’s why:
- Speed. FastAPI is extremely fast, allowing for quick responses to user requests.
- Ease of use. It enables writing simpler, more concise code.
- Asynchronous capabilities. FastAPI supports asynchronous programming, making it suitable for a chatbot’s needs.
3. Managing data with databases
To keep track of conversations and user interactions, we needed a data management system. We opted for PostgreSQL, an open-source object-relational database system, for managing structured data.
In addition, we chose Redis. It is an in-memory data structure store used as a tracker store. This system saves and manages a conversation’s metadata and state, tracking key events and interactions between the user and the system. It helps preserve the conversation context by recording user inputs, system actions, and other important information.
As a result, your chatbot can maintain the conversation and make informed decisions.
4. Monitoring user intent
Kodee can connect the user to a live agent to handle complex queries or sensitive issues when necessary. It also prevents frustration in cases when a chatbot alone may not suffice.
Here’s how it works:
- From the first message, the system constantly monitors the conversation to assess whether the user is seeking human assistance.
- The function is_seeking_human_assistance evaluates if the user prefers human intervention.
- If the system determines that the user wants to talk to a support agent, it generates a suitable message to inform them about the transition. The get_handoff_response_message function handles it.
5. Managing chat routing between multiple agents
The ability to route chats dynamically between multiple agents or specialized handlers ensures that the most appropriate service handles user queries, enhancing the efficiency and accuracy of the responses.
Suppose a user asks about a domain-related issue. This conversation will get a domain chatbot label and the DomainChatHandler.
6. Handling queries with handlers, functions, and APIs
An AI-powered chat assistant like Kodee must effectively handle a wide range of user queries. We achieve this through specialized handlers, functions, and various APIs that work together to provide accurate and efficient responses.
Each handler has specialized knowledge and functions tailored to address a particular type of query:
- Base handler. The foundation class for all handlers, defining the structure and common functionality.
- Specialized handler. An extension of the base handler, it inherits and implements its core functionality. A specialized handler essentially becomes a fully functional agent once implemented, capable of addressing user requests within its domain.
You can create multiple specialized handlers, each extending the base handler to manage distinct types of interactions or tasks, allowing for flexible and modular handling of conversations.
Functions are modular code pieces designed to perform specific actions or retrieve information. Handlers invoke functions to complete tasks based on the user’s request. These functions can include specific logic, vector database searches, and API calls for extra information. Kodee passes these functions to OpenAI to decide what functions it should use.
Each handler processes the incoming message, utilizing relevant functions to generate a response. The handler may interact with APIs, execute specific functions, or update the database as needed.
7. Running the application locally
For deployment, we aimed to make the setup as seamless as possible. We used Docker to containerize the application, ensuring it runs consistently across different environments.
Finally, we started both the FastAPI server and the associated databases to run the application, allowing users to interact with Kodee through API endpoints.
Try the Kodee demo yourself
You can set up your own instance of Kodee’s demo version by following these steps:
1. Clone the repository by running this command:
git clone https://github.com/hostinger/kodee-demo.git
2. Set up environment variables.
Create a .env file with the desired configuration values; you can find them in .env.example.
3. Run the application.
To run the application, make sure Docker is running on your system. We have provided a makefile to simplify the setup process.
For the first-time setup, you’ll need to run the following command in the repository root directory:
make setup
This command sets up the Docker containers, creates a virtual environment, installs necessary Python dependencies, and applies database migrations.
For subsequent runs, you can start the application more quickly by using:
make up
By following these steps, you’ll have your Kodee’s demo version running and ready to interact with.
Interacting with Kodee
In this section, we’ll show you how to interact with your Kodee’s instance using API endpoints. Here’s an example of starting a chat session and getting your first response.
1. Initialize the chat session. To start a conversation with Kodee, make a POST request to the /api/chat/initialization endpoint:
curl -X POST "http://localhost:8000/api/chat/initialization" -H "Content-Type: application/json" -d '{
    "user_id": "test_user",
    "metadata": {
        "domain_name": "hostinger.com"
		}
}'
Response:
{
	"conversation_id": "7ef3715a-2f47-4a09-b108-78dd6a31ea17",
	"history": []
}
This response provides a conversation_id that is associated with user_id. It will be used for the rest of the conversation within this chat session. If there is already an active conversation with the user, the response will have the history of the conversation.
2. Send a message to Kodee. Now that the chat session is initialized, you can send a message to the chatbot by making a POST request to the /api/chat/respond endpoint:
curl -X POST "http://localhost:8000/api/chat/respond" -H "Content-Type: application/json" -d '{
    "user_id": "test_user",
    "role": "user",
    "content": "Hello",
    "chatbot_label": "chatbot"
}'
Response:
{
	"conversation_id": "7ef3715a-2f47-4a09-b108-78dd6a31ea17",
	"message": {
		"role": "assistant",
		"content": "Hello! How can I assist you today?"
	},
	"handoff": {
		"should_handoff": false
	}
}
Kodee will respond to your message, and you’ll see the reply in the response content. When you see that everything works, you can start creating new AI agents with new handlers and functions.
Steering the three key elements of LLM
Once the application is running, it’s time to set up the logic and personality of the chat assistant, configure the system prompt, and define specific functions and knowledge it should have access to.
Before implementing any changes, we tried OpenAI Playground for Assistants and experimented with what they could do and how specific changes work. Then, we scaled them in our system.
Prompt engineering is the first step. It’s the process of designing prompts or instructions to guide the AI’s responses effectively. This includes specifying how the assistant should behave in various scenarios and its tone of communication, as well as ensuring that responses are complete and accurate.
The good news is, you don’t need to be a programmer – anyone with good language skills and analytical thinking can do it; start by learning prompt engineering techniques and key concepts.
Then, we enhanced the chat assistant’s knowledge by providing comprehensive details about our internal systems, their design, and operations. The LLM will use this information to give accurate answers.
To avoid hallucinations, we use a Retrieval-Augmented Generation (RAG) system. We store and retrieve text blocks using the vector database Milvus. For information handling, we used LangChain at first but moved to our own solution later.
Finally, we specify Functions. Beyond generating text-based answers, the assistant can execute predefined functions like querying a database, performing calculations, or calling APIs. This allows it to fetch additional data, verify the accuracy of provided information, or perform specific actions based on user queries.
Once we’re done, we test it. Sure, everything didn’t work perfectly right away, but we kept updating and improving the chat assistant. By tweaking and adjusting the above-mentioned elements, our AI and Customer Success teams collaborate to achieve the desired quality of the dialogues for the top customer queries.
Our approach is to work out the specific customer query types in depth before going broad.
At the same time, our programming codes become bigger and more detailed. The good news is that although the lines of code keep growing, the time of development remains low. We can implement code changes in a live chat assistant in about five minutes. This is one of the biggest advantages of our simple, uncluttered system.
Managing LLM hallucinations with RAG
Another important task is to reduce incorrect answers, which are very common in LLM models.
An LLM can make up information based on generic knowledge or limited training data. In other words, it can presume it knows something, although it isn’t the case.
Say a customer asks what our nameservers are. The LLM doesn’t have this exact information in its knowledge base, but it knows what nameservers look like by default, so it answers confidently: “The correct Hostinger nameservers are ns1.hostinger.com, ns2.hostinger.com, ns3.hostinger.com, and ns4.hostinger.com. Please update these in the domain management section of the platform where your domain is registered.”
Meanwhile, our nameservers are ns1.dns-parking.com and ns2.dns-parking.com.
We have a RAG system to control the hallucinations. It extracts a document from a vector database based on similarities and hands it over to the assistant as a reference to guide it in generating a response.
Temperature control reduces inaccuracies by managing AI’s creativity: the closer the setting is to 1, the more creative the response will be; the closer it is to zero, the more deterministic it will be. In other words, if you set the temperature close to one, the answers to even identical questions will almost never match due to the probability distribution.
Even though it might be beneficial in some cases, setting the temperature close to 1 increases the likelihood of inaccuracies.
This is how the RAG system works and how it solves the hallucinations mentioned above:
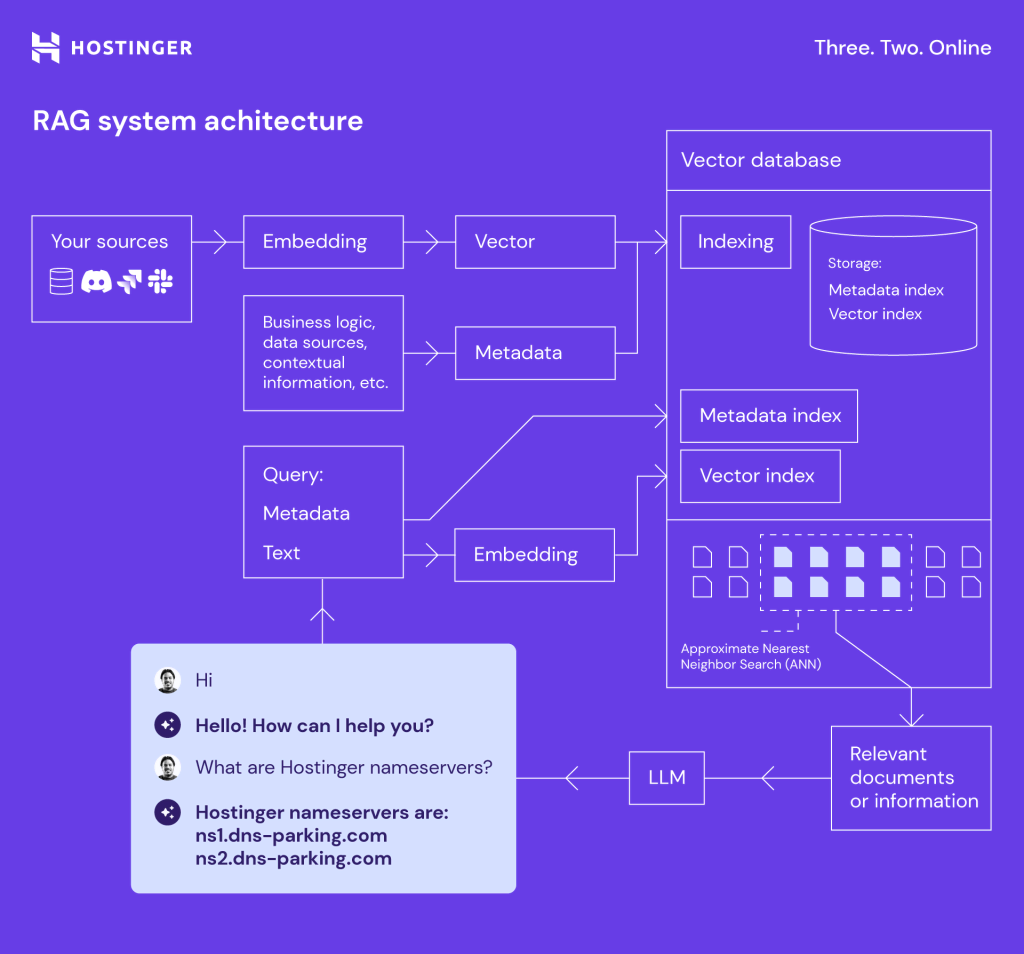
The scheme illustrates the entire process, breaking it down into systematic, interlinked components that work together to deliver rich, contextually informed responses.
- The process begins with our sources, which include various data repositories, databases or even website data. Embedding process transforms this raw data into dense vector representations, capturing the semantic meaning of the content.
- Then, the data is embedded into vectors – numerical semantic summaries of the data, and metadata which is contextual information such as a source, timestamp, or category.
- We store vectors and metadata in a vector database, designed to handle large-scale, complex data. We use Milvus. The indexing process consists of:
- Metadata indexing – creating searchable indices for the metadata.
- Vector indexing – creating indices to quickly find similar vectors.
- When a query is received, whether it’s metadata or text, the system converts it into a vector format. This allows for easy comparison.
- The vector database then uses techniques like Approximate Nearest Neighbor (ANN) search to quickly find the most similar vectors and their related metadata.
- These retrieved relevant documents and information provide context for LLM, enhancing its responses with precise, contextually enriched information.
- This process ensures that LLM delivers more informative, up-to-date, and context-aware answers, improving overall interaction quality.
Improving the AI assistant with an LLM
Data analysis plays a key role in improving the quality of AI chat assistants. By analyzing the logs and LLM responses in detail, we can understand exactly what went wrong and what needs improvement. We do this both manually and automatically using the LLM.
We group conversations into topics so that teams can assess what customers are asking most often, identify which questions Kodee answers well, and determine which ones need improvement.
We also employ LLMs to evaluate Kodee’s answers, their accuracy, completeness, tone, and references. With a GPT comparison function, we evaluate Kodee’s answers and compare them with those provided by live agents against our criteria. We also add additional steps to validate references.
All of these efforts have paid off. Currently, Kodee fully covers 50% of all live chat requests, and this percentage continues to improve.
Pros and cons of different GPT versions
Switching to a newer version of GPT is straightforward.
You just need to change the model information in the handler or API call if you call straight to OpenAI. Newer versions of GPT are backward-compatible with the structures and formats used in GPT-3.5, so your existing prompts, custom knowledge bases, and functions should work seamlessly. You don’t need to change anything unless you want to leverage the enhanced capabilities of GPT-4.
However, new models can sometimes expect slightly different prompts, so they may need some tuning.
We began testing with LLMs about a year ago using OpenAI’s GPT-3.5. It was fast and cheap, but the quality of the answers was insufficient, and it was not designed for feature selection.
First, we tried Function calling with our Domains AI agent. Implementing it with an LLM-only chat assistant was complex yet doable, and we learned a lot to work better with Function calling.
After some tests, we decided to try fine-tuning the GPT-3.5 model to see if it could bring us better results. Unfortunately, they were worse. We provided a pretty small dataset to fine-tune the model, but it felt like LLM lost its own knowledge and used only the fine-tuned responses we provided. Therefore, we dropped the idea.
We then began testing the GPT-4 version and immediately saw better results. Responses were better, and functions were called when they needed to be called.
Compared to the predecessor, GPT-4 offered notable improvements in terms of contextual understanding, and overall performance. For example, researchers claim that GPT-4 has five to 10 times more parameters than GPT-3.5.
We’ve witnessed it ourselves; GPT-4 was several times more accurate and understood the context better.
Here’s an example of how GPT-4 is superior: it doesn’t blindly execute queries but assesses the broader context to ensure the task is done correctly.
However, GPT-4 cost was about 10 times bigger and took around 20 seconds to generate an answer – significantly longer than GPT-3.5. Most likely, it was due to a sharp increase in the dataset.
We opted to stick with the cheaper and faster GPT-3.5. To our surprise and delight, OpenAI launched GPT-4 Turbo a few weeks later, in November 2023.
Optimized for lower latency and better throughput, GPT-4 Turbo also featured an impressive 128k context window, allowing it to maintain and recall a longer chat history, and reducing the chances of errors or off-topic responses. Besides being faster and more precise, GPT-4 Turbo was half the cost of GPT-4.
The very next day, we began testing GPT-4 Turbo and assessing its feasibility for implementation. It proved to be just the perfect solution for us: GPT-4 Turbo performed as well as, or even better than GPT-4, but delivered answers in about seven to eight seconds. As we have already experimented with different GPT models, we were ready for the change immediately.
We currently use the latest version of OpenAI’s GPT-4o model with even better pricing.
Note that the quoted seconds are the time it takes for GPT to respond. Due to the nuances of our infrastructure, the actual response time may vary. For example, we have set an additional delay for calls to Intercom to batch the messages and avoid cases when the chat assistant answers every single message the customer sends.
Key lessons and takeaways
As we grow rapidly in a competitive and dynamic hosting market, we innovate based on a simple logic: build it, release it, and see if it works. Mistakes are inevitable, but they ultimately lead to better solutions. This is what happened with Kodee.
We don’t think trying out Rasa was a mistake. It seemed to be the best solution at the time, because GPT did not have Function calling. As soon as they launched this functionality, we started testing it.
However, we did go wrong by choosing quantity over quality. We did many things quickly and now need to go back and improve them to achieve the quality we need.
Another mistake we won’t repeat is neglecting data analysis. Without examining logs and the customer communication path, we only knew that a conversation failed and the customer turned to a live agent. We didn’t understand why.
Now we can analyze and pinpoint exactly what needs fixing: whether we selected the wrong function, there’s an error in the response, or the data is outdated. We’ve even had cases where a few small changes increased the percentage of fully answered queries by 5%.
Constant experimentation and the search for new opportunities are our strengths. By testing the latest versions of GPT, we were ready to adapt quickly and make immediate changes.
We are not saying that our solution is the best for everyone. For example, Rasa is perfect for businesses with limited and clearly defined functionality, such as parcel services, pizzerias, or small shops.
Another easy way to implement an AI chat assistant in your business is the OpenAI Assistants API. It simplifies the job, since you only need to set up your chat assistant, and you can start using it right away.
If you have a large business with complex processes, logic, closed APIs, firewalls, and other limitations or protections, a self-developed chat assistant might be better. The good news is, now you are on the right track.

Mantas, a Data Scientist at Hostinger, focuses on leveraging AI technologies to drive innovation and enhance our projects. With a Ph.D. in Informatics and over 8 years of experience in AI, data science, and research, Mantas also contributes to academia through various AI-focused projects.

Gediminas is a communications specialist passionate about technologies and their possibilities. His main responsibility is to help people understand Hostinger products and their features. He likes spending his free time bathing in the hot tub, grilling, playing poker, fishing, and other activities.