How to install Yarn on Ubuntu via NPM and the repository + basic usage

Yarn is a JavaScript package manager for Node.js, similar to Node Package Manager (NPM), but with improved performance and security.
However, unlike NPM, Yarn uses a parallel installation method to configure multiple packages simultaneously, speeding up the process. It makes the tool suitable for a complex, large project with many dependencies.
In this tutorial, we wil explain how to install Yarn on Ubuntu using two methods. We will also go over basic Yarn commands for dependency management so you can quickly start using the tool on your project.
Prerequisites
Before installing Yarn, ensure you have a virtual private server (VPS) running a newer version of Ubuntu, like 22.04 or later. Otherwise, the configuration steps might be different, and incompatibility issues might arise.
Hostinger VPS hosting plan supports various software, including Yarn and other JavaScript dependencies. Preparing the hosting environment is also simple since our VPS operating system control panel lets you install distros and applications like Node.js in one click.
Moreover, our VPS comes pre-installed with various features that help simplify the JavaScript project deployment and management process. For example, you can easily generate commands using simple prompts with the Kodee AI assistant.

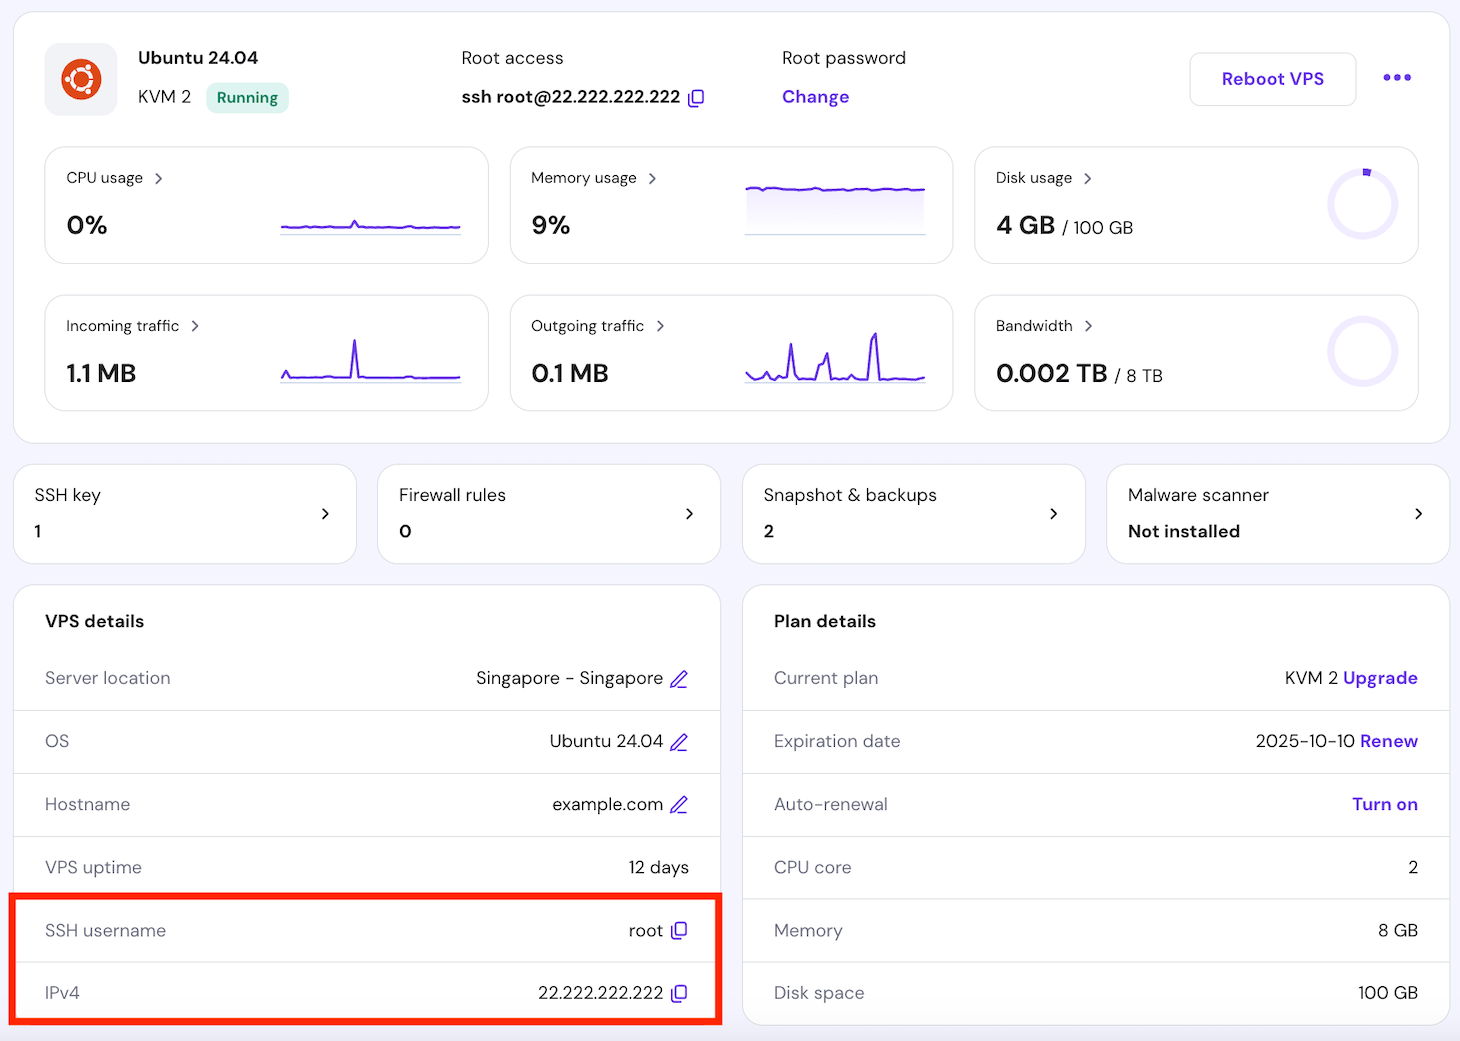
After purchasing a VPS hosting plan from Hostinger and completing the onboarding process, connect to it using Terminal, an SSH client like PuTTY, or hPanel’s Browser terminal. The credentials are at the bottom of your VPS overview menu.

By default, you will log in as root. However, using this account to manage your server can be dangerous since it can run any administrative command without confirmation.
To minimize accidental execution, we will create a new superuser by running this command. Replace your_username with your desired account name:
adduser your_username
Enter the required information, like the password and contact details. Then, add the new user to the sudoers group to grant it the superuser permission:
usermod -a -G sudo your_username
Once created, switch to the new account and return to the main directory using this command:
su your_username && cd
From this point, you will use more Linux commands to set up and manage Yarn. To help you understand the utilities, download our cheat sheet by clicking the banner below.
Installing Yarn on Ubuntu
This section will cover two methods for installing Yarn on Ubuntu. Since they are suitable for different use cases, choose one based on your needs.
Using NPM
The simplest way to install Yarn is to use NPM. Before doing so, configure the Node.js JavaScript environment since the package manager requires it to run. Start by updating your local repository to get the latest software version:
sudo apt update
Then, install Node.js and NPM using the following command:
sudo apt install -y nodejs npm
Check whether both software are installed correctly by querying their version number. To do so, enter these commands subsequently:
nodejs --version
npm --version
If your command-line interface returns the version number, it means the software is configured properly. Otherwise, you will see the “Command not found error,” which means you must rerun the installation commands.

Now, enter this command to install Yarn. We will add the -g option to make the package manager available in the entire system:
sudo npm install -g yarn
Check the version of Yarn to confirm that the software is configured correctly:
yarn --version
Using the official Yarn repository
Installing Yarn from its official repository is more complicated than using NPM. However, this method is suitable for users who want more frequent updates and direct support since the developer manages the source directly.
Start by adding the Yarn repository’s GPG key to your system. This step ensures the legitimacy and integrity of your package. Here’s the command:
curl -sS https://dl.yarnpkg.com/debian/pubkey.gpg | sudo apt-key add -
Now, add the Yarn repository to your local systems’ apt software library.
echo "deb https://dl.yarnpkg.com/debian/ stable main" | sudo tee /etc/apt/sources.list.d/yarn.list
Refresh the apt package manager so it can discover the new software:
sudo apt update
Then, install yarn via apt using the following command:
sudo apt install yarn
That’s it! Now, check the version of Yarn to confirm its installation. If you use this method, we recommend removing the repository afterward to avoid downloading or updating the software from the wrong source:
sudo rm /etc/apt/sources.list.d/yarn.list
Basic Yarn command usage
Now that you have installed the tool, let’s explore several basic commands to manage Yarn dependencies.
Updating Yarn
The command for updating Yarn differs depending on the installation method. If you use NPM, do so by running the following:
sudo npm install -g yarn
If you download Yarn from its official repository, update it using cURL like so:
curl --compressed -o- -L https://yarnpkg.com/install.sh | bash
If you are working in a team environment, the Yarn version might differ across the developers. This situation might lead to incompatibility and workflow issues, especially if some features are missing.
To avoid that, force Yarn on your project to use the latest version using the following command:
yarn policies set-version
You can also set Yarn to use a specific release by entering this. Replace 1.12.3 with your preferred version number:
yarn policies set-version 1.12.3
Creating a New Project
Before setting up a new Yarn project, create and enter a new root directory using the following command. For this tutorial, we will call it JS_project:
mkdir JS_project && cd JS_project
Then, create the project file using this command. Replace project_name with the actual title:
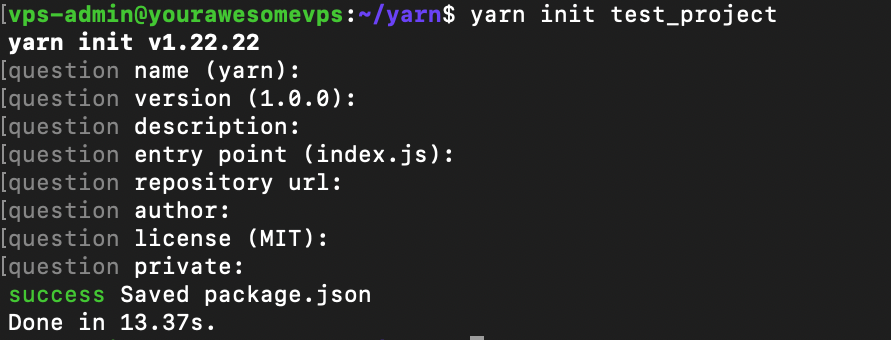
yarn init project_name
Yarn will ask for details about the project, like the version, repository link, description, author, and licensing. Optionally, hit Enter to skip the question and use the default values.

You will now see a new package.json file containing information about your project. Later on, you can adjust it to change the details or add new dependencies as your application develops.
Adding dependencies
Aside from manually editing the JSON file, you can add Yarn project dependencies using this command:
yarn add package-name
The command will install the specified package, add it to the package.json file, and update the yarn.lock file. You will learn about the lockfile when installing dependencies in the later section.
By default, the command will add the latest release of the package. However, you can install a specific version by entering:
yarn add package-name@1.12.3
You can also install a specific package by specifying its tag. For example, to install software in the stable release channel, enter:
yarn add package-name@stable
By default, Yarn will install most packages from the NPM registry, but you can use other sources. For example, the following will set up software from a local directory:
yarn add file:/path/to/local/folder
You can also download packages directly from a Git repository by specifying the URL at the end:
yarn add https://github.com/user/repo.git
There are other methods of adding a Yarn dependency using the command. We recommend checking the yarn add documentation to learn more about them.
Installing all dependencies
You can install all dependencies specified in the package.json and yarn.lock files simultaneously using the following command:
yarn install
The yarn.lock file stores the name and version of installed dependencies, ensuring consistency when working with multiple developers. If you run the installation command, Yarn will look for the correct releases within it.
The yarn install command will download the latest package version if the lockflile doesn’t specify a particular release. This usually happens if you manually add the dependency into the JSON file without updating yarn.lock.
If you wish to install packages in the JSON file without updating the lockfile, add the –frozen-lockfile argument to your command:
yarn install --frozen-lockfile
There are various other options for modifying the dependency installation behavior. To learn more about it, check the yarn install command manual.
Removing dependencies
To remove a package using Yarn, simply specify its name after the yarn remove command. For example, use the following to uninstall foo:
yarn remove foo
This command will also automatically update the information in the package.json and yarn.lock files. Since yarn remove uses similar parameters to yarn install, check the manual in the previous section to learn more about them.
However, you can’t use the –frozen-lockfile option to block the command from modifying yarn.lock. This restriction ensures the lockfile gets updated to avoid accidental reinstallation.
Running scripts
You can add custom scripts within the package.json file to automate various tasks, like deployment or fetching data. To run them, use the following command:
yarn run script-name
Unlike dependencies, however, you must manually write the script in the JSON file since Yarn doesn’t have a command for this task.
Conclusion
Yarn is a JavaScript package manager like NPM with improved performance and security, making it a popular choice for large projects. In Ubuntu, you can install this tool using two methods – via NPM or the official repository.
To download Yarn via NPM and node.js, simply run npm install -g yarn. If you use the official repository, add the software library to your local system using echo and run apt install yarn. Print the version to check if it is configured correctly.
You can rerun the installation commands to update Yarn. Meanwhile, enter yarn init to create a new project in your current working directory. It will create a package.json file in which you can specify dependencies.
If you want to install the dependencies listed in the JSON file, run the yarn install command. To remove a package, enter yarn remove followed by the software name. You can also use this tool to run custom scripts for various tasks.
Install Yarn on Ubuntu FAQ
This section will answer several common questions about installing Yarn on your Ubuntu server.
Can I install Yarn with a package manager like apt or yum?
Yes, you can configure Yarn using your distro’s default package manager, like apt or yum. However, the tool is not available in the local software library by default. It means you must fetch the official repository first and add them to the local one.
How can I check if Yarn is already installed on my Ubuntu server?
You can check if Yarn is installed on your Ubuntu machine by running the yarn –version command. If your command-line interface returns a version number, it means the tool is configured. Otherwise, it will print an error.
Which is better to use Yarn or NPM?
Whether you should use Yarn or NPM depends on your use case. Yarn is suitable for a larger, resource-intensive project since it offers higher performance and caching. Meanwhile, NPM offers more packages and a more established community, making it more versatile.
How to uninstall Yarn on Ubuntu?
If you install Yarn using apt, you can remove it by running sudo apt remove yarn. Meanwhile, enter sudo npm uninstall -g yarn if you configured it via the NPM package manager.


