How to integrate Stripe payments with Hostinger Horizons

Stripe is a payment platform that lets you accept online payments and manage subscriptions securely.
If you’ve built a web app with Hostinger Horizons and want to monetize it – whether through premium content, memberships, or recurring plans – Stripe offers a simple yet powerful solution.
This guide will walk you through integrating Stripe with your Hostinger Horizons project. By the end, you’ll know how to connect your Stripe account, create a subscription product, and start accepting payments directly from users.
Why integrate Stripe with Hostinger Horizons?
Connecting Stripe with Hostinger Horizons web app builder gives you a fast, secure way to accept payments without writing backend code.
You can offer subscriptions, manage recurring billing, and deliver a seamless checkout experience directly in your web app.
With Hostinger Horizons handling the front end and Stripe managing payments, you get a complete setup that’s easy to launch and scales as your project grows.
Whether you’re running a paid membership platform or selling digital products, this integration helps you monetize your web app safely and efficiently.

How to set up Stripe payments on your web app
Before adding Stripe to your web app, you should connect it to a custom domain. This will make your app easier to access and help build user trust.
For this tutorial, we’ll implement a recurring subscription model similar to Netflix. Users will pay a fixed monthly fee to access premium content.
If you need other models like one-time purchases or pay-what-you-want donations, don’t worry – we’ll cover those later in this guide.
1. Sign up for a Stripe account
To start accepting payments, you’ll need a Stripe account:
- Go to the Stripe registration page and create your free account.
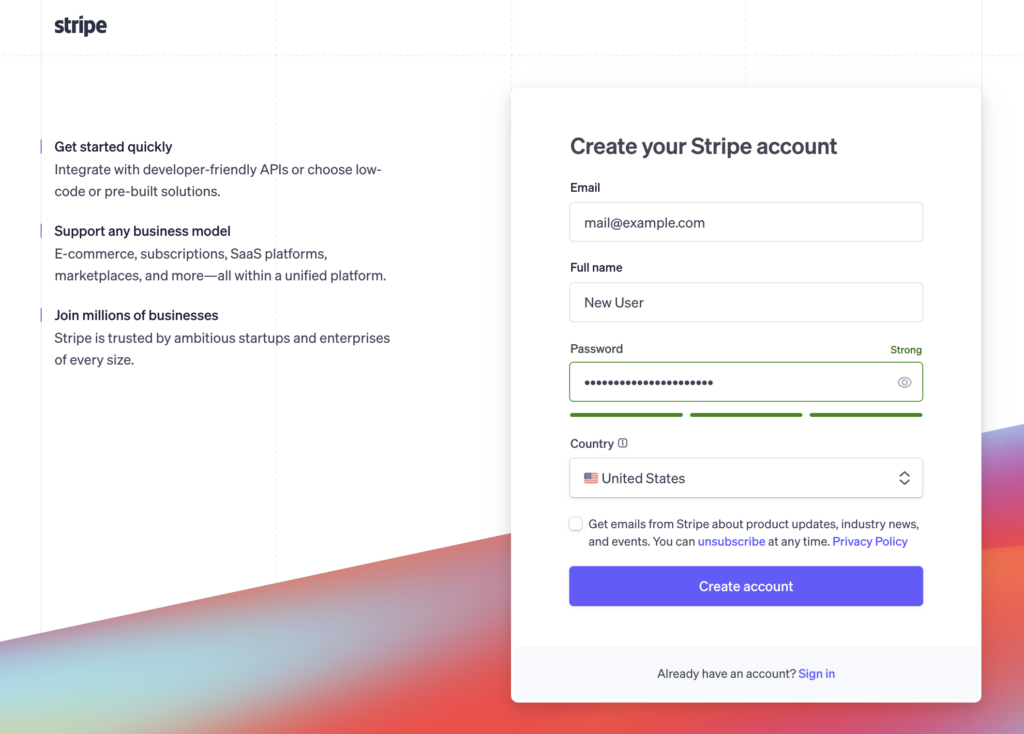
- Enter your email, password, and business or personal details. Stripe uses this information to set up your profile and payment preferences.
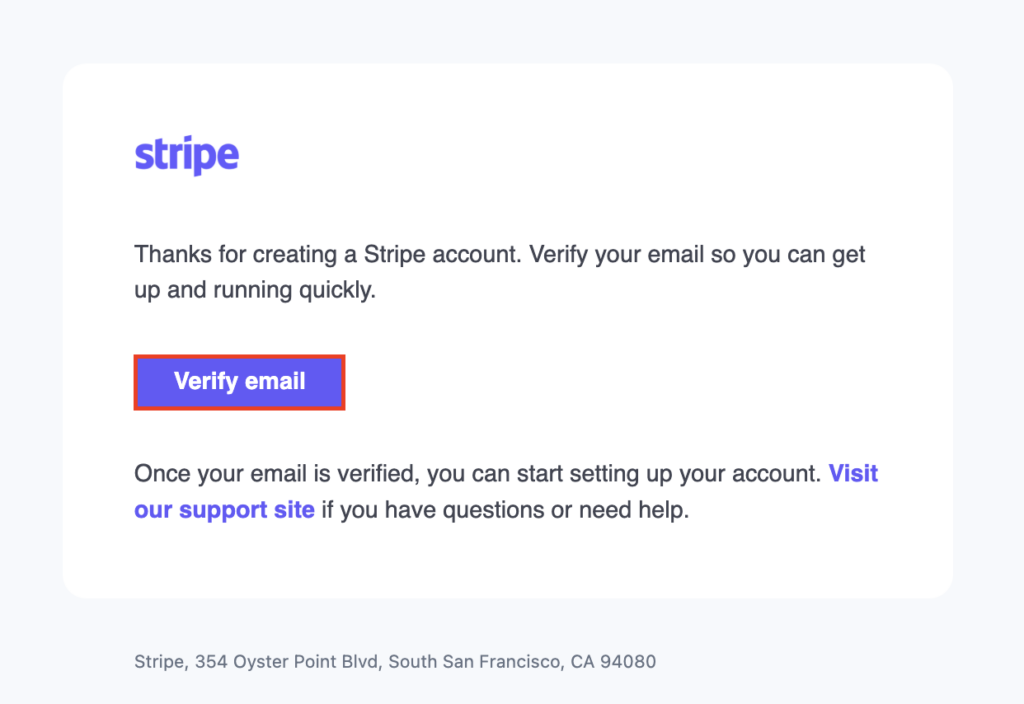
- Once you complete the form, check your inbox and verify your email address to activate the account.
2. Enable the client-only integration
With your account ready, enable client-only integration in Stripe to power your app’s checkout page. This setup lets you accept payments without a backend server – ideal for no-code platforms like Hostinger Horizons.
- Open your Stripe dashboard and navigate to Settings → Payments.

- Under the Checkout and Payment Links tab, scroll to the bottom and hit Enable client-only integration.
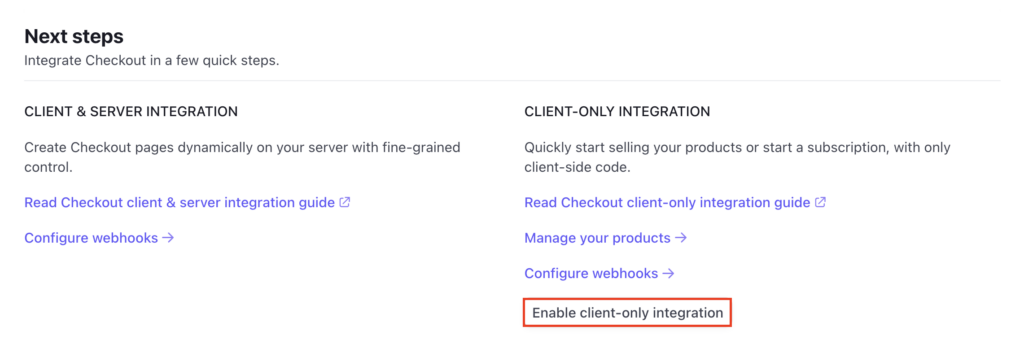
- Click Allow in the confirmation dialog to activate this setting.
3. Create a product for premium content
Next, set up a subscription-based product that users will pay for on a recurring basis.
- Go to Product catalog from the left-hand menu.
- Click Create product, then fill in the details:
- Name – enter a clear name, such as Premium Content Access.
- Pricing model – select Recurring.
- Amount – set your monthly rate. For example, $9.99.
- Billing period – choose Monthly.
Feel free to adjust the name, price, and billing period to fit your app’s needs.
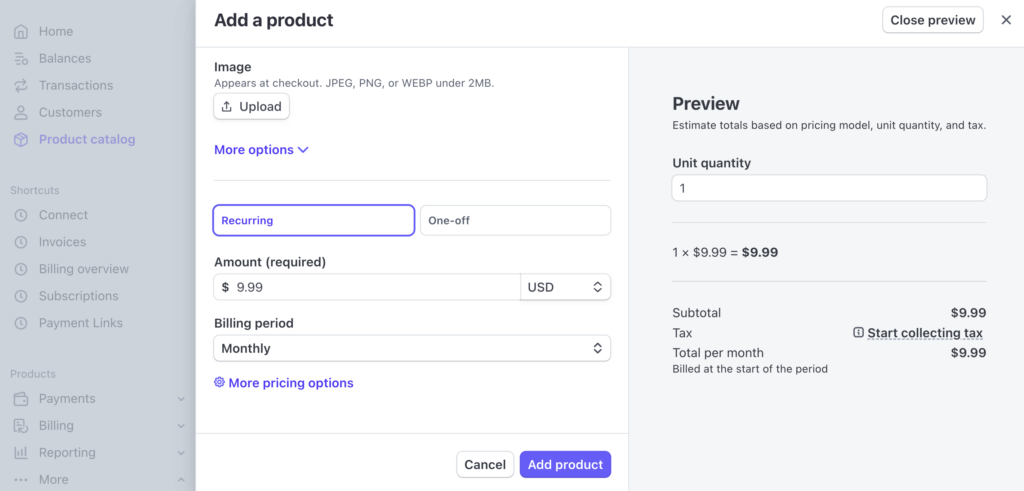
- When you’re ready, hit Add product.
- Once saved, open the product, click the three horizontal dots next to the price, and select Copy price ID.
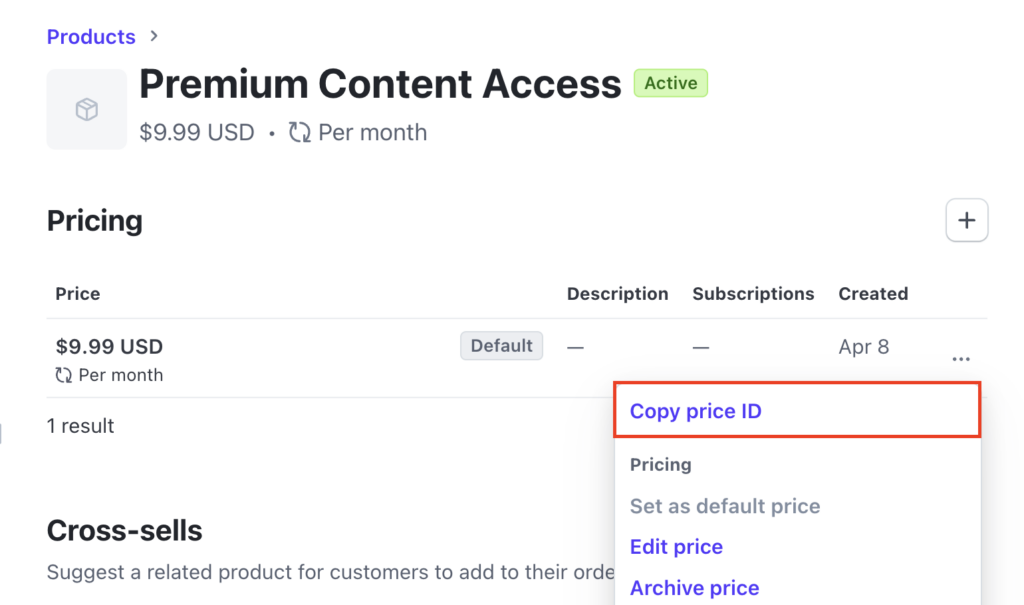
Store this ID – you’ll need it to complete the Stripe integration in Hostinger Horizons.
4. Get the Stripe publishable key
Now that you’ve added a product, grab your Stripe publishable key to connect the payment flow.
- From the bottom left corner of your Stripe dashboard, select Developers → API keys.
- Under the Standard keys section, find your publishable key. It typically starts with pk_test_ in test mode.
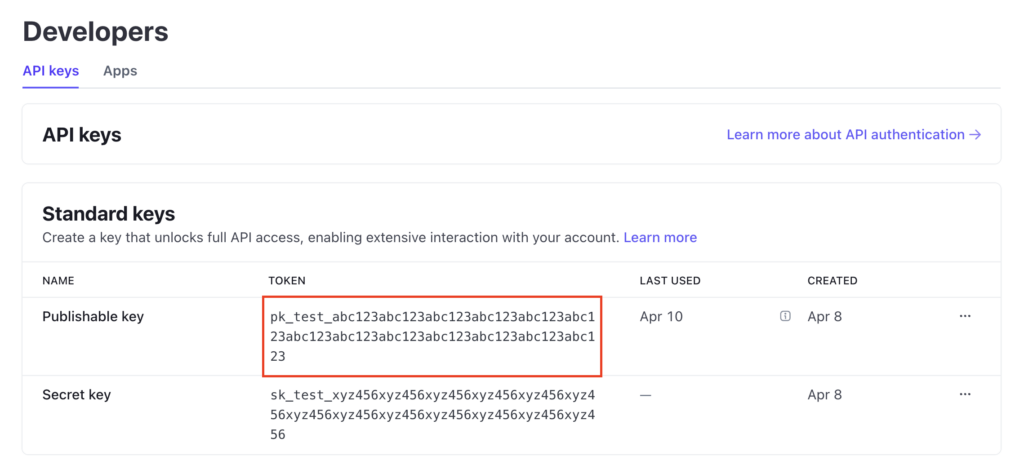
Click the key to copy it. You’ll use this and the price ID to link your web app with Stripe.
5. Share the price ID and publishable key
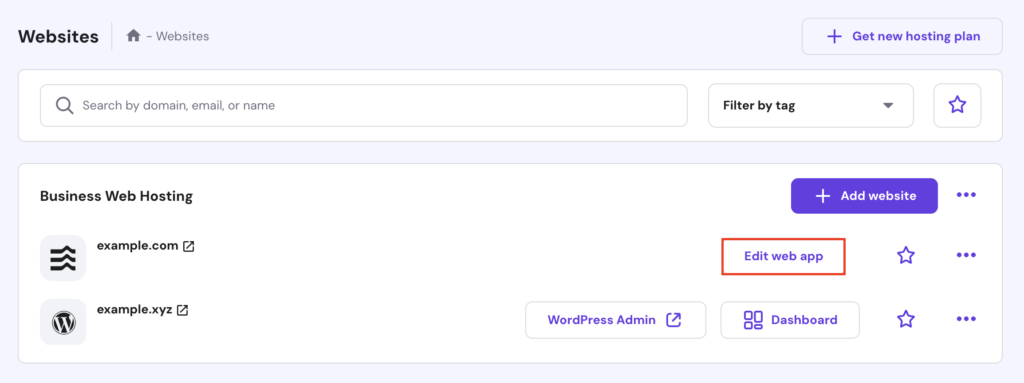
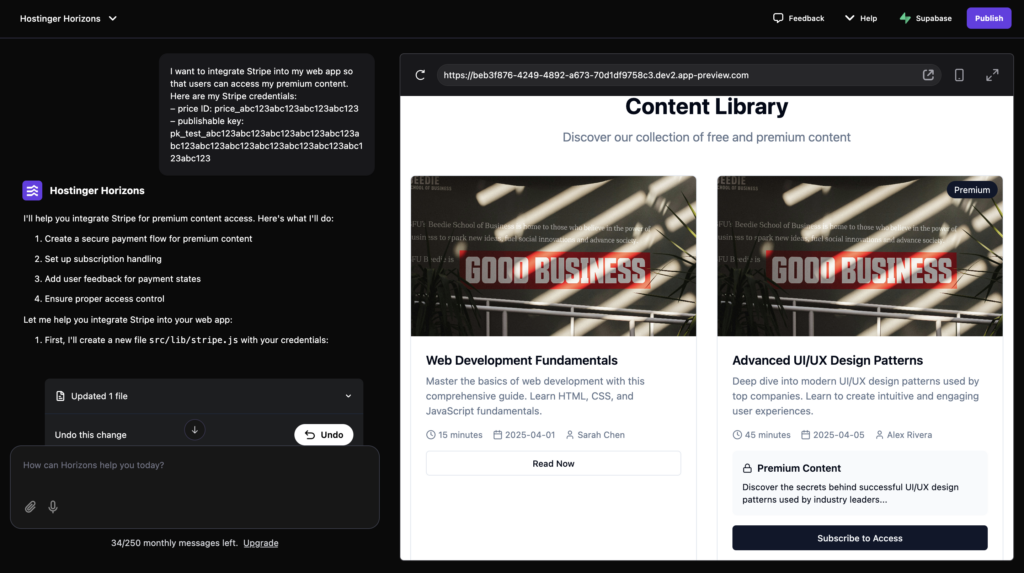
After collecting your Stripe details, open your Hostinger Horizons-built web app so the AI tool can implement the payment setup.
- Log in to hPanel with your Hostinger account and navigate to Websites → Website list. Then, hit Edit web app next to your project.
- Paste both the price ID and publishable key into the prompt box, along with a clear instruction like:
I want to integrate Stripe into my web app so that users can access my premium content. Here are my Stripe credentials:

– price ID: [your_price_id]

– publishable key: [your_publishable_key]
- Give Hostinger Horizons a moment to process the request and apply the changes.
- You can add access control logic if you haven’t done so already. For instance:
- When users click on premium content, ask them to sign in if they haven’t done so.
- After signing in, show a Subscribe to Access button that redirects them to Stripe’s checkout page.
- Users enter their payment details securely on Stripe’s page.
- After a successful payment, redirect them back to the content library.
- If they cancel, return them to the content page without granting access.
Here’s a sample prompt you can use:
Please add logic so that when users click on premium content, they're asked to sign in. After signing in, show a "Subscribe to Access" button that opens the Stripe checkout using the price ID above. After payment, redirect them back to the content page.
6. Test the payment integration
Your web app should now be ready to accept test payments. To verify everything, start by publishing your project.
You can’t test the Stripe integration using the preview pane in Hostinger Horizons, because the live preview runs within a sandboxed iframe that restricts redirections for security.
- Launch your app by clicking Publish in the top right corner of the project dashboard.
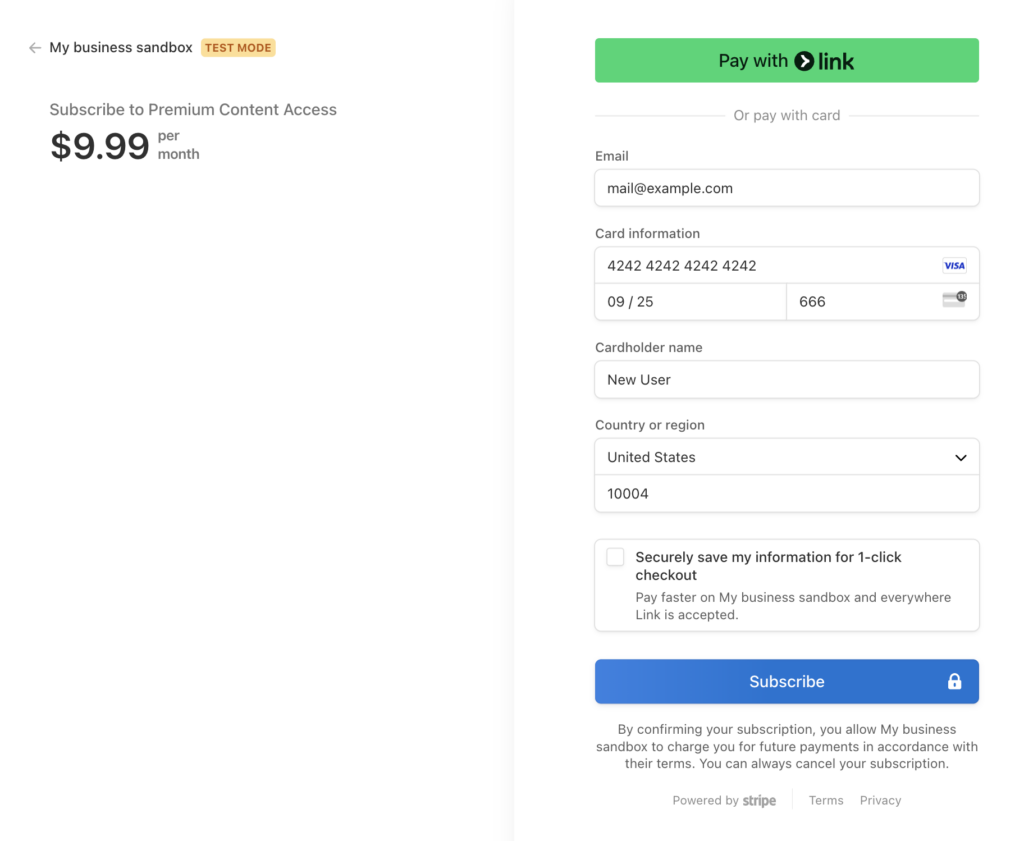
- Open your web app through your custom domain and try subscribing to premium content.
- You’ll be redirected to the Stripe checkout page, where you can test the payment process:
- Use Stripe’s test card: 4242 4242 4242 4242.
- Enter any future expiration date.
- Use any 3-digit CVC.
- Provide any name, email, and country.
If the payment succeeds, you’ll be redirected to the content library.
The Subscribe to Access button will change to Read Now, confirming that access has been granted. You’ll also see the Premium Access Active badge, meaning the subscription is active.

7. Make the Stripe integration go live
Once you’ve tested your web app, switch to live mode in Stripe to start accepting real payments.
Important notes before going live with Stripe
Once your Stripe payment is active, the test card number will no longer work. Using real credit cards for testing will result in actual charges, so proceed carefully.
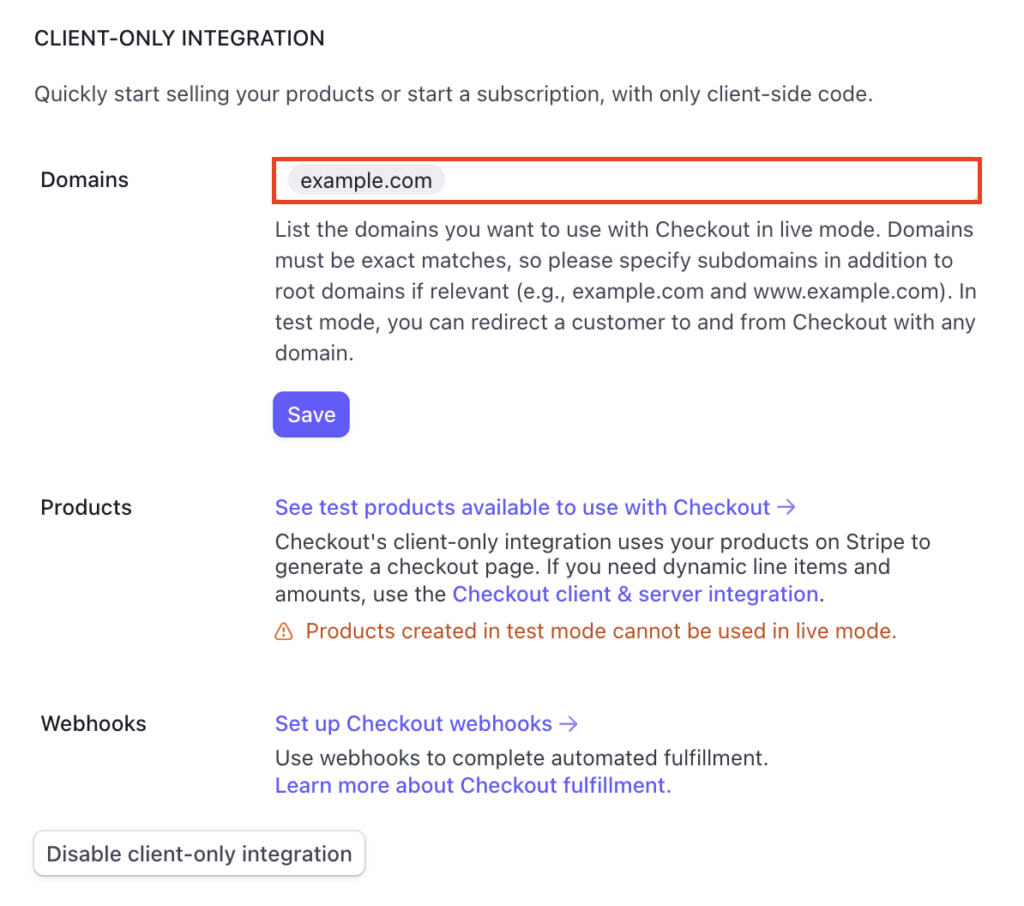
- In your Stripe dashboard, hit Get your live account at the top of the page and follow the instructions. This will include entering your business details and bank account information.

- Go to Settings → Payments → Checkout and Payment, then enter your domain under the CLIENT-ONLY INTEGRATION section to whitelist it.
- Create a new product, get your live publishable key, and share it with Hostinger Horizons again. Use this prompt to let the tool update your web app’s code:
I've switched Stripe to live mode. Can you update my web app with the live price ID and publishable key? Here are the details:

– price ID: [your_live_price_id]

– publishable key: [your_live_publishable_key]
- Once it processes the update, re-publish your app.
That’s it! You’ve successfully configured Stripe on Hostinger Horizons and are now ready to receive payments for your premium content.
How to handle Stripe webhooks with Hostinger Horizons (optional)
While the current payment system is enough to process basic transactions, you can enhance it further using Stripe webhooks.
Think of webhooks as a notification system: When something happens in Stripe, such as a successful payment, Stripe sends a message to your server. This is more efficient than the basic payment process you have now.
To set up webhooks, you’ll need to add some backend code. You should also connect your web app to a Supabase database.
Supabase will handle user data storage, provide server endpoints to receive Stripe webhook notifications, and offer a built-in authentication system.
Here’s a comparison of the flows:
- Current flow:
User pays → returns to the success page → the frontend checks the page and updates the stored data
- Webhook and Supabase flow:
User pays → Stripe confirms the payment → Stripe notifies Supabase → Supabase updates the database
The latter is more reliable and scalable because it ensures proper data storage, verifies payments, and automates updates.
If you’re interested in implementing webhooks, follow the official Supabase documentation on handling Stripe webhooks.
Stripe integration use cases
We’ve demonstrated how to integrate Stripe to charge users regularly, either monthly or yearly, to access premium content.
But you can also set up different payment models. Below are two examples:
Per-item purchases
If you sell individual items or digital products, such as ebooks or courses, you can create a product for each item in Stripe and set a one-time payment pricing model to process single transactions.
After that, note down each product’s price ID and share it with Hostinger Horizons so it can update the payment process for each item. Here’s an example prompt:
I want to set up Stripe payments for the following products. Here are their price IDs:

– price_abc123... for "Product 1"

– price_xyz789... for "Product 2"
Donations/pay-what-you-want
If you’re a creator, run a nonprofit platform, or manage a donation-based web app, you can let users choose how much they want to donate to support your cause.
In Stripe, go to Payment Links → New. Select Customers choose what to pay as the payment type. After configuring the other settings, click Create Link.
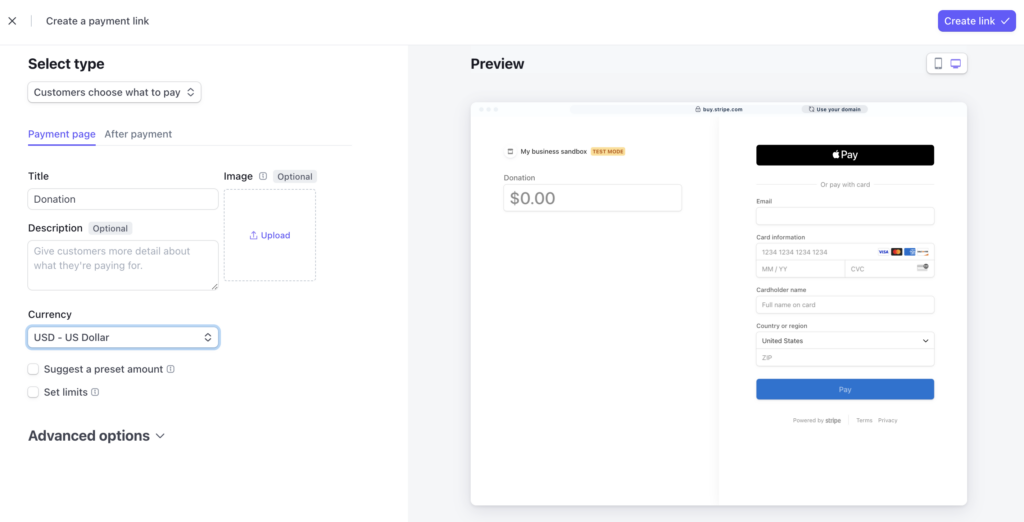
Once done, copy the generated link and share it with Hostinger Horizons. If you haven’t created a donation button yet, use a prompt like this:
I want to add a Support Us button that lets users contribute any amount. Please link it to [the Stripe donation link].
Security best practices when using Stripe on your web app
When integrating Stripe into your web app, follow these security tips to minimize vulnerabilities and prevent unauthorized access:
- Never expose secret keys in frontend code – secret keys provide full access to your Stripe account. If exposed, malicious users could perform unauthorized actions like refunding payments or accessing customer data. Always use only the publishable key on the front end, as shown in this guide.
- Validate webhook signatures server-side – Stripe includes a signature with each webhook event to prove it’s genuine. Use your webhook secret – a unique key provided by Stripe – to verify this signature. If you use Supabase Edge Functions, validate events with Stripe’s constructEvent method before processing them.
- Use HTTPS – this protocol encrypts all data transmitted between users and your app, protecting sensitive payment information from interception. Hostinger’s free SSL secures your entire web app, while Stripe’s checkout page is also served over HTTPS by default.
- Configure CORS properly – Cross-Origin Resource Sharing (CORS) controls which domains can access your app. Since Stripe Checkout uses redirects, your current setup avoids CORS issues. If you implement webhooks, configure CORS in your Supabase Edge Functions to accept requests only from Stripe.
- Keep test and live environments separate – when moving to production, switch to live mode keys, update webhook endpoints to production URLs, and keep test data separate from production. This prevents accidental mixing of real and test transactions.
Troubleshooting Stripe integration issues
Even with proper setup, you may encounter issues when setting up Stripe on your web app. Here are some common problems and how to fix them:
- Invalid price ID or publishable key – this issue occurs when the keys in your code don’t match those in your Stripe dashboard. To troubleshoot:
- Navigate to Developers → API keys → Standard keys to find the correct publishable key.
- For price IDs, go to Product catalog, select your product, and click the three dots next to the price.
- Ask Hostinger Horizons to update the credentials with the correct keys.
- Use the appropriate test or live keys based on your current environment.
- Double-check for typos or extra spaces in the keys.
- Webhook not firing – this happens when Stripe can’t reach your webhook endpoint, or the endpoint isn’t processing events correctly. To fix it:
- Verify your Supabase Edge Function URL is correct in Developers → Webhooks.
- View webhook attempts in Developers → Events.
- Confirm your Edge Function is deployed correctly in Supabase.
- Test the webhook using Stripe’s webhook tester in the Webhooks tab.
- Make sure your webhook secret is correctly set in your Supabase environment variables.
- Checkout sessions failing to redirect – this occurs when the success and cancel URLs aren’t configured correctly or are inaccessible. Try the following:
- Verify that the successful and canceled URLs match your actual domain.
- Ensure the URLs are whitelisted in Stripe.
- Test them by manually navigating to the URLs.
- Check the browser console for any errors during the redirect.
Conclusion
Using Stripe gives you a secure, scalable, and no-code-friendly way to accept payments and manage subscriptions.
In this article, we’ve explored how to integrate Stripe into your Hostinger Horizons-built web app. Here’s a quick recap of the steps:
- Create a new Stripe account.
- Enable the client-only integration.
- Set up a premium product.
- Obtain your Stripe publishable key.
- Share the Stripe details with Hostinger Horizons.
- Test the payment flow by purchasing premium content.
- Switch the payment system to live mode.
As your app grows, you can add different pricing models, explore other Stripe features like coupons, and customize the checkout page’s appearance. Doing so will help you deliver more value to your users and manage payments more efficiently.
Join our Discord channel for more tips and inspiration on making the most of Hostinger Horizons. Connect with the community, get expert advice, and stay updated on the latest features!

Ariffud is a Technical Content Writer with an educational background in Informatics. He has extensive expertise in Linux and VPS, authoring over 200 articles on server management and web development. Follow him on LinkedIn.