How to Launch a WordPress Site: 6 Easy Steps

Websites are becoming a necessity for every business, organization, or even personal project. In starting a website, WordPress has become one of the most popular platforms. However, not everyone knows how to launch a WordPress site. Don’t worry, this tutorial will help you get through the process with ease.
So, how do you launch a WordPress site? It really isn’t as difficult as you might think it is. After all, WordPress is a content management system that is meant to assist people when it comes to starting a website.
Follow our tutorial as we’ll walk you through the steps to launch your WordPress site.
Download website launch checklist
How to Launch a WordPress Site
1. Define Your Site’s Idea and Content
2. Choose a Domain Name
3. Setup Your Hosting
4. Install WordPress
5. Pick a WordPress Theme
6. Install WordPress Plugins for Better Functionality
1. Define the Idea and Main Content
The first and utmost important step before you launch a WordPress site is to know what kind of website you want to start. It can be that you’re starting a blog, an eCommerce site, a company profile, etc.
Important! Check out our previous articles on the different types of websites ideas and blogs.
If you are creating a website for personal use, choose a topic that your site will focus on. In other words, pick a niche for your content.
It can be anything like photography blog, travel blog, or food blog. Pick something that is of your interest so that content creation won’t feel burdensome in the long run.
Once you decide on a niche, then you need to think about the ultimate goal of your website. Are you planning to monetize your website or is it just for leisure? Whatever goals you’ve settled on, make sure to be consistent.
You should also decide on your target audience: who will benefit from your writing? This will affect the format, style, and tone of your content.
2. Choose a Fitting Domain Name
Another crucial step that you need to think through is deciding on a domain name. This is because a domain name will represent your overall brand. Therefore it needs to be well thought out.
What do Wikipedia, YouTube, and Netflix have in common? A short and unique name that is easy to spell and recall. That is how a domain name should be. You don’t want to drive visitors away with a difficult name to remember or spell.
To help you with the task, you can make use of domain name generators.
Domain Name Checker
Instantly check domain name availability.
Once you’re happy with the chosen name, it’s time to check if it’s available and purchase the domain.
Here at Hostinger, you can get .store, .online, or .xyz domains for less than a $1 and .com for $9.99. You can also register a .co.uk domain or any other country-code TLD for a reasonable price.
| TLD | Registration | Renewal | Transfer |
|---|---|---|---|
| .com | $9.99 | $16.99 | $9.99 |
| .co.uk | $7.99 | $11.99 | $0.99 |
| .info | $1.99 | $24.99 | $16.99 |
| .net | $14.99 | $15.99 | $14.99 |
| .xyz | $29.97 | $41.97 | $9.99 |
Pro Tip
Get a free domain for one year by subscribing to one of our managed WordPress hosting plans, starting with the Premium hosting plan, available from $1.95/month.
3. Setup a Web Hosting Service
To launch a WordPress site you need to find the right web host. There are a few important points to consider when choosing a hosting provider:
- What you need ‒ how many resources will your website need, what is your plan for the next 12 months, and how big will your site grow.
- Uptime scale ‒ a 24/7 operating and stable web host is essential.
- Customer support ‒ if your website is down or experiencing any problems, you’d want to contact customer support for help.
- Easy to use ‒ many website owners don’t have a background in programming. The control panel should be easy to navigate through.
- Affordable ‒ budgeting and costs are important when running a website in the long run. You don’t want to pay more for a web host that doesn’t cater to your needs well. In the beginning, we suggest choosing from the cheapest web hosting companies.
With Hostinger you will not have to worry about the points above as our hosting is affordable and of premium quality. We also have live chat support that can connect you to our customer success agents in less than a minute.

4. Install WordPress Core
Installing WordPress can be done with just a few clicks from Hostinger’s control panel. You will be able to launch a WordPress site in just a couple of minutes!
Here’s how to install WordPress:
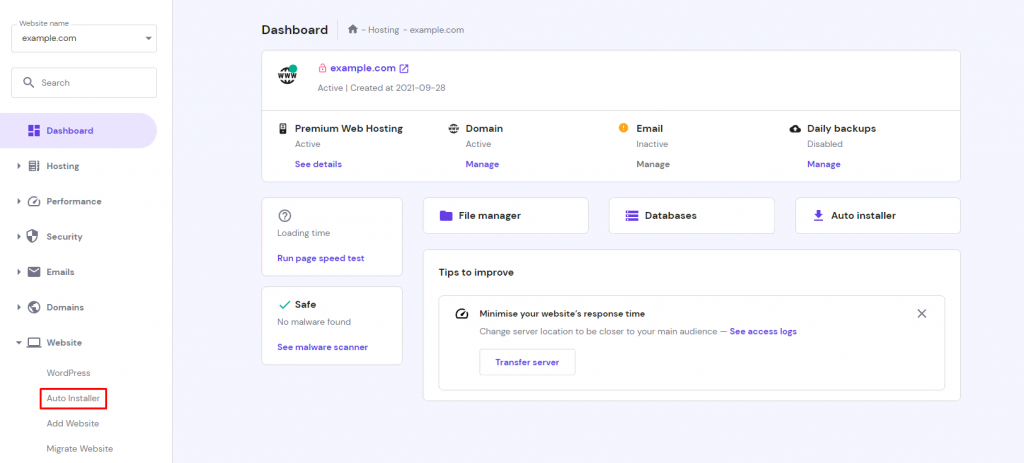
1. Once you access Hostinger’s dashboard, click on Auto-Installer on the left sidebar menu.

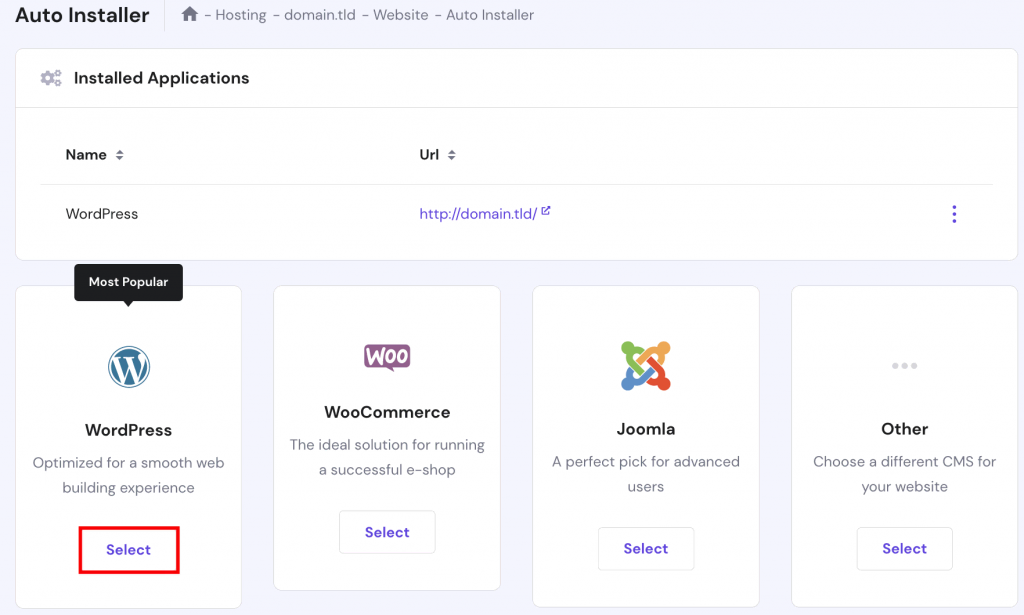
2. Find the WordPress Select button and simply press it.

3. Type in the necessary details:
- URL ‒ your registered domain or address of your WordPress website.
- Language ‒ pick the primary language for WordPress.
- Administrator Username ‒ the username you’ll use to log into the WordPress dashboard.
- Administrator Password ‒ the password that you have to type in to enter the WordPress admin area.
- Administrator email ‒ enter an active email address as it’ll be used for notifications and password reset.
- Website Title ‒ your website’s title
- Website Tagline ‒ a slogan or a short description of what your site is about.
4. Click on the Install button.
5. Pick and Activate a Theme
When you launch a WordPress site, you need to make sure it looks and functions well.
Each type of blog or website may require different layouts and themes. An eCommerce site will need a more complex design than a blog would.
The best thing about WordPress is that it has a staggering amount of themes to choose from.
There are both free and premium themes. A few popular free WordPress themes are Zakra, Shapely, and Astra, while Uncode, Divi, and X are some of the paid themes we recommend.
You can browse through the WordPress theme gallery and pick one that matches your needs.
To install a theme, simply log in to your WordPress Dashboard and hover over the Appearance tab. Select Themes and click Add New. Search for the WordPress theme that you want and move the cursor over it, then press the Install button.
For a detailed tutorial, you can check our article on how to install WordPress themes.
6. Install Plugins to Customize Your Website
When you launch a WordPress site, you’ll have to choose and install plugins. WordPress provides tons of plugins that will help to extend the functionality of your sites such as admin enhancements, website security, and much more.
Some of the essential WordPress plugins that you can start with are:
- WooCommerce ‒ a useful plugin if you want to set up an online store. Perfect for website owners who wish to sell their products or services through their WordPress site. Note, if you’re planning to sell products online, it’s better to host your site with a platform that can guarantee seamless and secure transactions, for example, WooCommerce web hosting.
- Yoast SEO ‒ one of the best Search Engine Optimization (SEO) plugins. It helps you to publish higher-quality, search-optimized content.
- W3 Total Cache ‒ the plugin helps your site to load faster on your readers’ computer on subsequent visits.
- Keyy Two Factor Authentication ‒ this plugin for security protects your website from unauthorized access. It lets you confirm your identity through a secondary device.
How to install plugins:
- Got to the Plugins section through your WordPress dashboard.
- Then click the Add New button at the top of the page.
- Type the keyword of the specific plugin that you need on the search field and press the Install Now button near the plugin. Or if you’ve downloaded the plugin in advance, simply click Upload Plugin. Then Choose File, selecting the plugin archive from the computer, and hit Install Now.
- To activate the plugin after the installation process, click the Activate Plugin.
For a complete tutorial, check our post on how to install WordPress plugins.
Once you’re all set, now you’re ready to launch a WordPress site for the world to see.
What’s Next?
Now you see how easy it is to launch a WordPress site!
However, that is just the beginning of your online journey. The next move will be building your audience. In other words, traffic. To do that, you can start with promoting your website on social media platforms and continuously post great content.
Visit our article for tips on how to drive traffic to your website.
To assist your journey with WordPress, you can install the Google Analytics plugin.
Observe the stats of your website and get to know your readers. You can quickly grow your traffic once you find out how visitors come across and use your site.
Pay attention to updates and maintenance for WordPress, themes, and plugins. It improves the performance of your website by fixing bugs, adding new features, and enhancing security.
Conclusion
Now you know how to launch a WordPress site! It’s not hard at all, though you do need to ponder a lot when planning it as there are many grounds to cover. We hope that our tutorial will help you with the process. Let’s recap the steps once more:
- Define the site’s content ‒ pick a niche, define your goals and target audience.
- Decide on a domain name ‒ come up with a short, simple, and memorable domain name.
- Choose a web host ‒ Hostinger offers web hosting at an affordable price.
- Install WordPress ‒ with just a few clicks WordPress can be installed through Hostinger’s control panel.
- Pick a theme ‒ design the site to your heart’s content with WordPress themes.
- Install plugins ‒ extend your website’s functionality with WordPress plugins.
Finally, you can launch your WordPress website and start your online journey!


Comments
May 15 2022
I have a website running on my web hosting on hostinger with WordPress installed, can I have another WordPress installed on a new domain?
May 18 2022
Hi there! Yes, you can add another domain through your control panel -> Add Website, then install a new WordPress. If you're having any trouble, feel free to reach out to our Customer Success team :)