How to fix the 503 Service Unavailable error in six steps

Imagine a visitor is about to make a significant purchase or access a service on your website. Instead of reaching the desired page, they’re greeted with a frustrating message: 503 Service Unavailable. For them, it can be a deal-breaker.
It’s even worse for the website owner who’s risking lost traffic, missed sales, and potential reputation damage as visitors might not return in the future.
Although the 503 error is often temporary, addressing it quickly is crucial. In this article, we’ll explain what the 503 Service Unavailable error means, explore its common causes, and guide you through actionable steps to fix it. By the end, you’ll know how to troubleshoot the error and apply preventive measures to make sure it doesn’t happen again.
What is the 503 Service Unavailable error, and what causes it?
What is a 503 error
The 503 Service Unavailable error is a temporary HTTP response status code indicating that the server can’t handle the request at the moment. This often occurs due to resource limitations, scheduled maintenance, or back-end issues. It typically resolves once the underlying problem is fixed.
503 Service Unavailable falls under the 5xx HTTP status code category, representing server-side issues. Unlike permanent errors such as 404 Not Found, the 503 error indicates that the server is functioning but unable to complete requests.
Behind the scenes, a client (such as a web browser, app, or API client) sends a request to the server for a webpage, API resource, or other content. The server (usually a web server like Apache or NGINX) recognizes the request, but something prevents it from being processed correctly.
Instead of delivering the requested resource, the server sends back an HTTP 503 response, informing the client that the service is currently unavailable.

Some possible causes of the 503 Service Unavailable error include:
- High server traffic or resource overload. Too many concurrent users or insufficient resources can overwhelm the server.
- Scheduled server maintenance. Website administrators or hosting providers may temporarily turn off services during updates or repairs.
- Backend dependency failures. Issues with databases, APIs, or other components can prevent the server from processing requests.
- Misconfigured server or application settings. Configuration errors can disrupt normal server operations.
- Malicious or unusual traffic patterns. Distributed denial-of-service (DDoS) attacks, cross-site scripting (XSS), and SQL injections may overload the server.
- Faulty security measures or rate-limiting settings. Overly restrictive web application firewall (WAF) rules or rate-limiting policies can block legitimate requests, leading to a 503 error.
| Error code | 503 Service Unavailable |
| Error type | Server-side error |
| Error variations | 503 Service Unavailable Error 503 Service Unavailable 503 Service Temporarily Unavailable HTTP Error 503 HTTPS Error 503 HTTP Server Error 503 HTTP Error 503. The service is unavailable. The server is temporarily unable to service your request due to maintenance downtime or capacity problems. Please try again later. |
| Error causes | Excessive traffic or insufficient resources to handle requests Temporary downtime for maintenance or updates Issues with backend systems Incorrect server or application configurations Malicious DDoS attacks Faulty security settings or overly restrictive rate-limiting policies |
How to resolve the 503 Service Unavailable error
While 503 Service Unavailable is a server-side issue, website visitors can try a few quick fixes, such as:
- Refreshing the desired web page.
- Checking if the website is down for others using tools like DownDetector.
- Clearing the browser’s cache, cookies, and history.
For website owners, we’ve outlined six proven steps to resolve the 503 Service Unavailable error. Start with the first method, and if the issue persists, try the next steps until the problem is fully resolved.
1. Analyze server resource usage
The first step is to analyze whether your server has sufficient resources to handle the current traffic or tasks.
Servers process requests using resources like CPU, RAM, bandwidth, and disk space. When these resources are maxed out, your website’s performance can degrade, triggering errors like 503.
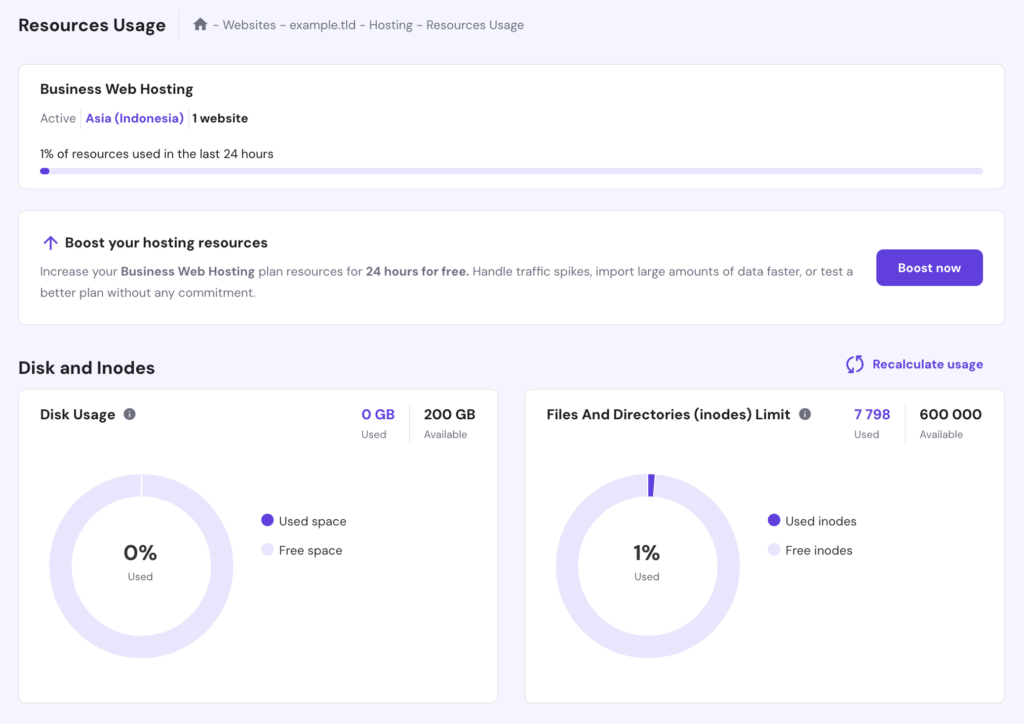
Website owners can monitor resource usage through their hosting provider’s control panel.
For example, on Hostinger’s web hosting, cloud hosting, and Managed WordPress plans, open hPanel to access your website’s dashboard. Then, go to Hosting Plan → Resource Usage to view metrics such as disk space, inodes, CPU, memory, bandwidth, and I/O (throughput).

If your website consistently exceeds disk space, inodes, or memory limits (represented by a red line on graphs), you need to optimize resource usage or upgrade to a higher-tier plan with more CPU, RAM, and bandwidth.

If you host your website on a Linux virtual private server (VPS), run commands like top, htop, or vmstat in the terminal to monitor running processes and resource usage in real time. If you identify processes consuming excessive CPU or memory, terminate them using commands like kill or pkill to free up resources.
2. Check for scheduled maintenance
Server maintenance is important for optimizing performance and reducing security risks. However, web servers and applications often shut down automatically during updates or maintenance, which can lead to 503 Service Unavailable.
For instance, many web hosts enable automatic updates for new WordPress releases. During the process, they may issue the 503 HTTP status code on user websites until the update is completed. Hostinger customers can check real-time server updates on our status page.
You can modify your server settings to disable automatic updates and prevent unexpected downtime. For Hostinger’s web hosting users, here’s how to do so on hPanel:
Important! If you decide to disable automatic updates, make sure to manually check for updates and apply them promptly to keep your site secure.
- From your website’s dashboard, navigate to WordPress → Security.
- Expand the WordPress auto-updates section by clicking Customize.
- Select No updates from the WordPress (core), Themes, and Plugins drop-down menu, then hit Save.

Pro tip
Enable maintenance mode on your site during planned maintenance. This informs visitors about the downtime and reassures them that your website will return soon.
3. Inspect server logs
Examining server logs can help pinpoint the cause of the 503 error. Logs provide detailed information about your website’s activities, such as requested pages and system errors, making it easier to identify the root issue.
For WordPress websites, enable debugging mode to generate an error log. If you host your WordPress site on Hostinger, follow these steps:
- Navigate to Websites → Dashboard → Files → File Manager on hPanel.
- Open the public_html folder and locate the wp-config.php file.

- Right-click the file and select Edit.
- Add the following code inside the file – preferably at the end of it – and hit Save.
define( 'WP_DEBUG', true );

define( 'WP_DEBUG_LOG', true );

define( 'WP_DEBUG_DISPLAY', false );

- Trigger the error by accessing your website or a specific page where the 503 occurs.
- Go to public_html → wp-content to find a file named debug.log.
In this file, you’ll find the detailed error information, which might include:
- PHP warnings. Issues with plugins, themes, or scripts.
- Failed API calls. Errors in external service integrations.
- Database connection timeouts. Problems with database credentials or performance.
Review the logged errors and address them accordingly, such as fixing misconfigured plugins or updating database settings.
If you’re unsure whether the issue is WordPress-specific or caused by broader PHP scripts, activate PHP error logging. Here’s how to do it on hPanel:
- Navigate to Advanced → PHP Configuration from your website dashboard’s left sidebar.
- Select the PHP Options tab, enable the logErrors option, and click Save.

- Access your server configuration files via SSH and navigate to the .logs directory:
cd .logs
Locate the error log file, typically named error_log_yourdomain_tld. It records broader PHP-related issues, such as syntax errors in server-side scripts and failed server processes or script executions.
For VPS hosting users, check web server logs to investigate errors like missing files, misconfigured virtual hosts, and module failures. Depending on your server software, the log files are located in the following:
- Apache. /var/log/apache2/error.log
- NGINX. /var/log/nginx/error.log
4. Restart the server or key components
Restarting your server or specific components can often resolve 503 Service Unavailable. This clears problems such as locked files, memory leaks, or unresponsive processes so your server can start fresh.
On Hostinger’s web hosting plans, you don’t have root access to restart the server directly. However, you can stop and restart key processes using hPanel:
- Go to Hosting → Resources Usage and scroll down to the Stop running processes section.

- Click the corresponding button and confirm the action in the dialog box.
- Give a few seconds for the process to finish.
If you use VPS hosting, you have complete control over restarting your entire server or individual services. To reboot your VPS via hPanel:
- Go to VPS → Overview.
- Click the Reboot VPS button.

- Wait at least two minutes for the process to complete.
If you prefer restarting your server via the command-line interface (CLI), open your terminal and run the command below:
sudo reboot
Besides rebooting the entire server, you can also reboot individual services like Apache, NGINX, or MySQL. Use the appropriate command based on the service you want to restart:
- Apache:
sudo systemctl restart apache2
- NGINX:
sudo systemctl restart nginx
- MySQL:
sudo systemctl restart mysql
5. Fix faulty firewall configurations
Web application firewalls (WAFs) protect your server from malicious activities. However, misconfigurations or overly strict rules can result in false positives, blocking safe traffic and triggering 503 Service Unavailable errors.
If you suspect your firewall is blocking legitimate requests, reset its configuration to default settings. For Hostinger’s web hosting users, follow these steps:
- On hPanel, navigate to Performance → CDN and hit Manage.
- Select the Security tab and set the security level to Essentially Off.

- Revisit your website to see if the error is resolved.
If the error continues, return to the CDN page and deactivate it entirely.

Important! Only disable the firewall temporarily. Don’t forget to re-enable it after identifying the issue to maintain server security.
If you use a firewall from a third-party content delivery network (CDN) service like Cloudflare, visit its dashboard to adjust the settings. If you need help adjusting the firewall to prevent false positives, contact its support team.
On Hostinger’s VPS, you can reset or modify firewall rules using hPanel:
- From your VPS dashboard, go to Security → Firewall.
- Click the three horizontal dots next to your custom firewall configuration and select Edit.

- Review each rule you’ve set, then edit or delete any that might be causing issues.
- If necessary, delete the custom configuration entirely.
- If the above steps don’t help, go to Settings → Main settings and click the button next to Reset firewall configuration. This will reset all rules to the default settings.

If you use Uncomplicated Firewall (UFW), you can disable or reset it via the terminal:
- Disable the firewall temporarily with this command:
sudo ufw disable
- Re-enable it after testing:
sudo ufw enable
- If necessary, reset the firewall configuration entirely by executing:
sudo ufw reset
6. Investigate recent changes
The 503 Service Unavailable error can be caused by a misconfiguration or incompatibility after an update, deployment, or code change.
On WordPress, plugins commonly cause 503 errors because they can consume excessive resources or conflict with each other. If the error occurs right after installing a specific plugin, you’ve likely found the culprit. In this case, deactivate or uninstall the problematic plugin completely.
If you’re not sure which plugin is causing the error, consider disabling all of them at once and then check your website. If the error resolves, reactivate the plugins individually to identify the root cause.
Poorly coded WordPress themes can also trigger 503 Service Unavailable. To troubleshoot, switch to a default theme like Twenty Twenty-Five. If this solves the issue, you’ll know for sure that the issue is with your theme.
If the error began after deploying new code, rolling back to a previous stable version can often fix it. Use a version control system like Git to revert recent commits:
Important! Test the rolled-back version in a staging environment to ensure compatibility and stability before deploying it to production.
git reset --hard [commit_hash]

git push --force
Pro tip
Learn the most used Git commands to manage your deployments more efficiently.
Traffic impact of the 503 error
High traffic can trigger and sustain the 503 error. When too many requests overwhelm a server’s resources, it can lead to downtime, stopping visitors from accessing the desired page.
Addressing traffic-related issues can help resolve the error and prevent it from recurring. Here are some strategies to mitigate the traffic-related problems:
- Use a load balancer. A load balancer distributes incoming requests across multiple servers, preventing any single server from being overwhelmed. With it, you can ensure better availability and performance during traffic spikes.
- Choose a CDN service. A CDN caches and serves static content from servers closer to users, reducing the main server’s load by distributing traffic evenly. Hostinger offers an in-house CDN included with our cloud hosting, web hosting, and Managed WordPress hosting plans.
- Enable auto-scaling. Auto-scaling dynamically adjusts your server resources based on traffic demands. During high-traffic periods, it allocates additional resources to maintain performance, and during quieter periods, it scales back resources to save costs.
- Optimize database queries. Review and refine database queries regularly so that they’ll execute efficiently, reducing server strain and improving overall website performance.
- Reschedule cron jobs. Schedule background tasks, such as cron jobs, during low-traffic periods to minimize their impact on server performance. This reduces the risk of resource contention during peak hours.
Conclusion
503 Service Unavailable is a common server-side issue that can disrupt your website’s availability and negatively impact user experience. By understanding its causes and applying a structured approach to troubleshooting, you can resolve and prevent the issue from recurring.
Here are six ways to fix the 503 error:
- Make sure your server has sufficient resources like CPU, RAM, and bandwidth.
- Verify whether the error is caused by server updates or maintenance.
- Use log files to pinpoint the specific issue.
- Restart your server or specific services to clear temporary glitches.
- Reset or adjust firewall rules to allow legitimate traffic.
- Roll back updates or debug recent code changes, plugins, or themes.
To prevent this error in the future, address traffic-related causes by implementing a CDN, load balancing, and auto-scaling. Additionally, optimize resource-intensive processes like database queries and schedule cron tasks during low-traffic periods to maintain server stability.
We hope this guide has helped you resolve the 503 error code and restore access to your website. If you have further questions or need assistance, feel free to leave them in the comment section below.
503 Service Unavailable FAQ
Is the 503 error permanent?
No, the 503 Service Unavailable error is usually temporary. It often occurs due to server overload or maintenance. Once the underlying issue is resolved, the error disappears, and the site becomes accessible again.
How can I prevent 503 Service Unavailable errors?
You can prevent 503 errors by regularly monitoring server resources, implementing load balancing, and using a CDN. Optimizing resource-intensive tasks like database queries, enabling auto-scaling, and scheduling background processes during low-traffic periods can also help.
What are some other related errors to 503 Service Unavailable?
Other related errors under the 5xx category include 502 Bad Gateway, which indicates communication issues between servers. Another example is 504 Gateway Timeout, which occurs when a server takes too long to respond.


