How to set up Hermes Agent (managed or self-hosted)
Sep 15, 2026
/
By Ariffud M.
/
10 min Read
You can set up Hermes Agent in two ways: use a managed plan that handles the server and maintenance for you, or self-host it with Docker on a virtual private server (VPS). The managed option is quicker and requires less technical work, while self-hosting gives you more control over the agent’s infrastructure, models, memory, and tools.
Hermes Agent is an always-on AI agent that learns from your interactions and turns successful workflows into reusable skills. Once it completes a task, it can use what it learned to handle similar requests more effectively in the future.
This guide covers both Hermes Agent setup methods, starting with the managed option. You’ll learn how to:
- Choose between managed and self-hosted Hermes Agent.
- Set up Managed Hermes Agent and connect an AI provider.
- Add a messaging channel and test your managed agent.
- Prepare a VPS and deploy Hermes Agent with Docker.
- Configure models, gateways, and tools.
- Test and secure your self-hosted deployment.
Choose how to set up Hermes Agent
You can run Hermes Agent as a managed service or self-host it on a VPS. The best option depends on how much control you need and how much server maintenance you want to handle.
| Factor | Managed Hermes Agent | Self-hosted Hermes Agent |
|---|---|---|
| Setup | Guided setup with no manual server deployment | Manual VPS and Docker configuration |
| Technical knowledge | Suitable for beginners | Requires experience with Linux, Docker, and server management |
| Maintenance | Server updates, infrastructure, and core security are handled for you | You manage updates, backups, firewall rules, and container health |
| Control | Less control over the underlying infrastructure | Full control over the server, models, memory, tools, and configuration |
| Best for | Users who want to start quickly and avoid server administration | Developers and advanced users who need a custom setup |
Choose Managed Hermes Agent when you want the quickest setup and don’t need direct control over the server. Choose the self-hosted option when you need more flexibility and are comfortable maintaining a VPS.
How to self-host Hermes Agent with Docker
Self-hosting Hermes Agent with Docker gives you full control over the server, models, memory, and tools, but you’ll need to manage the deployment, updates, and security yourself. Follow the steps below to install and configure Hermes Agent on a VPS.
1. Prepare your VPS environment
To run Hermes Agent, you need a server with a Linux distribution (Ubuntu works best), plus root access and a stable internet connection.
Aim for a VPS plan with at least 2 CPU cores and 8 GB of RAM. This setup handles Docker isolation and the gateway process comfortably. The container itself uses around 1 GB of RAM, or 2–4 GB if you enable browser automation.
After purchasing your VPS, connect to it via SSH and update your system packages:
sudo apt update && sudo apt upgrade -y
This helps prevent dependency conflicts when installing Docker and Hermes Agent’s components.
You should also secure and prepare your VPS. Create a dedicated user, adjust permissions, and enable public key authentication for safer access.
2. Deploy Hermes Agent with Docker
Docker packages Hermes Agent and all its dependencies into a single container, so you don’t need to install Python or Node.js or manually configure environment variables.
There are a few ways to get it running, depending on your setup.
If you don’t have a VPS yet, the fastest and easiest option is to use Hostinger’s Hermes Agent template. Choose your preferred plan, complete the payment, and the system installs everything automatically.
During setup, you’ll create a username and password to access the Hermes Agent web terminal.
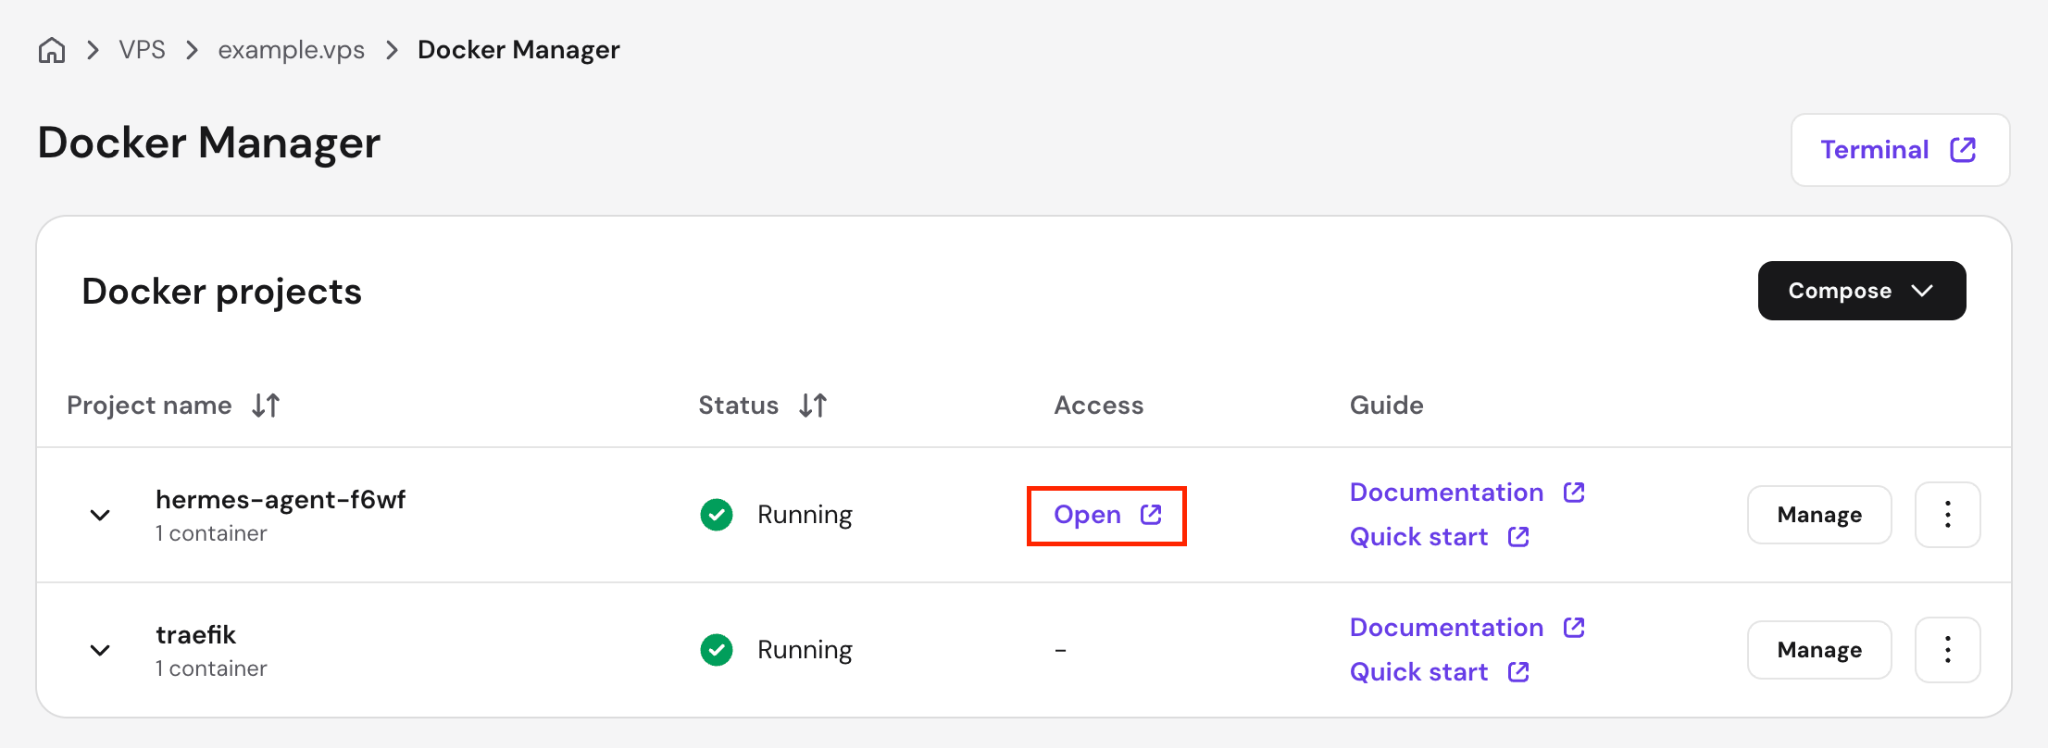
Once the installation finishes, you’ll land in the Docker Manager, where Hermes Agent appears as a Docker project. Click Open next to it, then log in using the credentials you created earlier.
If you already own a Hostinger VPS, you can deploy Hermes Agent from Hostinger dashboard. Go to VPS → OS & Panel → Operating System → Change OS, search for Hermes Agent, and select it to start the installation.
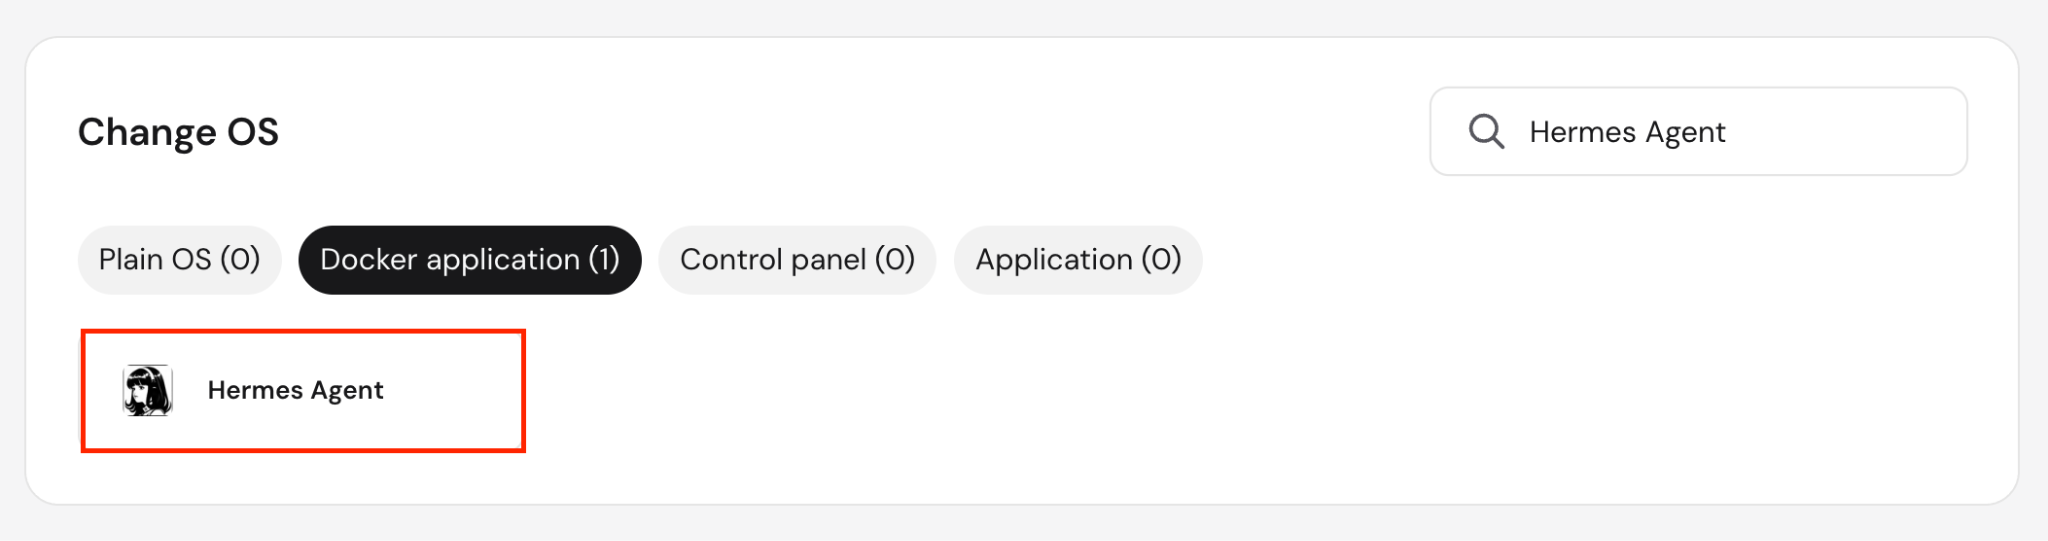
When the installation finishes, go to Docker Manager → Projects and open the Hermes Agent web terminal the same way.
If you’re using a different VPS provider, install Docker first. Once it’s ready, create a data directory for Hermes Agent and open it:
mkdir -p ~/.hermes

cd ~/.hermes
Then deploy the Hermes Agent container:
docker run -it --rm

-v ~/.hermes:/opt/data

nousresearch/hermes-agent setup
The -v ~/.hermes:/opt/data flag mounts a host directory to the container’s data path. Hermes Agent stores its configuration files, API keys, sessions, skills, and memory in this directory.

3. Run the setup wizard
After you access the web terminal or run the container, the Hermes Agent setup wizard launches automatically. It asks how you want to configure the agent.
It offers two paths:
- Quick setup. Covers the provider, model, and messaging. This is the best option for most users.
- Full setup. Adds terminal backend selection, agent behavior settings, tool toggles, and persona configuration.
We’ll use Quick setup here. You can configure everything else later, so nothing is locked in. The wizard walks you through these steps:
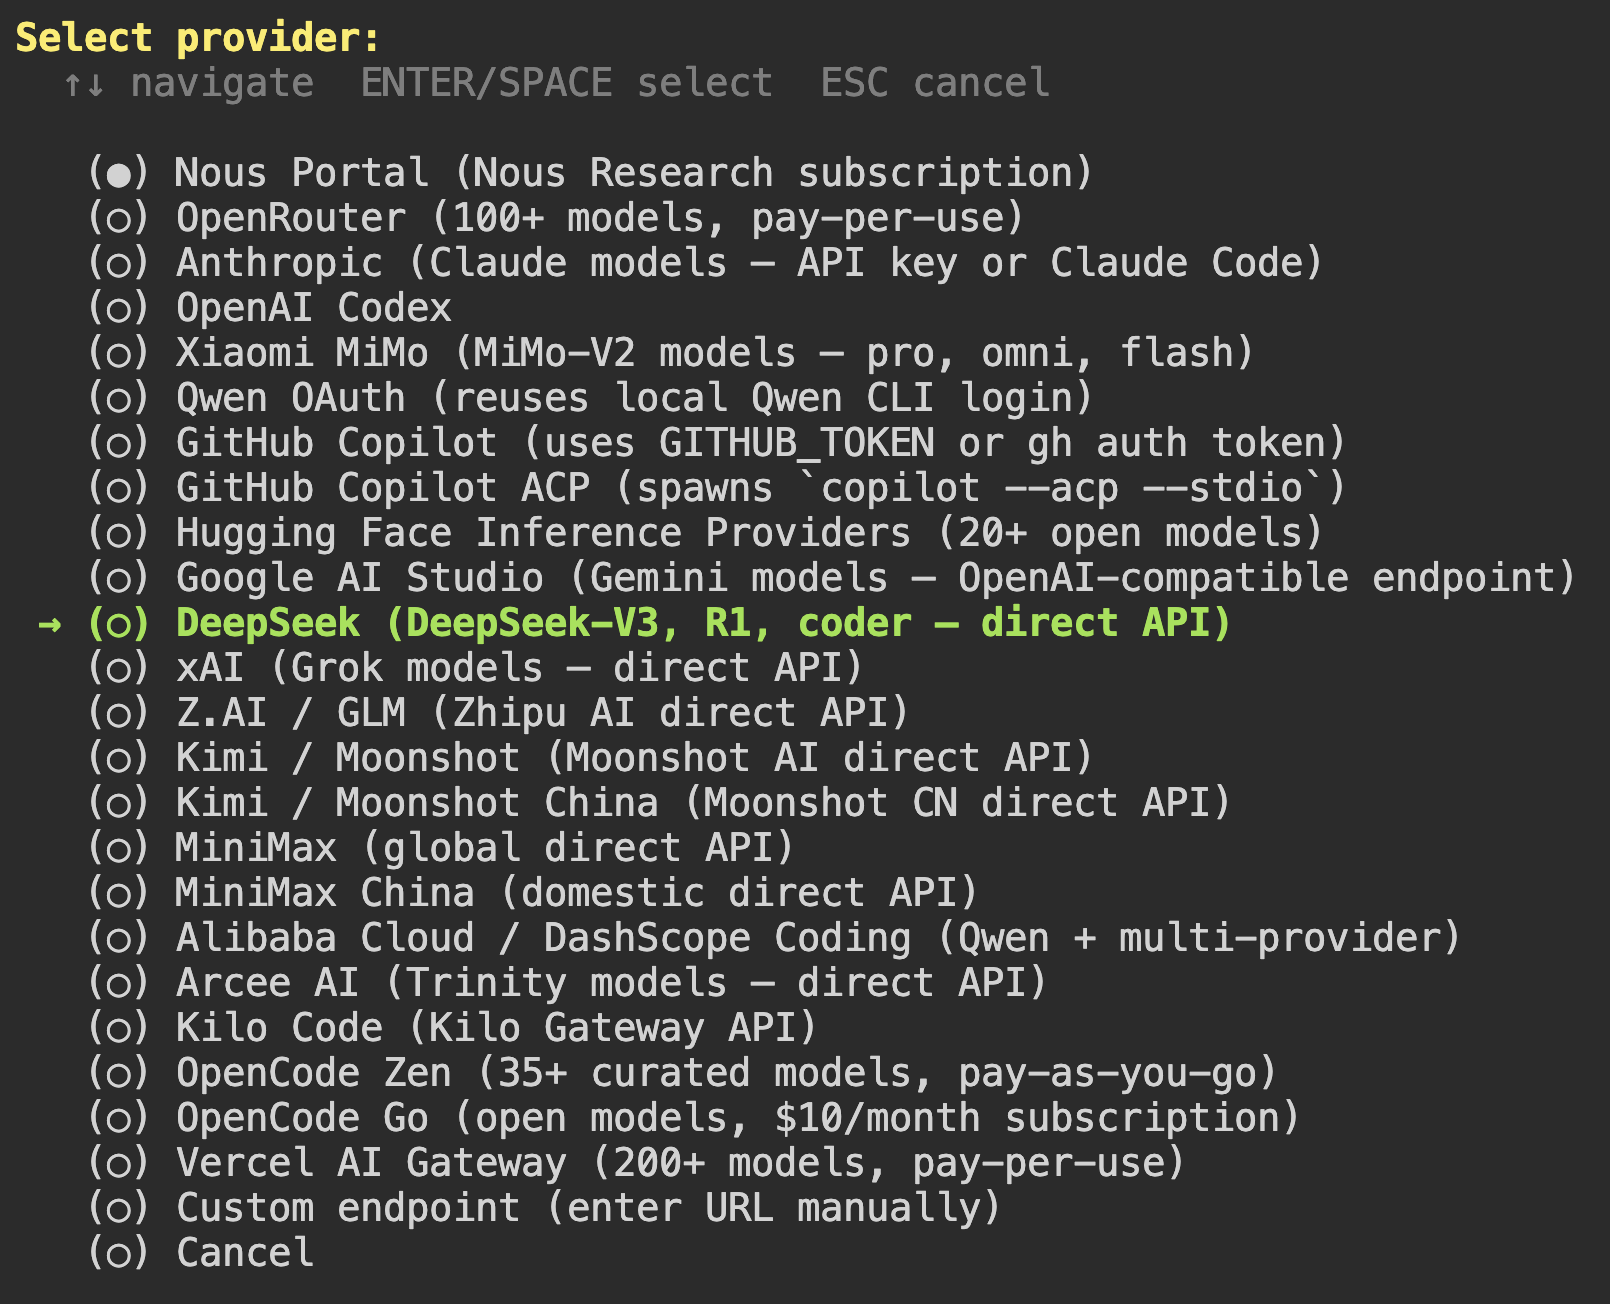
- Select an LLM provider. Choose from OpenRouter, Anthropic, OpenAI, Nous Portal, Ollama, or a custom endpoint.
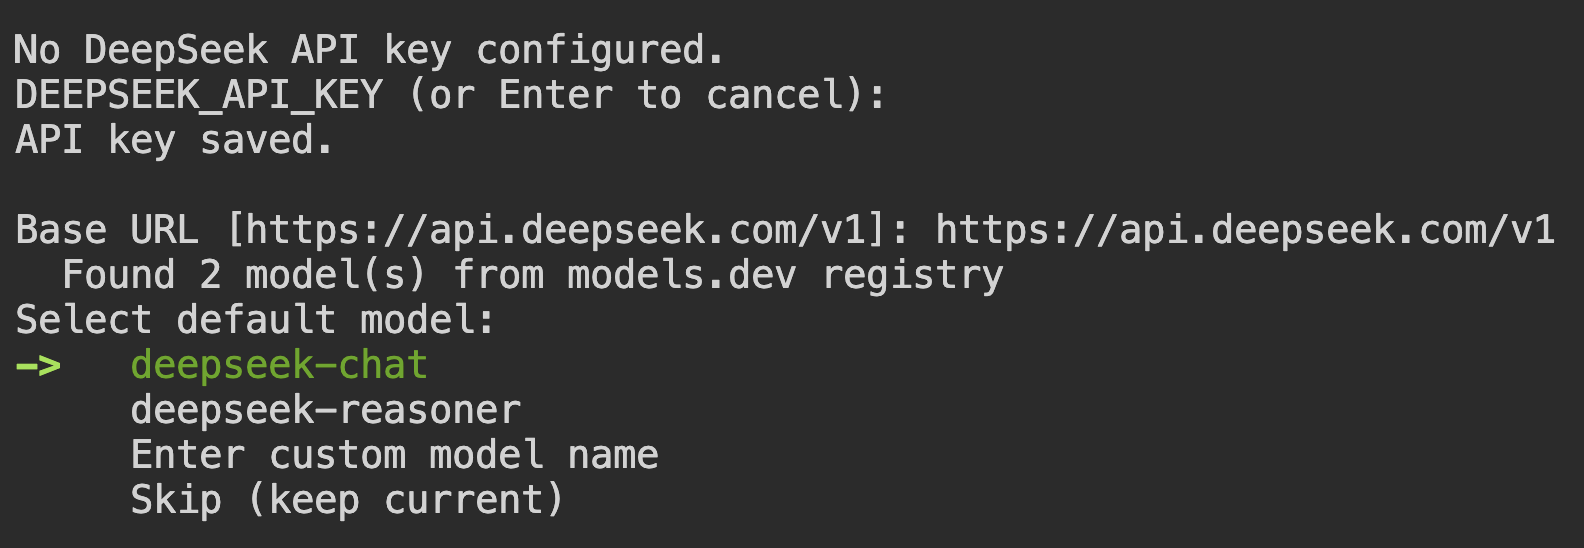
- Enter your API key. Paste the key for your chosen provider.
- Choose a model. Select one from the available models for your chosen provider.
- Connect a messaging platform. Choose Telegram, Discord, Slack, WhatsApp, or another platform. You can skip this for now and test the CLI chat first.
Hermes Agent stores sensitive data, such as API keys, in ~/.hermes/.env, while non-sensitive data goes in ~/.hermes/config.yaml.
4. Verify Hermes Agent is running
To verify that Hermes Agent is running correctly after the setup wizard, start a CLI session and check if the agent can communicate with your selected model:
hermes
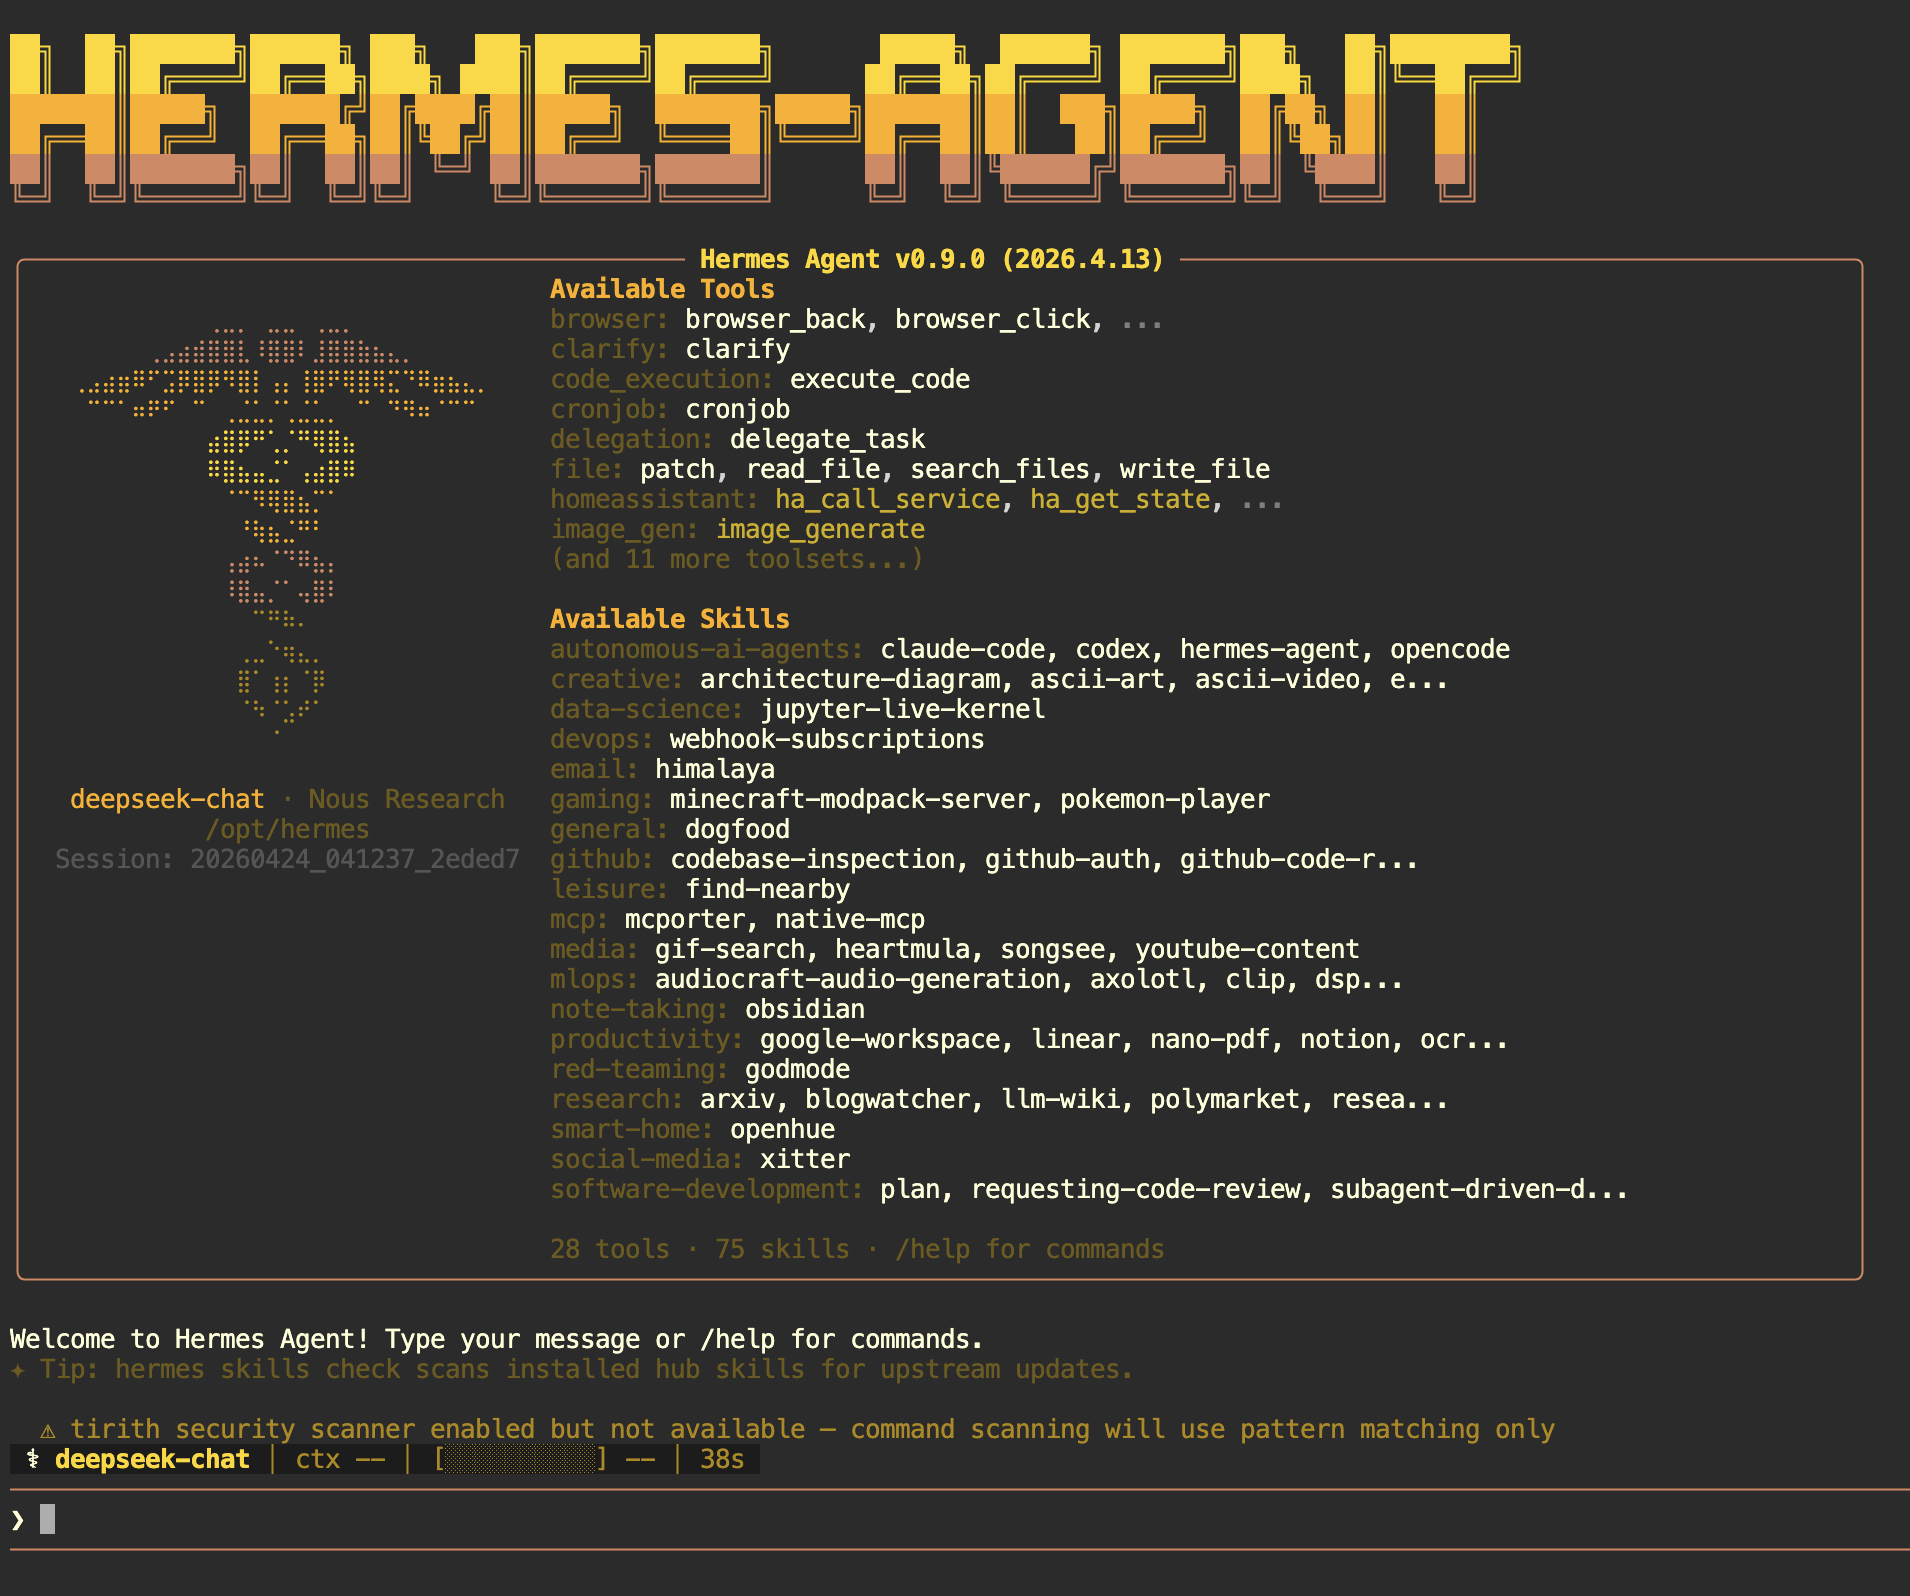
You should see a welcome banner with the selected model, available tools, and loaded skills.
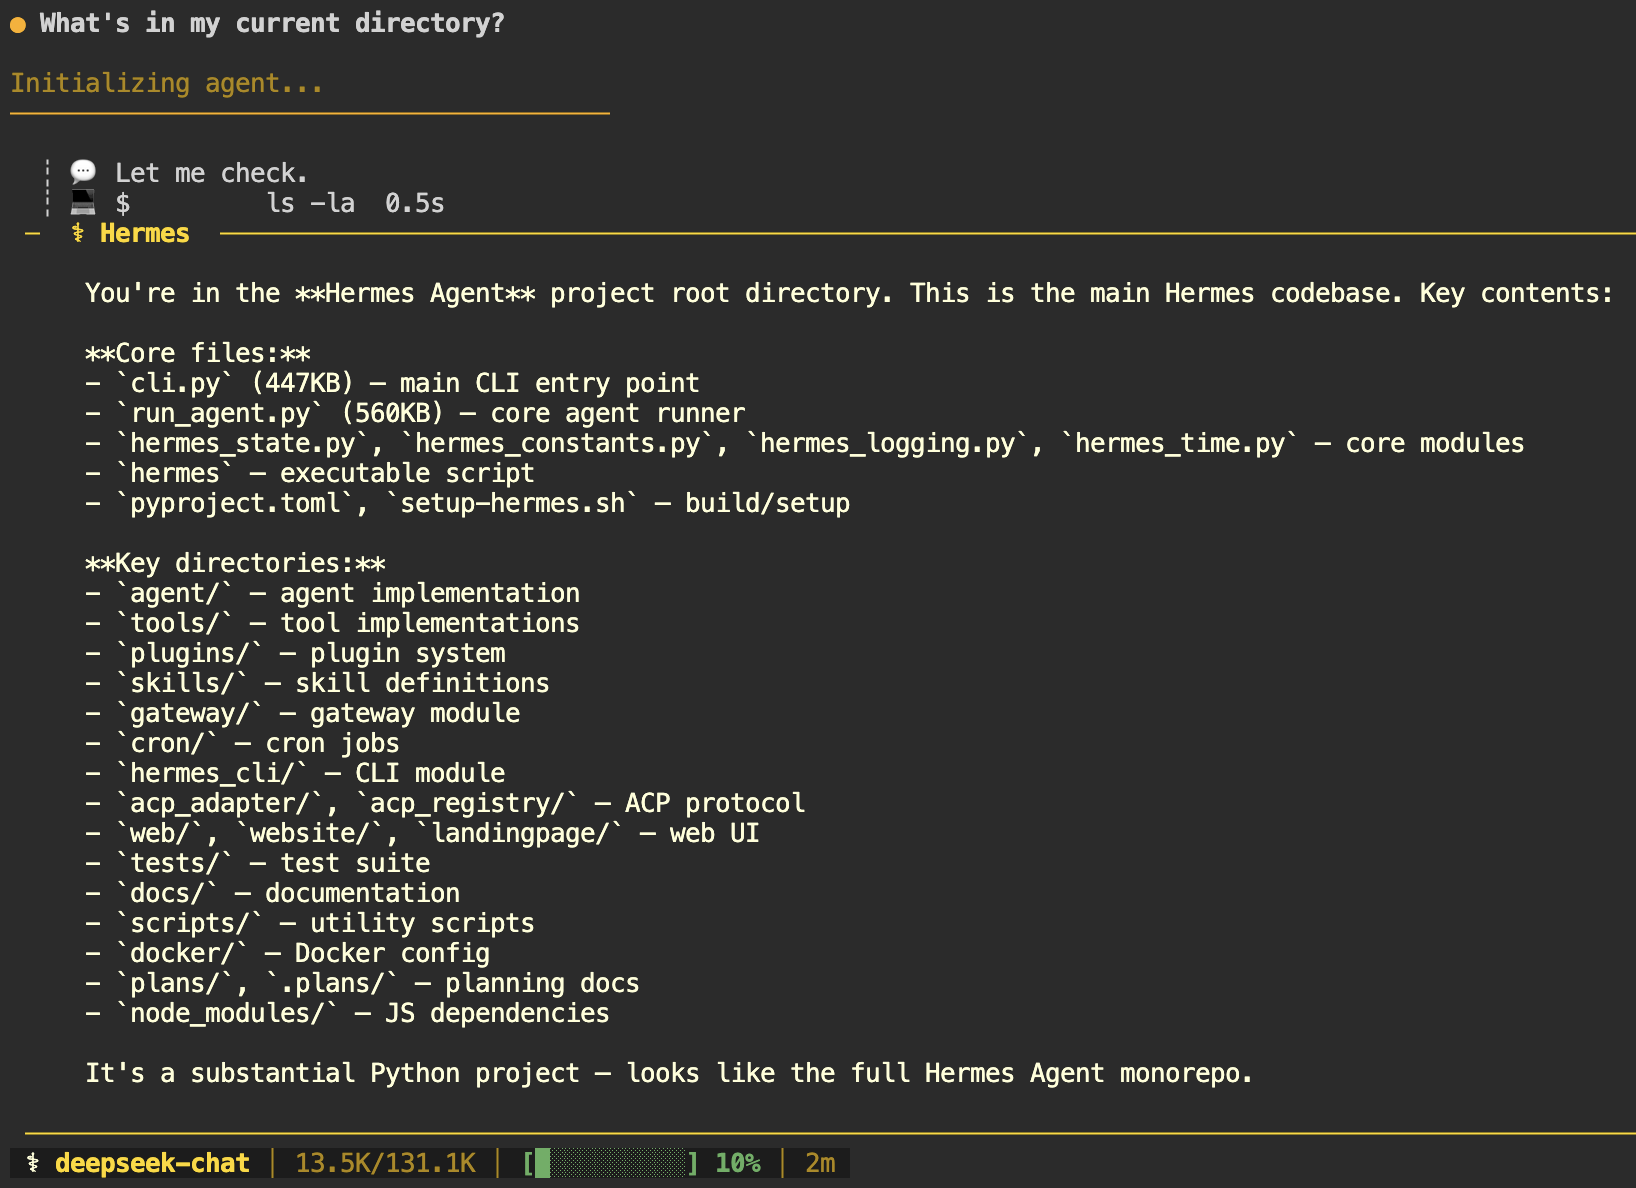
Test it with a prompt that triggers a tool, like “What’s in my current directory?” This confirms the agent can respond and execute commands.
To exit the session, type /exit. Use hermes to start a new session, or resume the last one with hermes –continue.
If the agent returns empty responses or connection errors, the most common cause is an incorrect API key or a misconfigured provider.
Run hermes setup again to reconfigure your provider and API key. Alternatively, use the hermes doctor command to scan your entire setup and identify the issue.
5. Configure other models, gateway, and tools
Once the CLI chat works, you can add another model, connect a messaging platform, and configure the tools your workflow needs.
To add a new LLM provider alongside the one you set up earlier, run hermes model. It walks you through provider selection and API key entry, just as the setup wizard does.
Once you have multiple providers configured, switch between them during a session with the /model command inside the chat.
The messaging gateway lets you talk to Hermes Agent through platforms like Telegram, Discord, Slack, WhatsApp, Signal, or email instead of the CLI.
Use hermes gateway setup to connect your preferred platform, then follow the on-screen instructions.
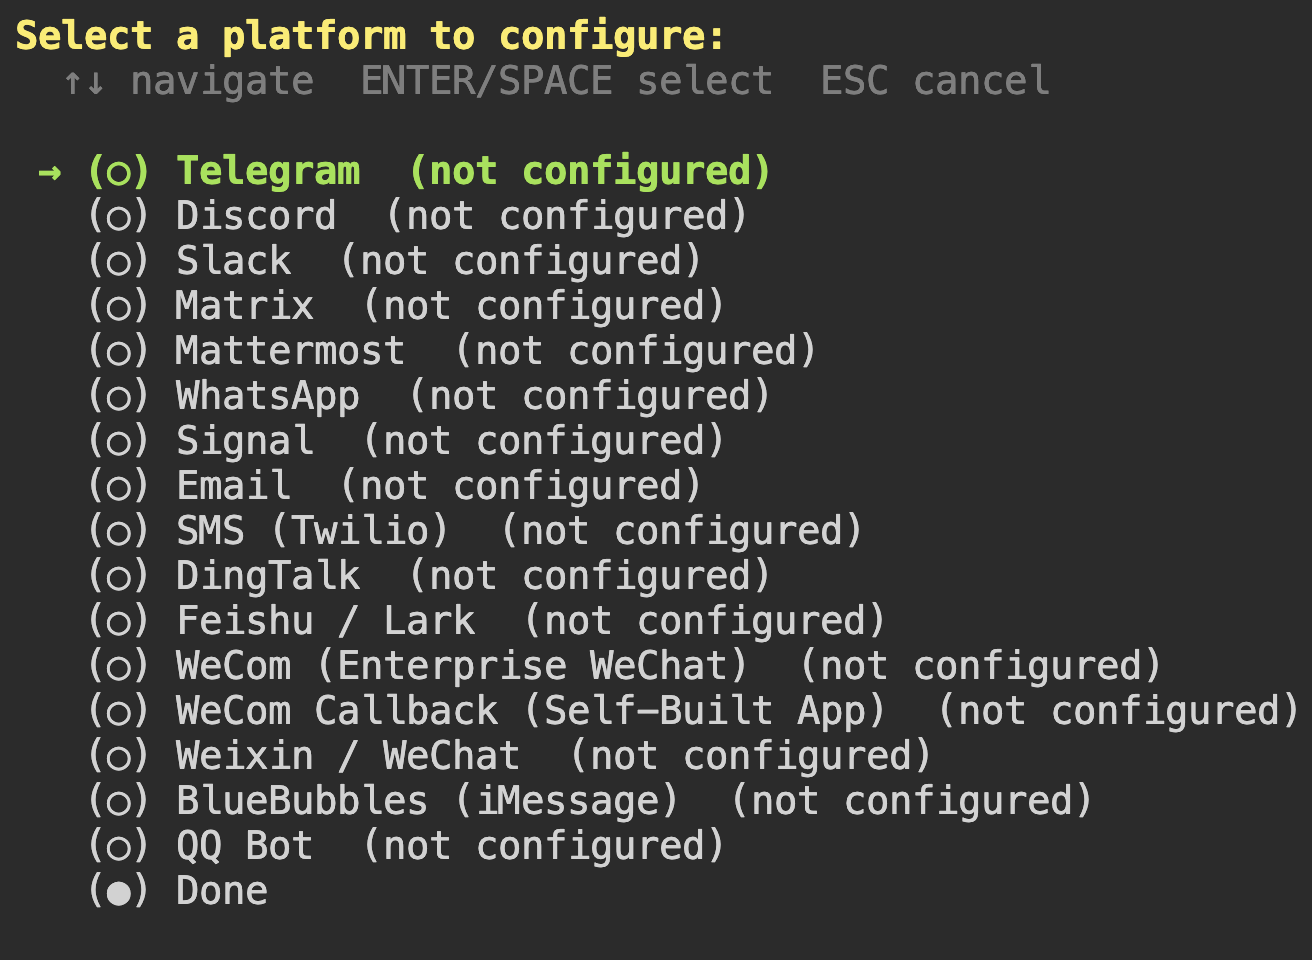
After setup, run hermes gateway run to start the bot. Otherwise, it stays configured but inactive.
Hermes Agent also includes built-in tools like terminal execution, web search, file system access, and image generation. Open the tool list with hermes tools, then toggle each tool on or off based on your needs.
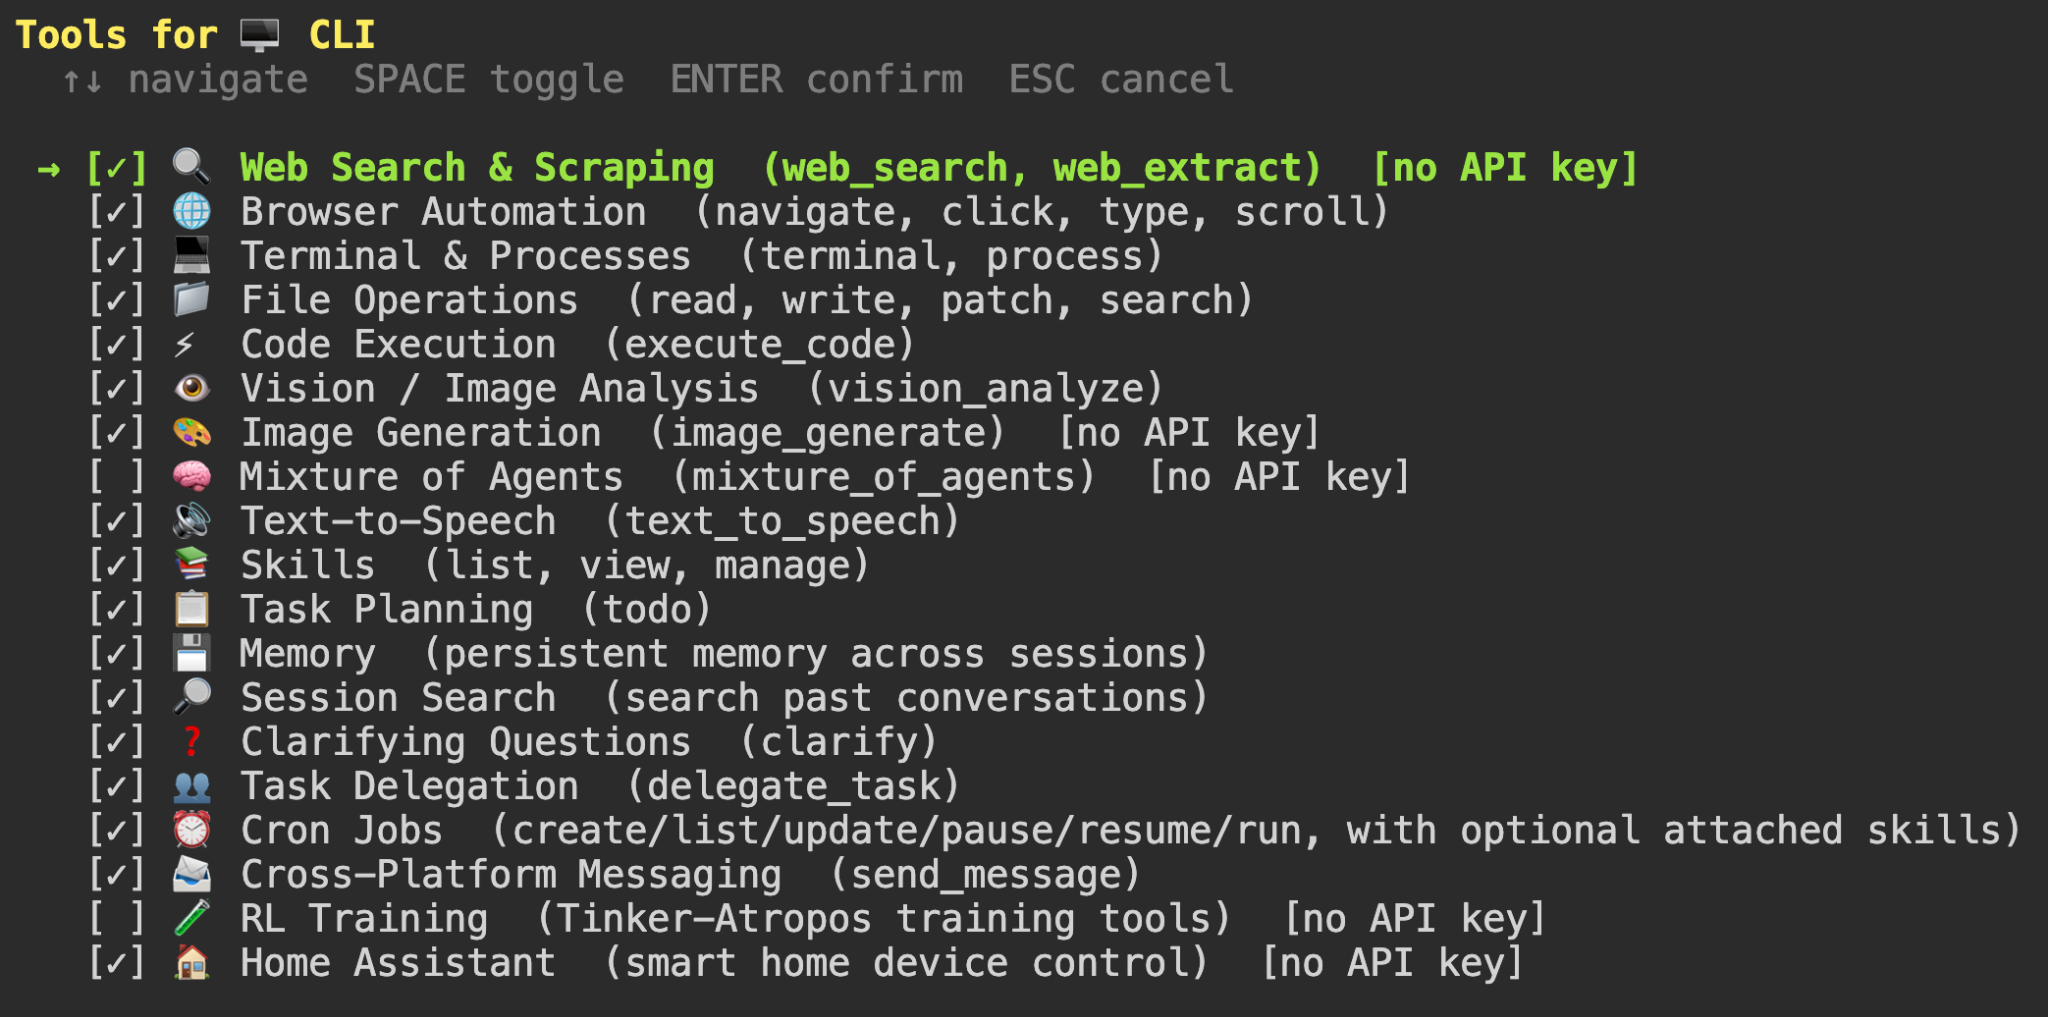
Note that some tools, like web search and image generation, require their working API keys.
6. Secure your Hermes Agent setup
Securing your Hermes Agent setup covers both the agent’s built-in protections and server-level rules that limit outside access.
Hermes Agent comes with a security scanner called Tirith. It checks every terminal command before execution. It’s enabled by default and looks for risks like prompt injection, credential exfiltration, and SSH backdoor patterns.
If Tirith flags a command, you’ll see a summary of the issue. You can approve or deny it using /approve or /deny. To control how approvals work, edit ~/.hermes/config.yaml:
approvals:

   mode: manual    # manual | smart | off

   timeout: 60 # seconds to wait for user response (default: 60)
- manual. Asks for approval before every potentially risky command.
- smart. Approves low-risk operations automatically and prompts only for dangerous ones.
- off. Disables all approval checks.
The messaging gateway needs protection, too. In the same config.yaml file, add your user ID to the allowed list for each platform so only you can send commands to the bot.
Here’s an example for Telegram:
gateway:

   telegram:

      allowed_user_ids:

         - 123456789
Replace 123456789 with your actual Telegram user ID. You can get it by messaging @userinfobot on Telegram.
For other platforms like Slack or WhatsApp, replace telegram with the platform name and use the correct user ID format for that service.
On the network side, close ports 8642 (API server) and 9119 (dashboard) if you only use Hermes Agent through chat platforms. The gateway creates outbound connections, so it doesn’t need inbound traffic:
sudo ufw deny 8642

sudo ufw deny 9119
To stay up to date, pull the latest image and replace the running container:
docker pull nousresearch/hermes-agent:latest

docker rm -f hermes

docker run -d

   --name hermes

   --restart unless-stopped

   -v ~/.hermes:/opt/data

   nousresearch/hermes-agent gateway run
All data lives in the mounted ~/.hermes volume, so nothing gets lost during updates.
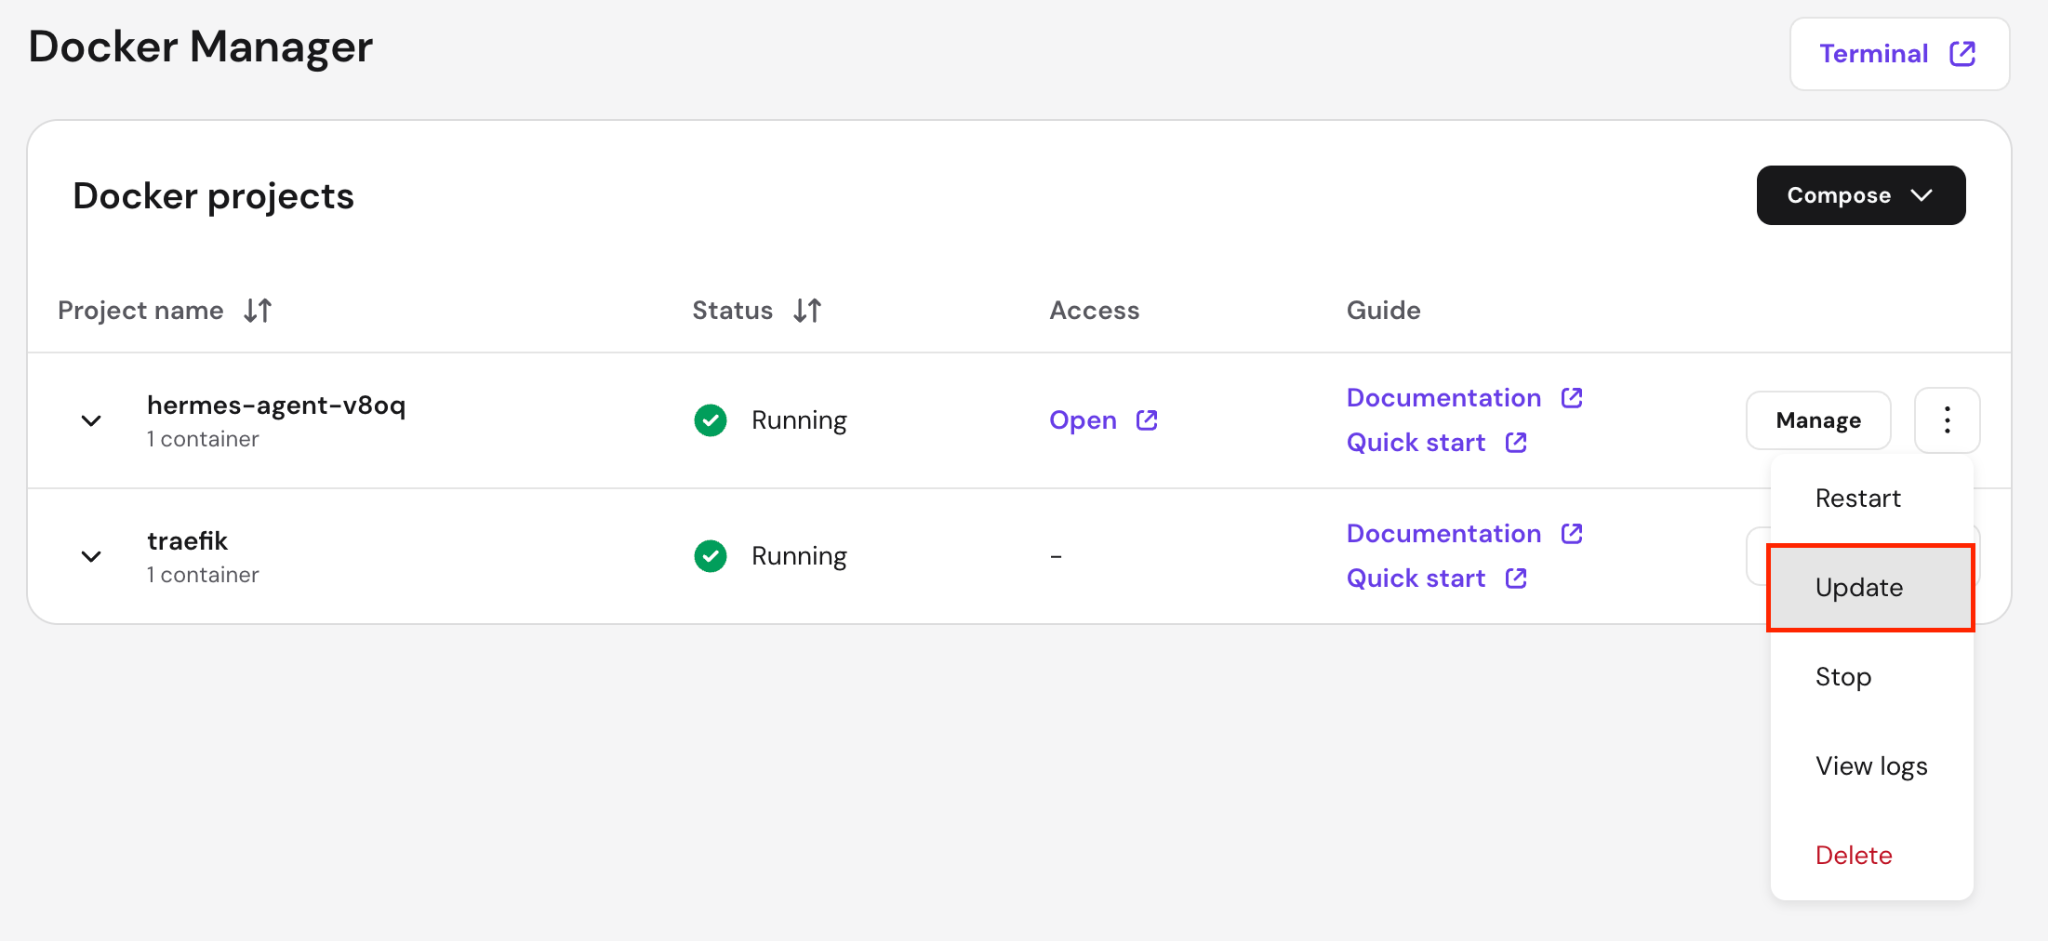
For Hostinger VPS users, you can update the container directly from Hostinger dashboard. In Docker Manager, find your Hermes Agent project, click the three-dot menu, and select Update.
Also, secure your VPS by turning off root SSH login, configuring fail2ban to block repeated login attempts, and installing a malware scanner to detect threats.
How to set up Managed Hermes Agent
Managed Hermes Agent lets you run Hermes without configuring a VPS or maintaining its Docker container yourself. Hostinger prepares the isolated environment and handles infrastructure updates and backend security, while you choose the AI model and how you want to access the agent.
1. Get a Managed Hermes plan
Log in to Hostinger dashboard and select Hermes from the left sidebar. You can also purchase a plan from the Hostinger Managed Hermes page.
Choose your subscription period and any optional features:
- Ready-to-use AI provides nexos.ai credits for accessing models such as Claude, Gemini, and GPT without adding separate provider API keys.
- Instant web search provides Oxylabs credits that Hermes can use to access and extract information from websites.
You can skip the ready-to-use AI option if you prefer to connect your own AI provider with an API key.
2. Choose an AI provider
During onboarding, select how Hermes will access an AI model. You can use the included nexos.ai integration or enter an API key from a supported external provider.
If you use your own provider, paste its API key when prompted. You’ll select the specific model after Hostinger finishes preparing the application.
3. Open your Hermes application
Wait while Hostinger deploys the Managed Hermes environment. Once the installation is complete, click Hermes to open the application.
You can also copy the Access key, which serves as the gateway token to access your Hermes instance. Store it securely and don’t share it publicly.
4. Complete the initial setup
In the Hermes setup window, review the options already configured and click Continue.
If you didn’t select ready-to-use AI during checkout, enter your provider API key and choose a setup mode. Then, select the AI model you want Hermes to use.
The application password is configured automatically, so you can skip that step. Review your settings and finish the setup.
5. Connect a communication channel and test Hermes
Connect a supported communication channel, such as Telegram, WhatsApp, or Hostinger Email, and follow the on-screen instructions to authorize it. You can then send a simple test message to confirm that Hermes can receive requests and respond through your selected model.
After setup, open Hermes → Manage in Hostinger dashboard to change your AI provider or model, monitor credit usage, restart the application, view logs, or copy your access key.
Common mistakes when setting up Hermes Agent
The most common mistakes when setting up Hermes Agent include adding features before testing the CLI chat, not mounting the data volume, using incorrect API credentials, skipping the gateway allowlist, and running commands directly on the host. These issues mainly affect self-hosted Docker deployments, as Managed Hermes Agent handles the server setup, infrastructure updates, and core security configuration for you.
- Adding features before verifying the CLI chat. Connecting Telegram, enabling cron jobs, or integrating third-party services before confirming the CLI chat works makes troubleshooting harder. If something breaks, you won’t know where the problem lies. Test the agent in the CLI first, confirm it responds and can use tools, then add other features.
- Not mounting the data volume. If you run the container without -v ~/.hermes:/opt/data, all data (memory, skills, and configuration) stays inside the container. When the container restarts, everything is lost. Always include the volume flag when running the container manually.
- Using incorrect or expired API credentials. If the API key is wrong or expired, the agent can’t communicate with the model. Double-check the key in your provider’s dashboard or generate a new one. Then run hermes setup again to update it.
- Skipping the gateway allowlist. If you set up a messaging bot without adding allowed_user_ids in config.yaml, anyone who finds your bot’s username can interact with it. Add your user ID to the allowlist so only you can access it.
- Leaving the default terminal backend on a VPS. By default, the agent runs terminal commands directly on your server. On a VPS, this can affect your entire system. Switch to a sandboxed container with hermes config set terminal.backend docker so commands run in an isolated environment.
How to manage Hermes Agent after setup
How you manage Hermes Agent depends on your installation method. Managed Hermes Agent provides maintenance controls in Hostinger dashboard, while a self-hosted installation requires you to monitor and update the Docker deployment yourself.
Managing Managed Hermes Agent
To manage your application, log in to Hostinger dashboard and go to Hermes → Manage. From the Managed Hermes dashboard, you can:
- Open the Hermes web interface or command-line interface.
- Check whether the application is running and restart it when needed.
- Change the AI provider, API key, or model.
- Add or edit environment variables, including integration credentials and the gateway token.
- View application logs and generate AI-based troubleshooting suggestions.
- Monitor and top up nexos.ai or Oxylabs credits.
- View, download, or restore automatic backups.
- Renew your subscription or delete the application.
Changes to environment variables don’t take effect immediately. After editing them, select Save & redeploy to restart Hermes with the new settings.
Managed Hermes Agent creates a backup once per day and keeps it for seven days. Before restoring a backup, download a copy of your current data if you might need it later, as restoring replaces the current application files.
Managing a self-hosted Hermes Agent
For a self-hosted installation, use Docker and the Hermes CLI to monitor the container, manage connected channels, schedule tasks, and access the dashboard.
Monitor logs and gateway health
Check the container logs when Hermes stops responding or a connected service returns an error:
docker logs hermes
To follow new log entries in real time, run:
docker logs -f hermes
Check whether your messaging channels are connected:
hermes gateway status
Restart the gateway if a channel disconnects:
hermes gateway restart
Schedule recurring tasks
Hermes Agent includes a cron scheduler for recurring tasks such as daily summaries, backups, reports, and service checks.
Open the scheduler with:
hermes cron
Follow the prompts to define the task, schedule, and messaging channel where Hermes should send the result.
Access the web dashboard securely
The web dashboard lets you manage settings, API keys, sessions, and scheduled tasks without editing configuration files manually.
Start the dashboard container and bind it to the server’s local interface so port 9119 isn’t publicly accessible:
docker run -d
  --name hermes-dashboard
  --restart unless-stopped
  -v ~/.hermes:/opt/data
  -p 127.0.0.1:9119:9119
  nousresearch/hermes-agent dashboard
On your local computer, create an SSH tunnel to the server:
ssh -L 9119:127.0.0.1:9119 username@your-server-ip
Replace username and your-server-ip with your server credentials. Then open http://localhost:9119 in your browser.
Keep the SSH connection open while using the dashboard. Don’t expose port 9119 directly to the internet unless access is restricted through a VPN or firewall allowlist.
You should also monitor available storage, keep the Hermes container updated, and back up the ~/.hermes directory regularly. This directory contains your models, memory, skills, sessions, and configuration.
What can you do with Hermes Agent?
Whether you use Managed Hermes Agent or self-host it on a VPS, you get an always-on AI assistant that you can access through your preferred communication channels.
What you do with it depends on your needs, whether you’re a developer, a sysadmin, or someone who wants a personal assistant for recurring tasks.
For development tasks, you can ask the agent to clone a repository, create a staging environment, and run tests, all from a Telegram message while you’re away from your desk.
For system administration, you can connect Hermes Agent to your server and schedule tasks using natural language. For example, you can request a weekly disk usage report in Slack every Monday morning or have the agent monitor a service and alert you when it goes down.
For personal use, you can have the agent send a morning briefing with your calendar, top news, and GitHub notifications before your day starts.
For more advanced examples, including content production pipelines, deployment automation, and research or data processing workflows, explore these Hermes Agent use cases.
All of the tutorial content on this website is subject to Hostinger's rigorous editorial standards and values.

Ariffud is a Technical Content Writer with an educational background in Informatics. He has extensive expertise in Linux and VPS, authoring over 200 articles on server management and web development. Follow him on LinkedIn.